Where Things Live: The Memory Hierarchy

A computer has many places to keep data. Going down the list, each one is bigger, cheaper per byte, and slower. Partway down, it stops forgetting when the power goes off.
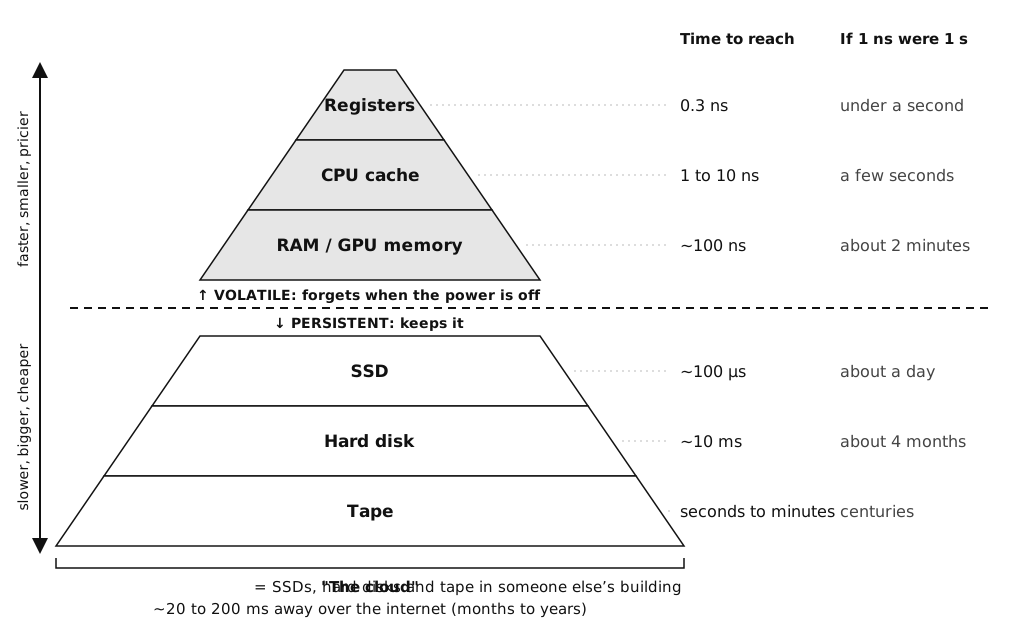
The memory hierarchy as a pyramid. From the narrow top: registers, CPU cache, RAM and GPU memory, all volatile. Below a dashed line: SSD, hard disk, tape, all persistent. Times to reach, with 1 nanosecond scaled to 1 second: registers under a second, CPU cache a few seconds, RAM about 2 minutes, SSD about a day, hard disk about 4 months, tape centuries. The cloud is SSDs, hard disks and tape in someone else's building, months to years away on that scale.
LevelTypical sizeTime to reachForgets when power is off?What is stored
CPU registers and cachebytes to ~100 MBunder 1 to ~10 nanosecondsyesthe values the processor is using right this instant
RAM8 to 128 GB~100 nanosecondsyesrunning programs, every open tab, your JavaScript variables
GPU memory (VRAM)8 to ~200 GBsimilar to RAM, but moves far more data at onceyestextures, 3D scenes, AI models while they run
SSD (flash)0.5 to 8 TB~100 microseconds (1,000× slower than RAM)noyour files, apps, and the browser's localStorage
Hard diskup to ~40 TB~10 milliseconds (a spinning disk has to turn)nomostly data centers now, not laptops
Tapetens of TB per cartridgeseconds to minutes (a robot loads the cartridge)nolong-term archives, the cheapest storage per byte
"The cloud"effectively unlimited~20 to 200 milliseconds (a trip over the internet)nosomeone else's SSDs, hard disks, and tape, in a building
A nanosecond is a billionth of a second. Scaled so that 1 nanosecond becomes 1 second, reading RAM takes about 2 minutes, an SSD about a day, and a hard disk about 4 months.
Notes

"Forgetting" (erased memory) in your programs

To survive both cases, the data has to move down the hierarchy, out of RAM and onto the SSD. That is what localStorage does: the browser writes it into an actual file on disk.

On a Mac, Chrome keeps it here:
~/Library/Application Support/Google/Chrome/Default/Local Storage/
This folder is hidden, and the files inside are a database mixed with every other site's data, so it is hard to find and read. You don't need to open it: DevTools shows you the same saved text much more clearly.
Notes

Keeping data: local persitant storage

Every browser has a small storage space for each website, called localStorage. It holds text, and it survives reloads and even quitting the browser. Lets call this state.
// save: whenever something changes
// "myScene: is a label for the data you save
// state: is the data itself
localStorage.setItem("myScene", JSON.stringify(state));

// load: when the page starts
const saved = localStorage.getItem("myScene");
if (saved) {
  const state = JSON.parse(saved);
  // use state to rebuild the scene
}
The difficult part is to decide what goes into state, and how your scene rebuilds itself from it.

Limits: it exists for only in specific browser on specific computer.
Notes

Cookies: Saved State Shared with the Server

Do you know what a cookie is? A cookie is a small piece of text a website asks your browser to store like session=a8f3k2 and is saved on your disk. The difference from local storage is that your browser sends it back to the website with every request.
1. You log in.          The server answers:  Set-Cookie: session=a8f3k2
2. Your browser saves the cookie on disk.
3. Every later visit:   your browser sends:  Cookie: session=a8f3k2
4. The server looks up a8f3k2 in its own records:  "I've seen you before "
!!(What does this mean? I've seen you before??)

continuity?

On its own, the web has no memory. Each request is answered as if the server has never seen you before.

Film setWeb
separate shots, filmed out of orderdifferent requests to same site (page 1 -> page 2 -> page 3)
edit:the audience sees one smooth scenecookie: your visit feels like one continuous visit
Usually the cookie holds only an ID number. The real information (your account, your cart) stays on the server. The cookie is like a claim ticket. See them on any real website: DevTools → Application → Cookies, right under Local Storage. (Pages opened from your own computer with file:/// don't get cookies.)
Notes

How a Company Follows You Around the Web

Example: weather.com

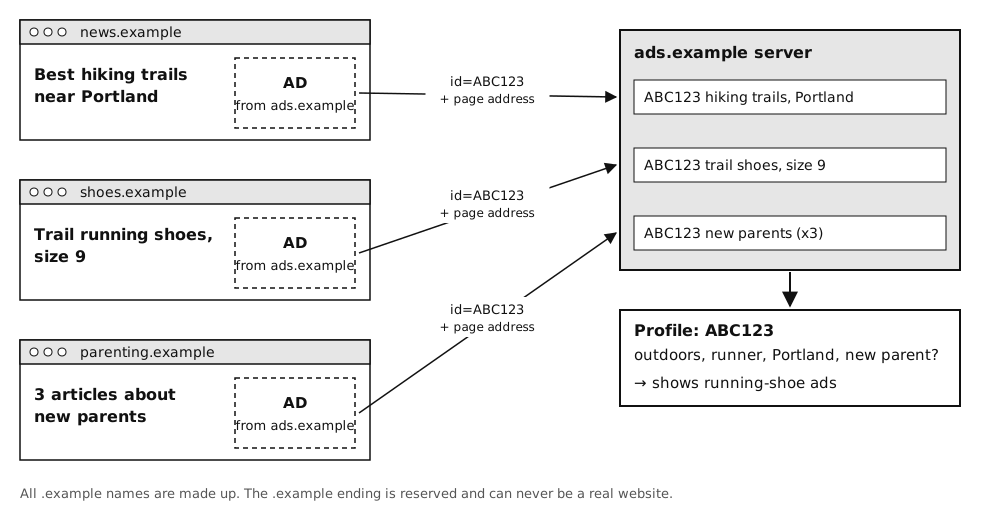
A first-party cookie comes from the site you are visiting. But one page often loads pieces from dozens of other companies, and each of them can set its own third-party cookie. Third-party companies whose pieces load as part of the page you are visiting can save their own cookies in your browser, even though you never visited their websites. Follow one hypothetical ad company, ads.example, that is on thousands of sites. (Real companies that do this include Google, Meta and Criteo.) Three made-up websites, news.example about hiking trails near Portland, shoes.example showing trail running shoes size 9, and parenting.example, each show an ad from ads.example. From each ad, the browser sends the same cookie, id=ABC123, plus the page address to ads.example's server. The server logs all three visits under ABC123 and builds a profile: outdoors, runner, Portland, new parent, and shows running-shoe ads.
  1. A news site shows an ads.example banner. ads.example gives your browser a cookie: id=ABC123.
  2. On every other site with its ads, your browser sends id=ABC123 back, along with which page you are on.
  3. Its records grow:
    ABC123   read "Best hiking trails near Portland"
    ABC123   viewed trail running shoes, size 9
    ABC123   read 3 articles about new parents
    
  4. From that list it guesses a profile: outdoors, running, maybe a new baby. It never needed your name.
  5. Next time a page with its ads loads, advertisers bid in a split-second auction to show something to "ABC123, likes running." That's why the shoes you looked at follow you around (retargeting).
If you are logged in to Facebook or Google, your browser sends your login cookie to them from every site that has their buttons or ads. Then they don't just know "ABC123", they know it's you, and they can connect your phone, laptop and work computer into one profile.

See it yourself: open a news site, then DevTools → Network and count the requests to other companies. Or type the site into Blacklight, which lists its trackers and third-party cookies.
Notes

What an Embedded Ad Looks Like

The site owner pastes a few lines from the ad company into their HTML. Your browser reads them and fetches something from the ad company's server, sending the ad company's cookie along.

1. A script (most common): the ad company's JavaScript picks an ad and draws it.
<script src="https://ads.example/ad.js"></script>
<div class="ad-slot" data-size="300x250"></div>
Google's version (AdSense) looks like this:
<script async src="https://pagead2.googlesyndication.com/pagead/js/adsbygoogle.js?client=ca-pub-1234"></script>
<ins class="adsbygoogle" data-ad-client="ca-pub-1234" data-ad-slot="5678"></ins>
2. An iframe: a small window in the page showing another website.
<iframe src="https://ads.example/banner?size=300x250" width="300" height="250"></iframe>
3. A tracking pixel: an invisible image. Its only job is to make your browser contact the server.
<img src="https://ads.example/pixel.gif?page=trail-shoes" width="1" height="1">
Notice that all three addresses point to the ad company, not to the site you are on. That is the same kind of tag you use to load three.js from a CDN: a file from someone else's server. What differs is what that server does with the request.

See it on a real site: open allrecipes.com or weather.com, right-click an ad and choose Inspect. Or open DevTools → Elements, press Cmd+F, and search for iframe or googlesyndication.
Notes

Cookies and You

What to know as a user: The question behind all of this: agian, who keeps state about you, and where/who does it work for?
Notes

Step 1: A Counter with no persistance

Run it: counter.html

The smallest program with state: one number. Copy everything below into a new file, save it as counter.html, and open it in a browser.
<!DOCTYPE html>
<html>
<head>
  <meta charset="utf-8">
  <title>Counter</title>
</head>
<body>

  <!-- onclick: when this button is clicked, run the function addOne() -->
  <button onclick="addOne()">Click me</button>

  <!-- the number is shown inside this span; it starts at 0 -->
  <p>Clicks: <span id="count">0</span></p>

  <script>
    // The state of this program: one number.
    // "let" makes a variable that can change later.
    // Variables live in RAM, so this one is erased on every reload.
    let count = 0;

    // A function: a named box of code. The button's onclick runs it.
    function addOne() {

      // change the state: add one
      count = count + 1;

      // show the new state: find the span by its id,
      // and put the number inside it
      document.getElementById("count").textContent = count;
    }

    // Reload the page and the code runs again from the top,
    // so count starts over at 0.
  </script>

</body>
</html>
Try it: click a few times, then reload. The count goes back to 0. The variable count was in RAM, and the reload ran the code from the top.
Notes

Step 2: A Counter with persistance

Run it: counter_saved.html

Same page, two new lines: one to load when the page starts, one to save on every click. Save it as counter_saved.html.
<!DOCTYPE html>
<html>
<head>
  <meta charset="utf-8">
  <title>Counter that remembers</title>
</head>
<body>

  <!-- same button and span as Step 1 -->
  <button onclick="addOne()">Click me</button>
  <p>Clicks: <span id="count">0</span></p>

  <script>
    // LOAD, once, when the page starts.
    // localStorage.getItem("clicks") looks up the saved value
    // under the name "clicks". It gives back text, like "7",
    // or null if nothing has been saved yet.
    // Number() turns the text into a number. Number(null) is 0,
    // so the very first visit starts at 0.
    let count = Number(localStorage.getItem("clicks"));

    // show the loaded number right away
    document.getElementById("count").textContent = count;

    // runs every time the button is clicked
    function addOne() {

      // change the state: add one
      count = count + 1;

      // SAVE, after every change.
      // setItem stores the value under the name "clicks".
      // The browser writes it to a file on disk, so it
      // survives reloads and quitting the browser.
      localStorage.setItem("clicks", count);

      // show the new state
      document.getElementById("count").textContent = count;
    }
  </script>

</body>
</html>
Try it: click, reload, quit the browser and open it again. The count is still there. In DevTools → Application → Local Storage you can see the key clicks and its value.

localStorage only holds text. One number is easy to turn back and forth. A list of things needs JSON.
Notes

Step 3: A Tiny Guestbook (Don't have to read the code unless you are interested)

Run it: guestbook_tiny.html

Now the state is a list of messages, an array of objects. JSON.stringify turns the array into text to save, and JSON.parse turns it back. Save it as guestbook_tiny.html.
<!DOCTYPE html>
<html>
<head>
  <meta charset="utf-8">
  <title>Tiny guestbook</title>
</head>
<body>

  <!-- a text box to type in, and a button that runs addMessage() -->
  <input id="msg" placeholder="Leave a message">
  <button onclick="addMessage()">Add</button>

  <!-- an empty list; JavaScript fills it with the messages -->
  <ul id="list"></ul>

  <script>
    // The state of this program: an array (a list) of messages.
    // Each message is an object: { text: "hello", time: "1:01:10 PM" }

    // LOAD, once, when the page starts.
    // getItem gives back the saved text, or null the first time.
    // JSON.parse turns that text back into an array.
    // JSON.parse(null) is null, and "|| []" means
    // "if that gave nothing, use an empty array instead".
    let messages = JSON.parse(localStorage.getItem("guestbook")) || [];

    // draw the saved messages on the page
    show();

    // runs every time the Add button is clicked
    function addMessage() {

      // read what was typed in the text box
      const text = document.getElementById("msg").value;

      // if the box is empty, stop here and do nothing
      if (text === "") return;

      // change the state: add a new message object to the end of the array,
      // with the text and the current time
      messages.push({ text: text, time: new Date().toLocaleTimeString() });

      // SAVE, after every change.
      // localStorage only holds text, so JSON.stringify
      // turns the whole array into one string of JSON text.
      localStorage.setItem("guestbook", JSON.stringify(messages));

      // empty the text box, ready for the next message
      document.getElementById("msg").value = "";

      // redraw the list so the new message shows up
      show();
    }

    // Draws every message in the array as a list item.
    function show() {
      const list = document.getElementById("list");

      // erase what is on the page, then draw the whole array again
      list.innerHTML = "";

      // go through the array one message at a time
      for (const m of messages) {
        // make a new <li> element
        const li = document.createElement("li");

        // put the text and time inside it. textContent (not innerHTML)
        // shows a message like <b>hi</b> as plain text, so nobody
        // can sneak HTML or code into the page.
        li.textContent = m.text + "  (" + m.time + ")";

        // add the <li> to the list on the page
        list.appendChild(li);
      }
    }
  </script>

</body>
</html>
The pattern is the same as the counter: load once when the page starts, save after every change, then redraw.
Notes

Your Library May Already Help

Some libraries have their own save tools. Check the docs before building your own.
LibraryWhat it has
three.jsscene.toJSON() and ObjectLoader save and reload a whole scene. GLTFExporter exports glTF, a standard 3D file Blender can open.
Babylon.jsSceneSerializer saves a whole scene as JSON.
LeaflettoGeoJSON() saves markers and shapes as GeoJSON (JSON for maps).
p5.jsstoreItem() and getItem(), a friendlier localStorage.
PixiJS, PhaserNo scene saver. You write your own JSON.

The trade-off: a library's format saves everything (large, hard to read, only that library understands it). Your own JSON saves only what you decided matters.
Notes

Lab: Two Options

Pick the lab that fits how you want to work. Both are about the same idea: decide what to remember, save it, and rebuild from it when the page opens.

[Lab Option 1] Pixel Art Lab[Lab Option 2] Save Your Scene's State
For those who want to read code (you learn by reading code) and code by hand those who want to think big picture
What you do Build a small drawing tool in four steps, then change it yourself: a different grid size, your own colors. You can add additional features like your own saved drawing if you like Look at a three.js or PixiJS scene, decide which of its states are worth remembering, and have the AI tool write the save and load code. Then do the same with your own scene.
You practice events, arrays, localStorage, JSON, read code line by line deciding what state is, and judging whether the AI's code does what you asked
Start at [Lab Option 1] READ: Pixel Art Lab, Step 1 (next slide) [Lab Option 2] State
Notes

[Lab Option 1] READ: Pixel Art Lab, Step 1: Make the Grid

Run it: pixel_1.html

A drawing tool you build in four small steps. Each step is a complete page you can copy, save, and open. Start with the canvas: 256 empty squares, made by a loop instead of typed by hand. Save it as pixel_1.html.
<!DOCTYPE html>
<html>
<head>
  <meta charset="utf-8">
  <title>Pixel art 1</title>
  <style>
    /* 16 columns of 20px squares, with 1px gray lines between them */
    #grid {
      display: inline-grid;
      /* CSS Grid: a standard CSS layout for rows and columns.
         repeat(16, 20px) means: 16 columns, each 20px wide.
         The cells fill the grid left to right, and start a new row after every 16. */
      grid-template-columns: repeat(16, 20px);
      gap: 1px;
      background: #ccc;   /* shows through the gaps as grid lines */
      border: 1px solid #ccc;
    }
    .cell {
      width: 20px;
      height: 20px;
      background: white;
    }
  </style>
</head>
<body>

  <!-- an empty box; JavaScript fills it with 256 cells -->
  <div id="grid"></div>

  <script>
    // find the empty grid box
    const grid = document.getElementById("grid");

    // repeat 256 times (16 x 16): i counts 0, 1, 2 ... 255
    for (let i = 0; i < 256; i++) {
      const cell = document.createElement("div");   // make a new <div>
      cell.className = "cell";                       // give the div class="cell", so the .cell style applies
      grid.appendChild(cell);                        // put it inside the grid
    }
  </script>

</body>
</html>
Try it: open DevTools → Elements and look inside #grid. The loop wrote 256 <div> elements. Change 16 in the CSS and 256 in the loop to get a different size.
Notes

[Lab Option 1] READ: Pixel Art Lab, Step 2: Paint on Click

Run it: pixel_2.html

One onclick on the whole grid. When it runs, the browser hands paint an event object describing the click, and event.target is the exact cell that was clicked. Save it as pixel_2.html.

What is an event? Something that happens on the page: a click, a key press, the mouse moving, typing in a text box.
<!DOCTYPE html>
<html>
<head>
  <meta charset="utf-8">
  <title>Pixel art 2</title>
  <style>
    /* 16 columns of 20px squares, with 1px gray lines between them */
    #grid {
      display: inline-grid;
      /* CSS Grid: a standard CSS layout for rows and columns.
         repeat(16, 20px) means: 16 columns, each 20px wide.
         The cells fill the grid left to right, and start a new row after every 16. */
      grid-template-columns: repeat(16, 20px);
      gap: 1px;
      background: #ccc;   /* shows through the gaps as grid lines */
      border: 1px solid #ccc;
    }
    .cell {
      width: 20px;
      height: 20px;
      background: white;
    }
  </style>
</head>
<body>

  <!-- onclick on the whole grid: a click on any cell runs paint(event) -->
  <div id="grid" onclick="paint(event)"></div>

  <script>
    // find the empty grid box
    const grid = document.getElementById("grid");

    // repeat 256 times (16 x 16): i counts 0, 1, 2 ... 255
    for (let i = 0; i < 256; i++) {
      const cell = document.createElement("div");   // make a new <div>
      cell.className = "cell";                       // give the div class="cell", so the .cell style applies
      grid.appendChild(cell);                        // put it inside the grid
    }

    // Runs when anything inside the grid is clicked.
    // event describes the click. event.target is the element
    // that was actually clicked: one of the cells.
    function paint(event) {

      // event.target.id is the id of the clicked element.
      // The cells have no id, but the grid has id="grid".
      // A click on the thin lines between cells hits the grid itself,
      // so if the id is "grid", stop here and paint nothing.
      if (event.target.id === "grid") return;

      // color the clicked cell
      event.target.style.background = "black";
    }
  </script>

</body>
</html>
Try it: draw something, then reload. It's gone. The colors were only on the page, and nothing remembered them.
Notes

[Lab Option 1] READ: Pixel Art Lab, Step 3: Using Array

Run it: pixel_3.html

Now the drawing lives in an array, colors, with one color per cell. paint changes the array, and draw colors the cells from it. Save it as pixel_3.html.

What is an array? A list of values kept in order under one name, like a row of numbered mailboxes. Each value sits in a numbered slot, and the numbering starts at 0.
let colors = ["white", "black", "red"];
//             slot 0   slot 1   slot 2

colors[1]              // read slot 1: "black"
colors[2] = "blue";    // change slot 2: now ["white", "black", "blue"]
colors.length          // how many slots: 3
new Array(256).fill("white") makes 256 slots, all "white", numbered 0 to 255. Slot i holds the color of cell number i. Because the whole drawing is one value with one name, JSON.stringify can turn it into text and save it.

To change colors[i], paint needs to know which cell was clicked. The loop gives every cell its number, 0 to 255, with cell.dataset.index = i. dataset stores your own information on an element as a data- attribute: in DevTools → Elements each cell shows data-index="17". paint reads it back from event.target. It comes back as text, so Number() turns it into a number.
<!DOCTYPE html>
<html>
<head>
  <meta charset="utf-8">
  <title>Pixel art 3</title>
  <style>
    /* 16 columns of 20px squares, with 1px gray lines between them */
    #grid {
      display: inline-grid;
      /* CSS Grid: a standard CSS layout for rows and columns.
         repeat(16, 20px) means: 16 columns, each 20px wide.
         The cells fill the grid left to right, and start a new row after every 16. */
      grid-template-columns: repeat(16, 20px);
      gap: 1px;
      background: #ccc;   /* shows through the gaps as grid lines */
      border: 1px solid #ccc;
    }
    .cell {
      width: 20px;
      height: 20px;
      background: white;
    }
  </style>
</head>
<body>

  <!-- onclick on the whole grid: a click on any cell runs paint(event) -->
  <div id="grid" onclick="paint(event)"></div>

  <script>
    // find the empty grid box
    const grid = document.getElementById("grid");

    // make 256 cells, and give each one its number, 0 to 255
    for (let i = 0; i < 256; i++) {
      const cell = document.createElement("div");
      cell.className = "cell";
      // saved on the element as a data- attribute. In HTML, cell 17 looks like:
      //   <div class="cell" data-index="17"></div>
      cell.dataset.index = i;
      grid.appendChild(cell);
    }

    // The state of this program: the drawing, as an array of 256 colors.
    // Cell number i is drawn with colors[i]. Every cell starts white.
    let colors = new Array(256).fill("white");

    // draw the whole picture from the array
    draw();

    function paint(event) {
      if (event.target.id === "grid") return;

      // which cell? read back the number stored on it.
      // dataset gives text ("17"), so Number() turns it into a number
      const i = Number(event.target.dataset.index);

      // change the state: the new color for that cell
      colors[i] = "black";

      // redraw the picture from the state
      draw();
    }

    // Colors every cell from the array.
    // The cells only show the drawing. The array stores the drawing.
    function draw() {
      for (let i = 0; i < 256; i++) {
        grid.children[i].style.background = colors[i];
      }
    }
  </script>

</body>
</html>
This looks the same as before, but the important change is inside: the picture is now data, a list of 256 words. This is waht we are going to save next.
Notes

[Lab Option 1] READ: Pixel Art Lab, Step 4: Remember the Drawing

Run it: pixel_4.html

The same two lines as the counter and the guestbook: load when the page starts, save after every change. Save it as pixel_4.html.
<!DOCTYPE html>
<html>
<head>
  <meta charset="utf-8">
  <title>Pixel art 4</title>
  <style>
    /* 16 columns of 20px squares, with 1px gray lines between them */
    #grid {
      display: inline-grid;
      /* CSS Grid: a standard CSS layout for rows and columns.
         repeat(16, 20px) means: 16 columns, each 20px wide.
         The cells fill the grid left to right, and start a new row after every 16. */
      grid-template-columns: repeat(16, 20px);
      gap: 1px;
      background: #ccc;   /* shows through the gaps as grid lines */
      border: 1px solid #ccc;
    }
    .cell {
      width: 20px;
      height: 20px;
      background: white;
    }
  </style>
</head>
<body>

  <!-- onclick on the whole grid: a click on any cell runs paint(event) -->
  <div id="grid" onclick="paint(event)"></div>

  <script>
    // find the empty grid box
    const grid = document.getElementById("grid");

    // make 256 cells, and give each one its number, 0 to 255
    for (let i = 0; i < 256; i++) {
      const cell = document.createElement("div");
      cell.className = "cell";
      // saved on the element as a data- attribute. In HTML, cell 17 looks like:
      //   <div class="cell" data-index="17"></div>
      cell.dataset.index = i;
      grid.appendChild(cell);
    }

    // LOAD, once, when the page starts.
    // getItem gives back the saved text, or null the first time.
    // JSON.parse turns the text back into the array of 256 colors.
    // If nothing was saved yet, start with 256 white cells.
    let colors = JSON.parse(localStorage.getItem("pixels")) || new Array(256).fill("white");

    // draw the saved picture
    draw();

    function paint(event) {
      if (event.target.id === "grid") return;

      // change the state
      const i = Number(event.target.dataset.index);
      colors[i] = "black";

      // SAVE, after every change: the whole array as JSON text
      localStorage.setItem("pixels", JSON.stringify(colors));

      draw();
    }

    // Colors every cell from the array.
    function draw() {
      for (let i = 0; i < 256; i++) {
        grid.children[i].style.background = colors[i];
      }
    }
  </script>

</body>
</html>
Try it: draw, reload, quit the browser and open it again. The drawing comes back. In DevTools → Application → Local Storage, the key pixels holds your picture: an array of 256 color names.
Notes

[Lab Option 1] Pixel Art Lab: Your Turn

Start from pixel_4.html. Save a copy as pixel_mine.html and change it.

A. Make the grid 8×8

B. Add color

Optional C. Additional Feature

Notes

[Lab Option 2] State

SampleLibraryPage
Clickable, draggable cubesthree.js html
Platformer gamePixiJS html

Open the cube scene, drag a few cubes, double-click a few away. Now reload the page.

Everything is reset (cubes are placed randomly) and the colors are different. The scene paremeters (cube position, colors....etc) only ever existed in the tab's memory, as JavaScript variables. Reloading erases those variables away and runs the code from the top again.

The platformer does the same. Play for a while, then reload: the score is back to 0 and the player is back at the start. There is no record of how well you did.

To keep anything, we have to:
  1. decide what is worth remembering
  2. write it down in a format we can read back (JSON)
  3. put it somewhere that survives a reload
Notes

[Lab Option 2] What Is "State"?

State is the set of values that can change while the piece is running.

A useful test: if it's written directly in your code and never changes, it isn't state. The code already remembers it. If it changes because of the user, randomness, or time, it's state, and it disappears on reload.

Not all state is worth saving. Some of it only matters for a fraction of a second. Choosing what to keep is a design decision, not a technical one.
Notes

[Lab Option 2] Example 1: Clickable, Draggable Cubes

SampleLibraryPage
Clickable, draggable cubesthree.js html

20 cubes with random positions and colors. They spin. You can drag them, double-click to delete them, and orbit the camera.

What are the important states we need to keep track of?
Notes

[Lab Option 2] Cubes: The States

StateChanges whenSave it?
which cubes still existyou double-click oneyes
each cube's positionrandom at load, then you drag ityes
each cube's colorrandom at loadyes, or every reload looks different
each cube's rotationconstantly, it spinsprobably not, would anyone notice?
camera positionyou orbit or zoommaybe, do you want people to return to their own view?
lights, cube size, the pop soundnever, they're written in the codeno, not state

The surprise is color: nobody touches it, but because it's random it changes on every reload. Randomness is state too.
Notes

[Lab Option 2] Example 2: Platformer Game

SampleLibraryPage
Platformer gamePixiJS html

A player block runs and jumps across platforms. The score goes up every second you survive, and resets to zero when you fall.

What are the important states we need to keep track of?
Notes

[Lab Option 2] Platformer: The States

StateChanges whenSave it?
player position (x, y)every framemaybe, resume where you left off?
player velocity, "on the ground"every frameno, resuming mid-jump is strange
which keys are held downevery key pressno, only matters this instant
scoreevery second, reset on fallmaybe, but only together with position, to resume a run
high scoredoesn't exist yet!yes, the classic thing games save
platformsnever, written in the codeno, not state (unless players could build them)

Games rarely save every value. They save checkpoints and high scores. Sometimes listing the states shows you a state you want that isn't there yet.

A bigger game's save file is still small. It keeps progress, not the game itself: The levels, art, music and sound (the assets) are not in the save file. They are files that ship with the game and never change, like the platforms here. The exception is anything players make themselves: a level they built, a character they designed. That is state, and it has to be saved.
Notes

[Lab Option 2] Writing It Down: JSON

JSON (JavaScript Object Notation) is the standard way to write state down on the web. It looks like JavaScript objects and arrays, and it's plain text you can read.
{
  "cubes": [
    { "id": 0, "x": 1.2, "y": -0.4, "z": 3.0, "color": "#ff3366", "deleted": false },
    { "id": 1, "x": -2.5, "y": 0.8, "z": 1.1, "color": "#33ccff", "deleted": true }
  ],
  "camera": { "x": 0, "y": 0, "z": 3 }
}
{ "player": { "x": 350, "y": 232 }, "score": 12, "highScore": 40 }
Javascript has utility functions like JSON.stringify(state) that turns an object into text, and JSON.parse(text) turns the text back into an object.

JSON holds numbers, strings, true/false, lists and objects. It can't hold functions or library objects like a three.js cube, so you copy out the plain values you chose.
Notes

[Lab Option 2] Restoring Changes the Code

Before, the cube code only knew one way to start: make 20 random cubes.

Once it can restore, every saved value has two paths:
if there is a save:   build the cubes from the saved positions and colors
otherwise:            make 20 random cubes
Coming back to a known state can happen in several ways: threejs_cubes_withstorage.html does both: it restores automatically, and the Reset button forgets the save on request.
Notes

[Lab Option 2] When to Save?

StrategyExampleGoodWatch out
Every changethe cubes demo: after each drag, delete, or orbit nothing gets lost fine for small state, too much for things that change every frame
Every so oftenautosave every 10 seconds works for constantly changing state, like a moving player you can lose the last few seconds
At key momentscheckpoints, finishing a level, a new high score saves only states that make sense to return to everything between moments is lost
When leavingwhen the tab closes or reloads one save, right at the end a crash, or a phone closing the tab, may skip it. Use it as a backup only
When askeda Save button, save slots the person chooses what to keep, and can have several versions forget to press it and the work is gone

Real software mixes these. A text editor autosaves constantly and lets you save versions by hand. Undo is saving too: it keeps a list of past states so you can step back.
Notes

[Lab Option 2] Lab: Save Your Scene's State

You will decide what gets saved and use the AI tool to write the code for you.

Part 1: the cubes
  1. Ask the AI to list the states in threejs_cubes.html, then save the ones you choose to localStorage. Compare its list with our table. Saving is only half of it: also ask it to load the saved state when the page starts and rebuild the scene from it. Without that, the data sits on disk and the scene still starts over.
  2. Change the scene: drag some cubes, delete a few, orbit the camera.
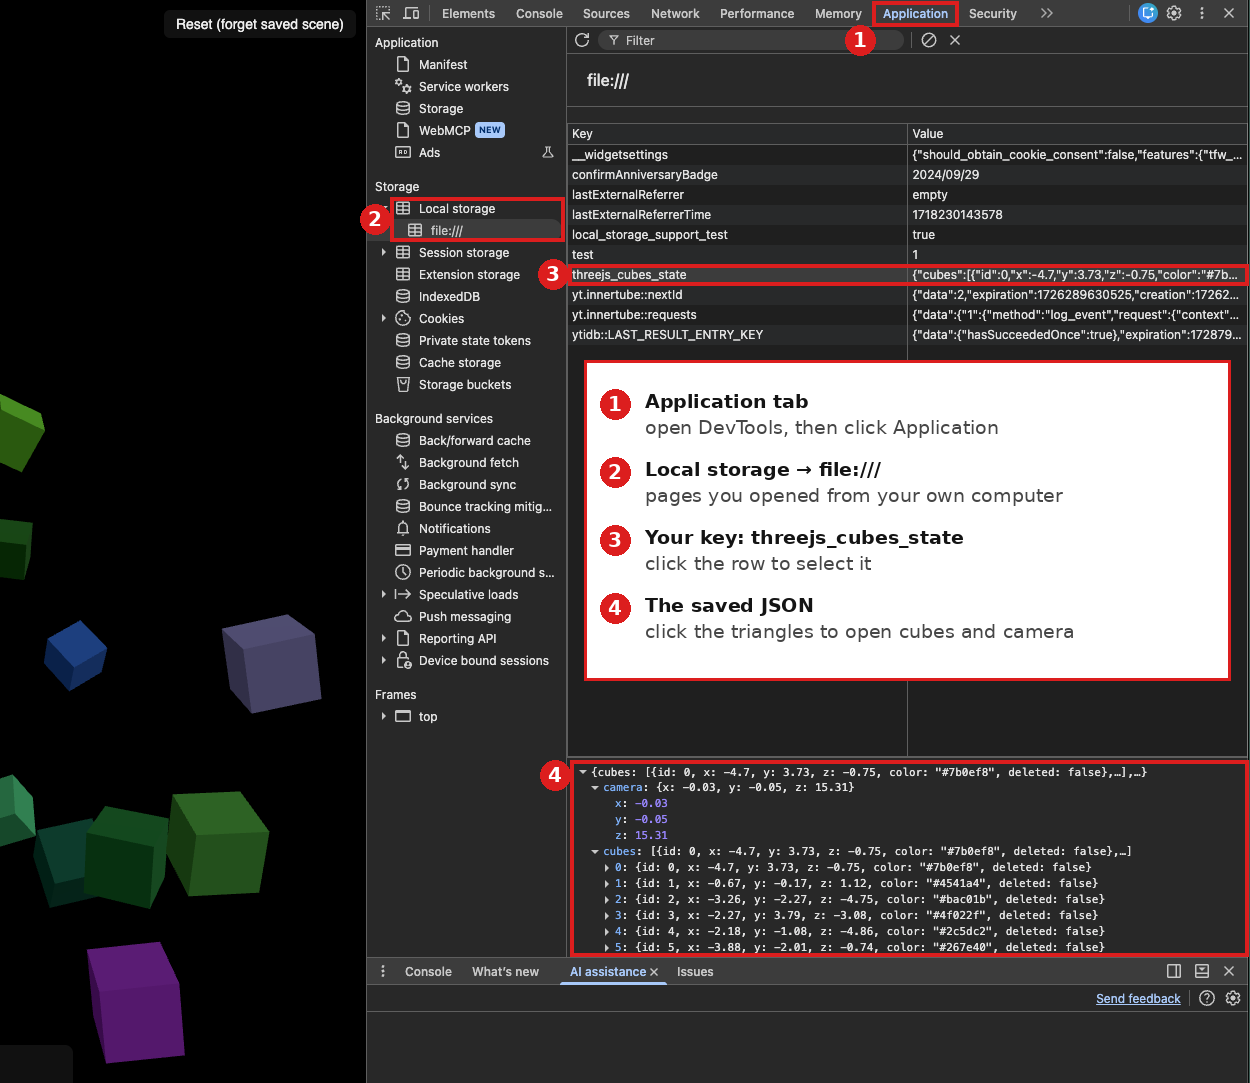
  3. Optional: Look whats stored In Chrome, open DevTools → Application → Local Storage and read the saved text. Can you find your cubes and the camera in it? (The actual file on disk is hard to find and read, so use DevTools.) Chrome DevTools next to the cube scene. 1: the Application tab. 2: Local storage, file:///. 3: the threejs_cubes_state row. 4: the saved JSON opened up, showing camera and cubes with id, x, y, z, color and deleted.
  4. Resume: reload the page. Then quit Chrome completely and reopen it. Are the cubes where you left them?
Part 2: your own scene
Do the same four steps with your own library scene.

Put in your README: the list of states and which ones you saved, a copy of the saved text, and what happened when you resumed.
Starting small counts as a full answer. Saving one object's position, a single setting (background color, camera angle), or a high score is enough to show you understand the pattern.
Notes