You should come out of this able to look at code an AI wrote for
you and say "that part is making a decision" or "that part repeats".
You do not need to be able to write all of it from memory.
Decisions. Code that does different things in different situations.
Wrong password: you get an error. Right password: you get in.
Instagram shows "Follow" or "Following" depending on whether you already do.
Repetition. Code that does the same thing many times.
A page of 100 thumbnails is not 100 lines of code.
A game redraws the screen 60 times a second.
Notes
if: Run This Only When...
A script with no decisions runs every line, top to bottom, the same way every time.
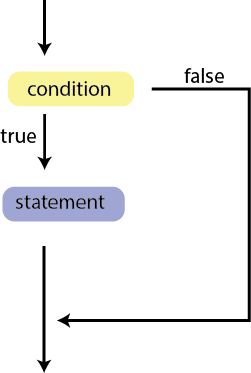
An if statement lets the code skip some lines depending on a condition.
if ( condition ) {
  // these lines run ONLY if the condition is true
}
// the program continues here either way
Read it out loud as English: "if A is true, do B."
let score = 10;

if (score > 5) {
  alert("You won!");
}

alert("Game over");
Predict: what do you see when score is 10? What if you change it to 3?
The condition is a question with a yes or no answer. Here are the ways you can ask:
Write
Means
Example that is true
>
greater than
10 > 5
<
less than
3 < 5
>=
greater than or equal to
5 >= 5
<=
less than or equal to
4 <= 5
===
is equal to
"blue" === "blue"
!==
is not equal to
"blue" !== "red"
One equals sign or three? =puts a value into a variable: score = 10 means "score is now 10". ===asks whether two things are the same: score === 10 means "is score 10?"
You will also see == (two equals signs) in older code. It is a looser version.
Use ===.
Ask:"In JavaScript, what is the difference between =, == and ===? Give me one example where == and === give different answers."
Notes
if / else: One or the Other
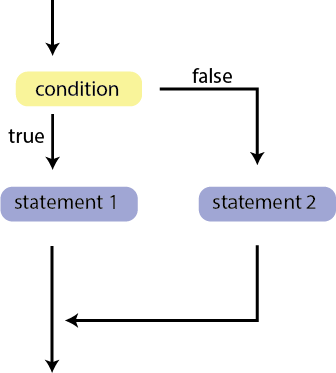
Add else when you want something to happen in the false case too.
Only one of the two blocks runs.
if ( condition ) {
  // runs if the condition is true
} else {
  // runs if the condition is false
}
Copy, paste, and run:
<!DOCTYPE html>
<html>
<body>
<script>
  let answer = prompt("Do you like the color blue? (yes or no)");

  if (answer === "yes") {
    document.write("<h1 style='color:blue;'>Blue it is.</h1>");
  } else {
    document.write("<h1>Fair enough. Black and white, then.</h1>");
  }
</script>
</body>
</html>
Run it three times. Type yes, then no, then Yes with a capital Y. Predict the third one first.
Notes
Checkpoint C1: The Gatekeeper
Create a new file called conditionals.html. You will keep adding to it in Checkpoints C2 and C3, until it becomes a small conversation with the viewer.
Use prompt() to ask for a secret word. Pick any word you like.
If the viewer types the secret word, document.write() a welcome heading.
Otherwise, write a "Sorry, wrong word" heading.
It is working when: the right word gets the welcome, and anything else (including a typo) gets the sorry message.
Show a hint
Start from the blue example on the previous slide. You only need to change the question,
the word inside the quotes after ===, and the two messages.
Notes
else if: More Than Two Paths
Chain conditions with else if. Javascript checks them top to bottom
and runs the first block whose condition is true. Everything after that is skipped.
A chain starts with one if and can end with one else. Every check in between must be an else if.
Demo: which block runs?
Drag the slider. It sets brightness to a number from 0 (black) to 255 (white).
The highlighted block is the one that runs. The grey blocks are skipped.
let brightness = 30;

if (brightness < 50) {
  label = "dark";
} else if (brightness < 200) {
  label = "medium";
} else if (brightness < 250) {
  label = "light";
} else {
  label = "white";
}
Notice that 30 is less than 50, less than 200 and less than 250, but only the first block runs.
Once one block wins, the rest of the chain is skipped.
The full code for the slider. Copy, paste, and run:
<!DOCTYPE html>
<html>
<body>

<input type="range" min="0" max="255" value="30" oninput="update(this.value)">
<div id="swatch" style="width:100px; height:100px; border:1px solid black;"></div>
<p id="output"></p>

<script>
  function update(value) {
    // the slider gives back text, Number() turns it into a number we can compare
    let brightness = Number(value);
    let label;

    if (brightness < 50) {
      label = "dark";
    } else if (brightness < 200) {
      label = "medium";
    } else if (brightness < 250) {
      label = "light";
    } else {
      label = "white";
    }

    // color the square in that brightness, and write the label under it
    let grey = "rgb(" + brightness + "," + brightness + "," + brightness + ")";
    document.getElementById("swatch").style.background = grey;
    document.getElementById("output").innerHTML = brightness + " is " + label;
  }

  update(30);   // run once at the start, so the page is not empty
</script>

</body>
</html>
The red part is the else if chain. The rest is the slider around it:
oninput is an event that fires every time the slider moves, and it calls update() with the slider's value.
document.getElementById("swatch") finds the element with id="swatch" so the code can change its color,
and innerHTML replaces the text inside the <p>. The optional slide that follows explains getElementById in detail.
Drag the slider to 30, 120, 230 and 252. Then land on exactly 50, exactly 200 and exactly 250 (click the slider, then use the arrow keys to move one step at a time).
Which label do 50, 200 and 250 get, and why?
Predict: if you swapped the first two conditions, so brightness < 200 came first,
what would brightness = 30 be labelled? Would anything ever be labelled "dark"?
Notes
Reaching Any Element: document.getElementById() Optional
Click to open this slide
Look at the slider code again. The event is on the slider (oninput),
but the things that change are somewhere else: the grey square and the line of text.
The code needs a way to point at a different element on the page. That is what
document.getElementById() is for.
You may have seen this inside an event attribute, as in onmouseover="this.style.color='red';".
this means "the element this attribute is sitting on". It is a handy shortcut, but it can only ever reach
that one element. If the slider used this, it could change the slider, not the square.
getElementById is the general version: it can reach any element, as long as the element has a name.
Think of the id as a name tag. Each id should be used only once on a page,
so there is never any doubt about which element you mean. (It is the same id you would target in CSS with #swatch.)
2. Find it with document.getElementById().
document.getElementById("swatch")
Piece
What it means
document
The whole page, as Javascript sees it. Every element on the page is somewhere inside it.
.
"Look inside." Whatever comes after the dot belongs to whatever comes before it.
getElementById
A function the browser already provides. The name says what it does: get the elementby its id.
("swatch")
The name tag to look for, in quotes. Just the name, no #.
It searches the page and hands back the element wearing that name tag, the same way
prompt() hands back what the viewer typed.
3. Change it. After you have the element, add another dot and say what to change:
document.getElementById("swatch").style.background = "gold";      // its CSS background
document.getElementById("swatch").style.width = "200px";          // its CSS width
document.getElementById("output").innerHTML = "Hello";            // the content between its tags
document.getElementById("photo").src = "night.jpg";               // an <img>'s picture
Read a full line from left to right as a sentence:
"In the page, find the element named swatch, go to its style, and set its background to grey."
Saving it in a variable. If you use the same element more than once, find it once and keep it in a variable.
This does exactly the same thing, and you will see it a lot in AI-written code:
let swatch = document.getElementById("swatch");   // find it once
swatch.style.background = "gold";                  // then use the variable
swatch.style.width = "200px";
Demo: click a line of code to run it
I am the caption
<div id="circle"></div>
<div id="square"></div>
<p id="caption">I am the caption</p>
(this one uses this: watch what changes)
(a capital S: watch the output)
click a line of code to run it
Every button is an event on the button, yet most of them change something else, because
getElementById can reach anywhere on the page. The this button can only change itself.
this
document.getElementById("...")
Reaches
only the element the event attribute is on
any element on the page that has an id
Needs an id?
no
yes
Good for
a quick hover effect on the thing being hovered
almost everything else: a button that changes a picture, a slider that changes a square
Common problems
Capital letters. It is getElementById: capital E, capital B, capital I, lowercase d.
Not getElementByID, not getelementbyid.
The id does not match."square" and "Square" are different names.
When nothing matches, getElementById hands back null (nothing), and the next dot fails with
Cannot read properties of null. When you see that error, check the spelling of the id first.
No #.getElementById("#swatch") looks for an element whose id is literally #swatch. The # is CSS only.
The element does not exist yet. The browser reads the page top to bottom. If your <script>
runs before the element is on the page, there is nothing to find. Putting the script at the bottom of the body, after the elements, avoids this.
That is why the script in the slider code comes after the slider, the square and the text.
Predict: in the full slider code, suppose the paragraph were written <p id="Output"> with a capital O.
What happens when you move the slider?
Ask:"What is the DOM in web pages? Explain how document.getElementById fits into it, as if I have never coded before.""What is the difference between document.getElementById and document.querySelector? When would I use each one?"
Notes
Combining Conditions: and, or
Sometimes one question is not enough.
Write
Means
True when
&&
and
both sides are true
||
or
at least one side is true
!
not
flips true to false, false to true
Copy, paste, and run:
<!DOCTYPE html>
<html>
<body>
<script>
  let hour = new Date().getHours();   // the current hour, 0 to 23
  let answer = prompt("Do you like the color blue? (yes or no)");
  let jumpKeyIsDown = true;           // pretend game: try changing to false
  let onGround = true;

  // the gallery is open from 11 to 5 (11 to 17 on a 24 hour clock)
  if (hour >= 11 && hour < 17) {
    document.write("Open");
  } else {
    document.write("Closed");
  }
  document.write("<br>");

  // accept either spelling
  if (answer === "yes" || answer === "Yes") {
    document.write("Blue it is.");
  }

  // accept three spellings: chain as many || as you need
  if (answer === "no" || answer === "No" || answer === "NO") {
    document.write("Fair enough. Black and white, then.");
  }
  document.write("<br>");

  // in a game: only jump if the jump key is down AND you are standing on something
  if (jumpKeyIsDown && onGround) {
    document.write("Jump!");
  }
</script>
</body>
</html>
Predict: with hour = 17, is the gallery open?
Ask:"In JavaScript, how can I check a prompt() answer without caring about capital letters? Explain toLowerCase() with a short example."
Notes
In a Real Game: Moving the Player
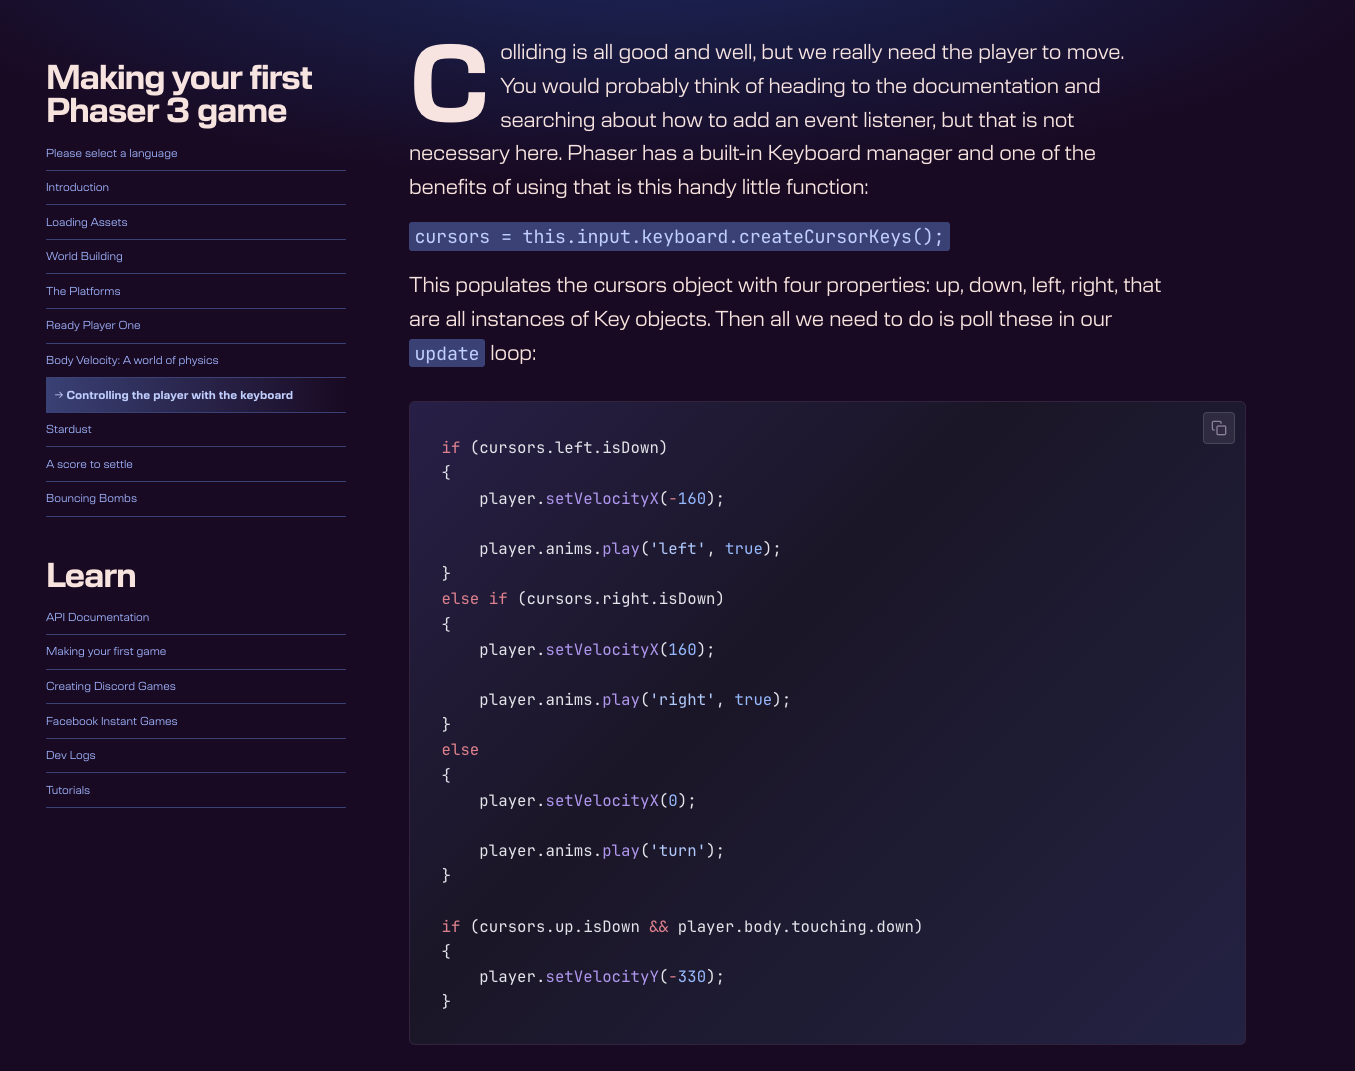
This is a screenshot from the official tutorial for Phaser, a free Javascript library for making 2D browser games:
Making your first Phaser 3 game, Part 7: Controlling the player with the keyboard.
It is the code that makes the character run left, run right, stand still and jump.
Everything in it is something you already know: if, else if, else and &&.
The first line, cursors = this.input.keyboard.createCursorKeys();, gives you an object that keeps track of the four arrow keys.
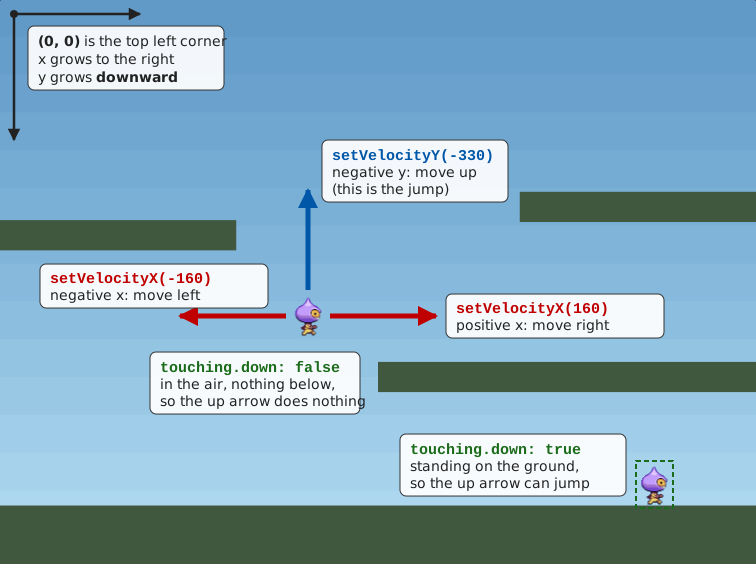
Here is what each line does in the game itself:
Demo: which blocks run this frame?
The code asks two questions: which arrow keys are held, and where the player is.
The highlighted lines are run and the grey lines are skipped.
Arrow keys held down: The player:
if (cursors.left.isDown) { // player.setVelocityX(-160); // move sideways at speed 160. Negative x is left
player.anims.play('left', true); // play the "walking left" animation. true means: if it is// already playing, keep it going, do not restart it
} else if (cursors.right.isDown) { // player.setVelocityX(160); // positive x is right
player.anims.play('right', true); // play the "walking right" animation
} else {
player.setVelocityX(0); // speed 0: stop
player.anims.play('turn'); // show the player facing forward, standing still
}
// player.body.touching.down is true when the bottom of the player is touching// something, like the ground or a platform
if (cursors.up.isDown && player.body.touching.down) { // player.setVelocityY(-330); // move upward. On a screen, y grows going down,// so negative y is up
}
Notice there are two separate questions here. The first is an if / else if / else chain: exactly one of its three blocks runs every frame.
The second if stands on its own, so it is asked every frame too, no matter which sideways block ran. That is why you can run and jump at the same time.
Predict: what happens if you hold only the down arrow? Tick it and check.
Predict: what happens if you hold the left and the right arrow at the same time? Tick both and check.
Predict: why does the jump check need && player.body.touching.down? What would happen if it were just if (cursors.up.isDown)?
Predict: what would happen if the else block (velocity 0) were deleted?
Ask:"Here is some Phaser 3 code that moves a player with the arrow keys. Explain it line by line as if I have never coded before. Then show me how to change it so the player can also move with the A and D keys."
Notes
Checkpoint C2: A Page That Knows What Time It Is
Try it: in conditionals.html, below your Gatekeeper code and inside the same <script>,
paste this and finish it:
  let hour = new Date().getHours();   // the current hour, a number from 0 to 23
  // hour = 22;                       // remove the // at the start to pretend it is 10pm

  if (hour < 12) {
    document.body.style.background = "lightyellow";
    document.write("<p>Good morning.</p>");
  }
  // add an else if for the afternoon (before 18)
  // add an else for the evening
Treat the first line and document.body.style.background as given:
the first gets the hour from your computer's clock, the second changes the page background.
Add the afternoon else if and the evening else, each with its own color and greeting.
Test every branch. You cannot wait until evening for the code to return a hour that is later, so remove the // in front of hour = 22;
and try 9, 15 and 22.
Now add a fourth case: "Go to sleep." for hours before 5. Where in the chain does it have to go?
It is working when: each of 3, 9, 15 and 22 gives a different color and greeting.
Show a hint for step 3
Every hour before 5 is also before 12. If the "before 5" check comes after the "before 12" check, it can never win.
Look back at the slider demo.
Notes
Loops: Doing Something Many Times
Say you want a row of ten black squares. Without a loop:
for (let i = 0; i < 10; i++) {
  document.write('<div class="sq"></div>');
}
One number controls how many squares there are. The code does not get any longer.
Notes
Reading a for Loop
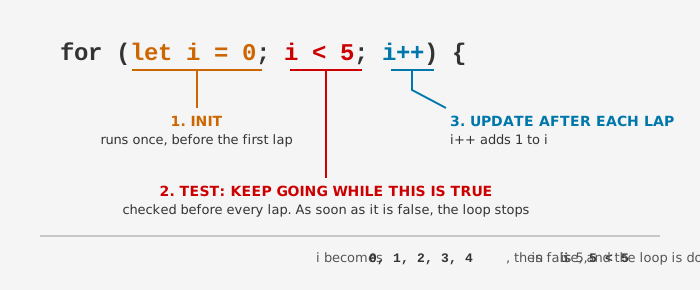
The first line of a for loop has three parts, separated by semicolons:
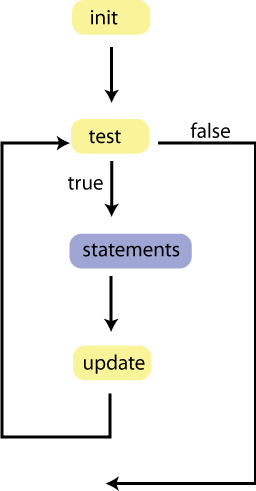
The same thing as a flowchart. The loop keeps going around until the test is false:
i is just a variable that counts the laps. It is called i by habit (for "index").
You can use it inside the loop:
<!DOCTYPE html>
<html>
<body>
<script>
  for (let i = 0; i < 5; i++) {
    console.log("lap number " + i);
  }
</script>
</body>
</html>
i
is i < 5?
what happens
0
true
prints "lap number 0"
1
true
prints "lap number 1"
2
true
prints "lap number 2"
3
true
prints "lap number 3"
4
true
prints "lap number 4"
5
false
the loop stops
Counting from 0 feels strange at first. It is a programming habit, and it matches how lists are numbered in Javascript.
Predict how many times each loop runs, and what i is on each lap:
for (let i = 1; i <= 10; i++) { ... }    // loop A
for (let i = 0; i < 10; i += 2) { ... }  // loop B
for (let i = 10; i > 0; i--) { ... }     // loop C
for (let i = 0; i < 0; i++) { ... }      // loop D
Notes
Checkpoint C3: How Many Squares?
Part 1. Try it: create a new file called loops.html with this in it, and run it:
Make the first 10 squares (0 to 9) red, using an if and <.
Put the lap number inside each square, so you can see i.
Make square number 5 gold. (Careful: 5 is also less than 10, so think about where the gold check has to go.)
It is working when: you see 40 numbered squares, 0 to 39, with squares 0 to 9 red, except square 5, which is gold.
Show a hint for step 2
Inside the loop, before drawing each square, ask: is i less than 10?
If yes, write a red square. Otherwise, write a black one. That is an if / else with the condition i < 10.
To make one square red, add a style to its div: '<div class="sq" style="background:red;"></div>'Show a hint for step 3
The text between <div class="sq"> and </div> shows up inside the square.
Use + to glue i in between: '<div class="sq">' + i + '</div>'
Part 2. Let the viewer decide: go back to conditionals.html. Right now it asks for a secret word
and greets the viewer depending on the time. Now it will also ask what the viewer wants, and answer differently for different answers.
Add the square style to conditionals.html, inside a <head> above the <body>:
Below your C2 code, inside the same <script>, ask the viewer a question:
  // prompt() always gives back text, Number() turns it into a number
  let count = Number(prompt("How many squares would you like me to draw?"));
Answer with an if / else if / else:
more than 100: write "That is a lot. I will draw 100." and set count to 100
less than 1: write "Nothing to draw, then."
otherwise: write "Here are your ___ squares." with the number in it
Then use a for loop to draw count squares, the first 10 red, like Part 1.
The only change from Part 1 is that the loop stops at count instead of 40.
End with a goodbye line, for example "Thanks for stopping by."
It is working when: you run it four times and answer 5, 40, 500 and 0,
and get four different replies: 5 squares, 40 squares, 100 squares with a "that is a lot" message, and no squares.
Run it once more as if you were a visitor. Your page now has a conversation: it asks who you are, greets you depending on the time,
asks what you want, and answers differently for different answers. Questions (prompt), decisions (if)
and repetition (for) are most of what a chat page is made of.
Show a hint for step 4
Copy your loop from Part 1 and change one thing in its first line: i < 40 becomes i < count.
Predict: what happens if the viewer types hello instead of a number?
Notes
while: Keep Going Until...
A for loop is best when you know how many times: "draw 40 squares".
A while loop is best when you do not know how many times, only when to stop:
"keep asking until they get it right."
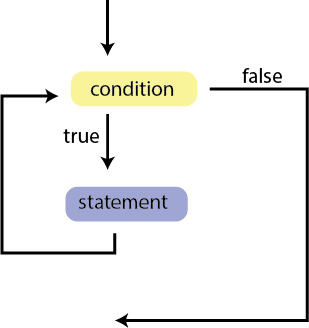
while ( condition ) {
  // runs again and again, as long as the condition is still true
}
Copy, paste, and run:
<!DOCTYPE html>
<html>
<body>
<script>
  let answer = prompt("What color do you get when you mix blue and yellow?");

  while (answer !== "green") {
    answer = prompt("Not quite. Try again: blue + yellow = ?");
  }

  document.write("<h1 style='color:green;'>Yes, green.</h1>");
</script>
</body>
</html>
Read it as: "while the answer is not green, ask again." It might run zero times (right the first time) or twenty.
The same idea shows up all the time in games and generative work:
"keep picking a random spot until it is not inside a wall",
"keep adding enemies until there are ten".
The infinite loop. If the condition never becomes false, the loop never ends and the browser tab freezes.
let i = 0;
while (i < 10) {
  document.write(i);
  // forgot i++ here, so i is 0 forever
}
If your page freezes, it is almost always this. Close the tab, fix the code, and open it again.
Something inside the loop has to change the thing the condition is checking.
Notes
Other Ways to Write a Loop: for...of and forEach Optional
Click to open this slide
Very often a loop goes through a list of things: every platform in a game, every cube in a scene.
In Javascript a list is written with square brackets, and it is called an array:
let colors = ["red", "gold", "teal"];
Here are three ways to say "for every color in the list, draw a square". All three do exactly the same thing.
Form
Code
Read it as
The for loop you know
for (let i = 0; i < colors.length; i++) {
  drawSquare(colors[i]);
}
Count from 0 up to the length of the list. Each lap, take item number i. colors.length is how many items the list has (3). colors[i] is item number i, counting from 0, so colors[0] is "red".
for...of
for (const c of colors) {
  drawSquare(c);
}
"For each cof the colors, draw it." No counter needed: c is the next item each lap.
forEach
colors.forEach((c) => {
  drawSquare(c);
});
"Colors, for each one, run this." (c) => { ... } is a short way to write a function.
forEach calls it once per item and hands it the item as c.
The name after const or inside ( ) is yours to choose. c, color or p all work,
as long as you use the same name inside the loop.
You will see both in the lab samples:
for (const p of platformDefs) { ... }     // for each platform p in the list of platforms
cubes.forEach((cube) => { ... });         // for each cube in the list of cubes
Copy, paste, and run:
<!DOCTYPE html>
<html>
<body>
<script>
  let colors = ["red", "gold", "teal"];

  for (const c of colors) {
    document.write('<div style="display:inline-block; width:40px; height:40px; margin:2px; background:' + c + ';"></div>');
  }
</script>
</body>
</html>
Add "purple" to the list and run it again. Then rewrite the loop as a forEach and check that you get the same squares.
Notes
Big Picture: English to Code
When you describe behavior in English, certain phrases turn into certain code.
This is useful when you read AI code, and when you write prompts.
When you say...
The code is usually...
Example
"if A happens, do B"
if
if (score > 10) { ... }
"if A, do B, otherwise do C"
if / else
if (answer === "yes") { ... } else { ... }
"if A... or if B... otherwise C"
if / else if / else
morning, afternoon, evening
"do B 10 times"
for
for (let i = 0; i < 10; i++) { ... }
"for every cube / platform / pixel, do B"
for, forEach, for ... of
cubes.forEach(...)
"keep doing B until A"
while
while (answer !== "green") { ... }
A program is mostly decisions and repetition. Once you can spot the ifs and the loops,
you can read the shape of code you did not write, even when the rest of it is unfamiliar.
Notes
Lab: Rules of the Game
You will take a working library sample, find the decisions and loops already inside it,
then add your own rules by prompting in "if A happens, do B" form.
Pick one sample. Read the prompts first, then open the page.
Step 0. Get it running. Make a folder called rules. Open the link for your sample,
then save it into that folder (File → Save Page As, or copy and paste the page source into VS Code).
Everything is in that one file: the HTML, the CSS inside <style>, and the Javascript inside <script>.
The library itself is loaded from a CDN, so you need to be online.
Open the file in your browser (double-clicking works, or use Live Server) and play with it for a minute.
Step 1. Find the rules that are already there. Open the file in VS Code and ask your agent to label
every decision and loop in the <script> part:
"In this file, find every if statement and every loop. Directly above each one, add a one-line comment in plain English
that starts with RULE: for an if, or LOOP: for a loop. Also find the game loop, the function that runs again every frame,
and label it GAME LOOP:. Only add comments. Do not change any code."
The comments should look like this:
// RULE: if the double click hit a cube, remove it and play a pop
// LOOP: for 20 times, make a cube with a random color and position
Then check the AI's work. Run the page again to make sure it still works the same. Then read each comment
next to its code and ask yourself whether it is true.
You will see forEach and for (const p of platformDefs) loops, the other ways to write a loop
explained on the optional slide before the Big Picture slide. They all mean "for every item in the list, do this".
Step 2. Add your own rules. Use your agent. Write at least three prompts in the form
"if A happens, do B", and at least one that is a loop.
Try for a "keep doing B until A" rule, which should come out as a while loop.
Some ideas, but your own are better:
three.js cubes
PixiJS platformer
"If the mouse hovers over a cube, make it twice as big. If the mouse leaves, shrink it back.""Make the cubes slowly fall. If a cube falls below y = -6, move it back to the top so it falls again, like rain.""If there are fewer than 5 cubes left, use a while loop to keep adding new random cubes until there are 20 again.""If a cube is double clicked and it is the last one, change the background color and show the text 'You cleared it'."
"If the score reaches 10, change the background color. If it reaches 20, change it again.""If the player holds Shift, move twice as fast.""Add 5 yellow coins. If the player touches a coin, remove it and add 5 to the score.""When all the coins are collected, place 5 new coins. Use a while loop to keep picking a random position until it is not inside a platform."
Add one rule at a time and test it before adding the next. If something breaks, tell the agent what you expected
and what happened instead.
Step 3. Find your rules in the code. For each rule you added, find the if or the loop the AI wrote
and put a // RULE: or // LOOP: comment above it in your own words, in the same RULE / LOOP form as Step 1.
Then, at the top of the file, write a comment block:
/*
  Rules I added (the prompts I typed):
  1. ...
  2. ...
  3. ...

*/
Show a hint: I cannot find the code for my rule
Search the file (Cmd+F) for a word from your prompt: hover, score, coin, while.
Rules that check something "every frame" are usually inside the game loop (animate or app.ticker.add).
Rules that react to the mouse or keyboard are usually inside an addEventListener.
Or ask the agent: "Which lines implement the coin rule? Do not change anything, just point to them."
Notes
What to Submit (Due by next class)
Create a folder on your Reed server:
~myname/ILCP/JS06/
Put these in it:
conditionals.html: Checkpoints C1, C2 and C3 Part 2 (the conversation: secret word, time of day greeting, and "how many squares?")
loops.html: Checkpoint C3 Part 1 (40 numbered squares, the first 10 red, square 5 gold)
the rules/ folder: the Lab, with your // RULE: and // LOOP: comments and the comment block at the top listing your prompts
Check before you submit: open each file from your Reed server URL in a browser
(for example https://people.reed.edu/~myname/ILCP/JS06/loops.html) and make sure it runs with no red errors in the console.