We start together with two live demos. After that you work through the page on your own: three checkpoints, then the lab.
this,
while we watch its src change in the Inspect panel.
(Slide: A Useful Shortcut: this)alert() and prompt() do not work inside VS Code's
built-in previews. Open your files in a real browser tab (double-click the file, or "Open with Live Server").
See Previewing Your HTML/JS File in Javascript #2.
So far every line of Javascript you have written ran once, top to bottom,
the moment the page loaded. You have used variables, arithmetic, string concatenation,
prompt(), alert() and document.write().
Today adds two things:
alert(), prompt() and Number() are things you
call by name, with parentheses, without ever having seen the code inside them.
Somebody else wrote them. You just use them.
alert().
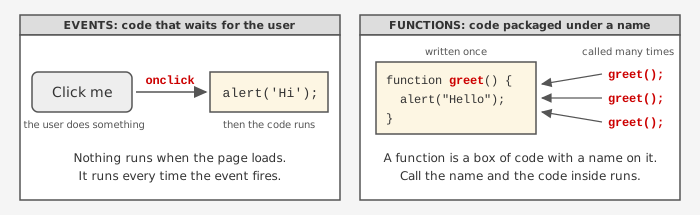
In Javascript, an event handler is code that runs when a specific event occurs. Common mouse events:
| Event | When it fires |
|---|---|
onclick |
user clicks the element |
onmouseover |
mouse pointer moves onto the element |
onmouseout |
mouse pointer leaves the element |
For a full list: w3schools, DOM events
Two button elements in HTML. Both work, <button> is more flexible:
<input type="button" value="Click Me" /> <button>Click Me</button>
Nothing happens above. No events are attached.
The simplest way to attach an event handler is to add it as an HTML attribute, named after the event, with Javascript directly inside the quotes:
<!DOCTYPE html>
<html>
<head><title>onclick Demo</title></head>
<body>
<button onclick="alert('Ouch, you clicked my button!');">Click Me</button>
<div onclick="alert('you clicked my div!');"> click here </div>
</body>
</html>
Try it right here on the slide:
The onclick attribute can be applied to nearly any HTML element, not just buttons.
alert() calls inside one onclick, separated by a semicolon?
Try it. Then ask your AI: when should code go directly in onclick
and when should it go in a separate function?
events.html. You will add to it in Checkpoint 2.
<button> and one <div> with some text in it.onclick attribute with its own alert() message.alert().
These two events fire as the mouse enters or leaves an element. They are how hover effects are built.
<!DOCTYPE html>
<html>
<body>
<img src="tick01.jpg"
onmouseover="alert('You entered the image!');" />
</body>
</html>
tick01.jpg with the real attribute on it:
<img src="tick01.jpg" onmouseover="alert('You entered the image!');" />
onmouseover is eventually matched by an
onmouseout, which is what makes hover effects reversible.:hover rule. Worth knowing: if all you want is a style change,
CSS can already do it. Javascript events are for when you need to do something more than
restyle, or when you need to know that it happened.
<img onmouseover=" ... " />
<img onmouseover="alert('hello');" /> correct
<img onmouseover="alert("hello");" /> breaks the HTML
Single and double quotes are interchangeable in Javascript. Use whichever is not
already in use by the surrounding HTML.
thisTo build a hover effect, the handler needs to change the element it is attached to. There is a one word shortcut for that.
this means
the element the attribute is sitting on.
this.src is that element's src.
this.style.color is its CSS text color.
Assign to them and the page changes.
this
means in Javascript is genuinely complicated, it changes depending on where the word appears,
and it is one of the most argued about corners of the language.
We are deliberately not covering it. Next class you will learn
document.getElementById(), which is the general way to reach any element on the page,
and that is the tool you will actually use most of the time.
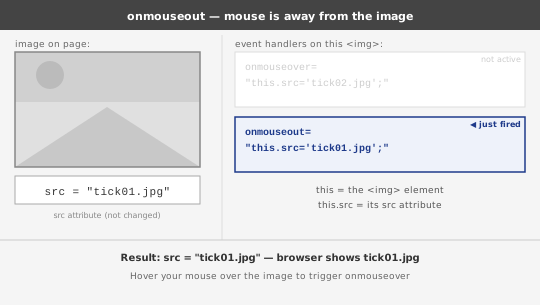
Image rollover. Swap the picture on hover:
<img src="tick01.jpg"
onmouseover="this.src='tick02.jpg';"
onmouseout="this.src='tick01.jpg';" />
src attribute change in place. The page you are looking at
is no longer the page that was sent to you.
The same recipe on the diagram from the DOM lesson:
Color change. Same recipe, different property. A <div> has no image
to swap, but it does have a style:
<div onmouseover="this.style.background='yellow';"
onmouseout="this.style.background='white';">
Hover over me
</div>
<p onmouseover="this.style.color='red';"
onmouseout="this.style.color='black';">
Now hover over me
</p>
Working versions, hover over each one:
Now hover over me
this.style.background is reaching the same CSS property you would write as
div { background: yellow; } in a stylesheet. The style rule is now being set from
Javascript, at the moment of the event, instead of ahead of time.
events.html, add one of these using the this recipe:
this.src, or<div> or <p> that changes this.style.background or this.style.color.onmouseover and onmouseout.
A function is a named block of code. You define it once, then call it by name as many times as you need.
Here is a page that asks for a name and three scores, calculates the average, and reports it. Three buttons, one per student. Read all of it, do not skim it:
<!DOCTYPE html> <html> <body> <button onclick=" let name = prompt('What is your name?'); let score1 = Number(prompt('Enter score 1:')); let score2 = Number(prompt('Enter score 2:')); let score3 = Number(prompt('Enter score 3:')); let average = (score1 + score2 + score3) / 3; alert(name + ', your average is ' + average); ">Student A</button> <button onclick=" let name = prompt('What is your name?'); let score1 = Number(prompt('Enter score 1:')); let score2 = Number(prompt('Enter score 2:')); let score3 = Number(prompt('Enter score 3:')); let average = (score1 + score2 + score3) / 3; alert(name + ', your average is ' + average); ">Student B</button> <button onclick=" let name = prompt('What is your name?'); let score1 = Number(prompt('Enter score 1:')); let score2 = Number(prompt('Enter score 2:')); let score3 = Number(prompt('Enter score 3:')); let average = (score1 + score2 + score3) / 3; alert(name + ', your average is ' + average); ">Student C</button> </body> </html>
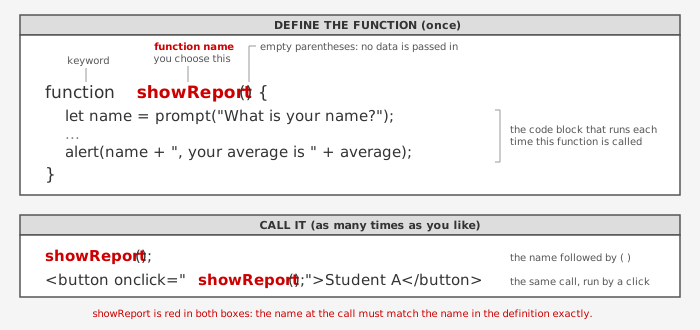
The red is the redundancy. Eighteen lines of Javascript, and only six of them are a real idea. The other twelve are photocopies.
Your eye slid over the second and third buttons, because they look the same as the first. That is exactly the danger. Nothing stops one of those copies from quietly being different, and nothing about the page will tell you which one.
Now suppose the assignment changes and the average should drop the lowest score. You have to find and correctly edit the calculation in three separate places. Miss one and two students get a right answer and one gets a wrong answer, with no error message anywhere.
Now the same behavior with a function. Three buttons, one copy of the code:
<!DOCTYPE html>
<html>
<head>
<script>
function showReport() {
let name = prompt("What is your name?");
let score1 = Number(prompt("Enter score 1:"));
let score2 = Number(prompt("Enter score 2:"));
let score3 = Number(prompt("Enter score 3:"));
let average = (score1 + score2 + score3) / 3;
alert(name + ", your average is " + average);
}
</script>
</head>
<body>
<button onclick="showReport();">Student A</button>
<button onclick="showReport();">Student B</button>
<button onclick="showReport();">Student C</button>
</body>
</html>
The red block appears exactly once now. It is the same six lines, in the same order, doing the same thing. The difference is that there is one copy of it instead of three, and the three buttons point at it by name.
One function, called three times. This solves two problems:
onclick="showReport()" instead of six lines of code.The syntax:
Define your functions inside <script> in the <head>.
That way they exist before any button can call them.
showReport() output if you enter
80, 90 and 70? Work it out by hand first.
<script> tag
from <head> to the very end of <body>? Does the button still work?
Why might someone do that?
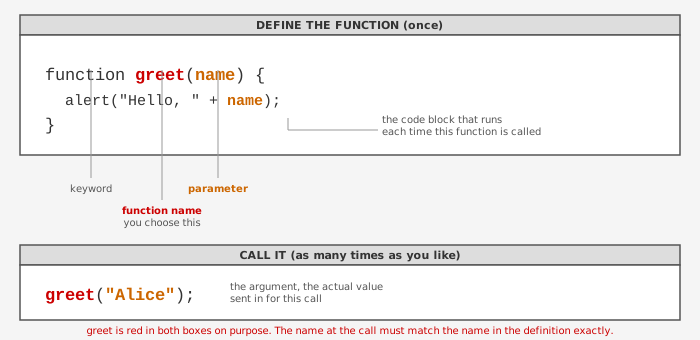
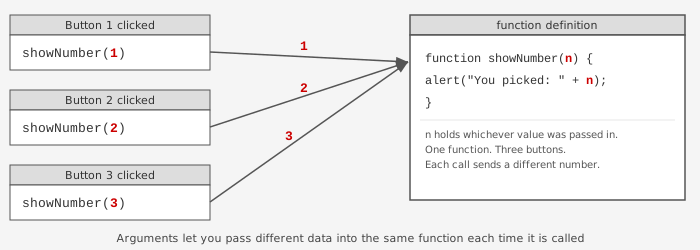
A function can receive data when it is called. The values you pass in are called arguments. The names that receive them inside the function are called parameters.
<script>
function greet(name) {
alert("Hello, " + name + "!");
}
greet("Alice");
</script>
The same function now produces different output depending on what you pass in:
greet("Alice"); gives Hello, Alice!
greet("Bob"); gives Hello, Bob!
greet("class"); gives Hello, class!
You can pass numbers too. This is the key idea behind Checkpoint 3:
<!DOCTYPE html>
<html>
<head>
<script>
function showNumber(n) {
alert("You picked: " + n);
}
</script>
</head>
<body>
<button onclick="showNumber(1)">Button 1</button>
<button onclick="showNumber(2)">Button 2</button>
<button onclick="showNumber(3)">Button 3</button>
</body>
</html>
One function. Three buttons. Each button passes a different value.
showNumber(99),
what appears? What about showNumber("hello")?
Remember what you learned about + and strings.
Part A, Step 1. Four buttons, one function.
In a new file called buttons.html, create four <button> elements. All four call the same
function, buttonClicked(). Type it in and run it:
<!DOCTYPE html>
<html>
<head>
<script>
function buttonClicked() {
alert("A button was clicked!");
}
</script>
</head>
<body>
<button onclick="buttonClicked()">Button 1</button>
<button onclick="buttonClicked()">Button 2</button>
<button onclick="buttonClicked()">Button 3</button>
<button onclick="buttonClicked()">Button 4</button>
</body>
</html>
Part A, Step 2. Identify which button. Right now every button gives the same message. Modify the code so that:
Button #2 was clickedButton #4 was clickedYou may not create more functions. There is still exactly one function when you are done.
Hint: pass a number as an argument when calling buttonClicked(),
and change the function to receive it as a parameter and use it in the message.
Button #2 was clicked, Button 4 says Button #4 was clicked, and there is still only one function.checkpoints.html from Javascript #2. Turn your wall label into a function that takes the title and year as arguments:
<head>
<script>
function showLabel(title, year) {
alert(title + ", YOUR NAME, " + year);
}
</script>
</head>
<body>
<button onclick="showLabel('Night Walk', 2025)">Night Walk</button>
</body>
Add two more buttons, one per artwork, each passing a different title and year.
Comment out the old prompt() lines so they do not run when the page loads.
showLabel function.| Idea | In one sentence |
|---|---|
| Event | Something the user did. A click, a hover. |
| Event handler | The attribute that says what to run when it happens. |
this | Inside a handler, a shortcut for the element it is attached to. |
| Function | A block of code with a name, so it can be called from anywhere. |
| Argument | A value you hand to a function when you call it. |
alert(), prompt(), Number(). Same parentheses, same arguments.
The only difference is who wrote the code inside.
Math. and document.
Make two copies of your buttons.html from Checkpoint 3, Part A. Leave buttonClicked() and Buttons 1 through 3 exactly as they are.
In the first copy, you will ask the agent to create a new function.
Button 4 gets its own, second function, something too "fun and complicated" to
build by hand in the next five minutes. This time you are not writing the code,
you are writing the request. Open your AI's edit or agent mode on this file and
try it twice.
Attempt 1. Step 1
Give it a vague instruction below. Type this in, run it,
see what you get:
When button 4 is clicked, do something fun and complicated: open a new window, play a sound, and change the page's background color to go along with the sound.
Look closely at what came back. Note what the AI decided for you: what size the window is, what kind of sound it picked, how the color changes, how long any of it lasts, whether the page goes back to normal afterward.
Attempt 1 Step 2
Once you are happy with the result, ask your agent to comment at the
top of your file what it is doing and to add descriptive comments on
what each function is doing. Read it carefully.
Attempt 2 Step 1.
Using the second copy, give it the precise instruction below:
Add one new function called wildButton(), attached only to Button 4's onclick. Do not change buttonClicked() or Buttons 1 through 3. When wildButton() runs: 1. Open a new browser window, 300px by 200px, showing the text "Surprise!". 2. Play a one second tone using the Web Audio API (AudioContext and OscillatorNode). Do not load an external sound file. 3. While the tone plays, smoothly slide a rainbow-colored gradient across the page background (for example, animate a CSS linear-gradient's background-position), so the colors blend continuously rather than switching abruptly. 4. When the tone ends, set the background color back to what it was before the button was clicked. Add no other functions.
Run it.
Attempt 2 Step 2
Once you are happy with the result, ask your agent to comment at the
top of your file what it is doing and to add descriptive comments on
what each function is doing. Read it carefully.