The WWW Environment


A web page is a plain text file (HTML). The browser reads that text and draws the page on screen. You are about to learn to write those files.
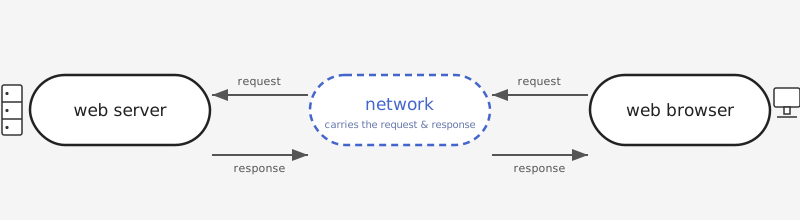
Diagram: web browser sends a request through the network to the web server, which sends back an HTML response
Ask:
"Explain what happens step by step when I type a URL into my browser and press Enter. Keep it simple, I'm a beginner." Read the answer. Then ask a follow-up question about whatever part you don't understand.
The web browser parses the HTML document and displays it according to its parsing algorithm. Different browsers may render some things slightly differently.

Web Browsers


List/genealogy of Web Browsers

Notes

HTML (Hypertext Markup Language)

HTML is the World Wide Web's core markup language. It has been evolving since 1991. Someone who learned HTML 20 years ago can still read HTML today. (Why is this imporant?)

Specification and references:

Ask:
"What is HTML? What can it do and what can't it do on its own?" "What is the difference between HTML, CSS, and JavaScript? Give me a one-sentence summary for each."
Notes

HTML Document: Structure vs. Style


CSS: Visual styling. CSS separates presentation from structure.
JavaScript: Adds behavior. Makes the page dynamic and interactive.
Notes

Tools: Visual Studio Code

Visual Studio Code (VS Code) is the text editor we use in this class. It is free, runs on Mac and Windows, and is used by professional developers worldwide.

Setup steps:

  1. Download and install VS Code
  2. Make sure VS Code is up to date (Code → Check for Updates)

Important habits:

Notes

Creating an HTML File (1): The File


The extension tells the operating system and the browser how to interpret the file:
  • .html → open as a web page
  • .txt → open as plain text
  • .jpg → open as an image
Same content, different extension, completely different result.
Notes

Creating an HTML File (2): The Boilerplate

Every HTML page starts with the same structure. Type this in VS Code and save as my_first_page.html:

  <!DOCTYPE html>
  <html lang="en">
  <head>
    <meta charset="utf-8">
    <title>My First Page</title>
  </head>

  <body>
    This is where content goes.
  </body>

  </html>
  
Ask:
"What does <!DOCTYPE html> do? What would happen if I left it out?" "What is the difference between <head> and <body>? What belongs in each one?" "What does meta charset='utf-8' do and why does it matter?" Then type the boilerplate yourself, don't paste it.
Notes

Creating an HTML File (3): Open and Edit

  1. Save the file in VS Code (Cmd+S)


  2. Open in Browser:
    Open Chrome → File → Open File → find your .html file
    Reload with Cmd+R after saving.

  3. Make a change, add a word to the body, save, and confirm you see the update. This loop (edit → save → preview) is how all web development works.
Note: A few assignments later in the course may need a real local server instead of a plain file. If that comes up, we'll install the Live Server extension then, no need to install it now.
Notes

The Full Template

This is the standard template every HTML file should start with:

  <!DOCTYPE html>
  <html lang="en">
  <head>
    <meta charset="utf-8">
    <title>Page Title Here</title>
  </head>

  <body>

    <!-- Your content goes here -->

  </body>
  </html>
  

VS Code shortcut: In a blank .html file, type ! and press Tab. VS Code will auto-fill the full boilerplate. Try it, then compare it to the template above and ask Copilot about any part you don't recognize.
Note: you must save the blank file with an .html extension first. VS Code uses the file extension to know it should offer HTML shortcuts, so the ! + Tab shortcut will not work on an unsaved or untitled file.
Notes

Lab: Your First HTML Page

  1. Generate the template:
    In VS Code, create a new file named my_first_page.html. On a blank line, type ! and press Tab. VS Code will auto-fill the full boilerplate (see "The Full Template" slide).

  2. Add some content:
    Between the opening and closing <body> tags, type some text of your own, for example Hello World.

  3. Confirm it works:
    Save the file (Cmd+S / Ctrl+S) and open it in the browser. Confirm your text shows up on the page.
Notes

GitHub Copilot: Getting Access

GitHub Copilot is an AI assistant that lives inside VS Code. It can explain code, write code, fix errors, and answer questions all without leaving your editor.

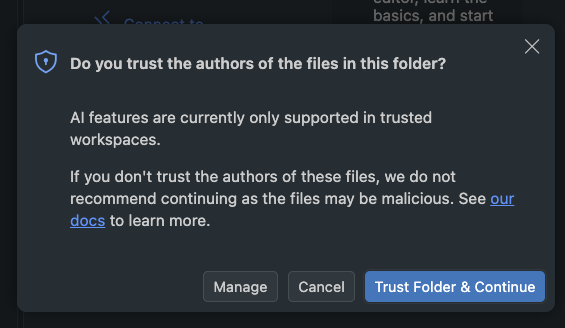
The first time you open a folder in VS Code, a window may ask "Do you trust the authors of the files in this folder?" This is a general VS Code security check, not specific to Copilot. Since it's your own folder, click "Trust Folder & Continue."
VS Code Workspace Trust dialog asking Do you trust the authors of the files in this folder, with Manage, Cancel, and Trust Folder and Continue buttons

Step 1: Start today with Copilot Free (no wait):

  1. Create a GitHub account using "Continue with Google" and your reed.edu account (if you don't have one)
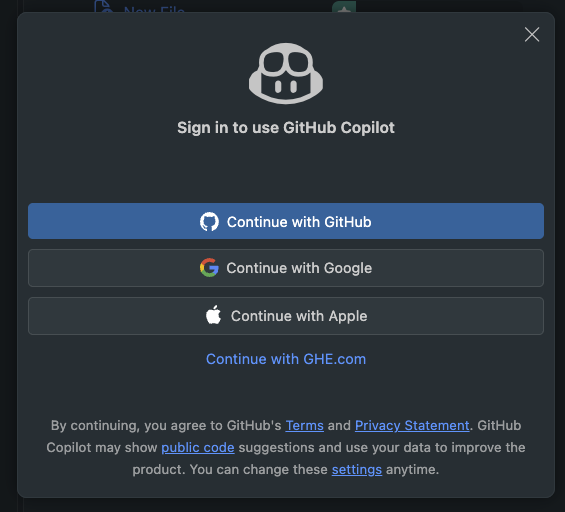
  2. Sign in to GitHub from within VS Code: open the Copilot Chat panel (chat bubble icon at the top of the window, next to your folder name) and type a message. If you're not signed in yet, a "Sign in to use GitHub Copilot" window pops up with several options. Choose "Continue with Google" (not the highlighted GitHub button) and log in with your reed.edu account. Free tier activates automatically
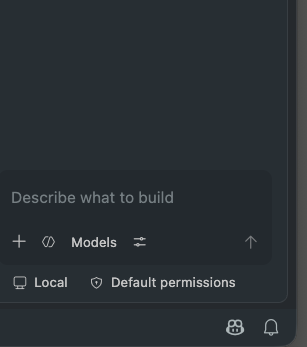
Top of the VS Code window showing the folder name and the Copilot Chat icon circled in red, a speech bubble with a sparkle, next to a dropdown arrow The empty Copilot Chat panel in VS Code, showing a Describe what to build input box with Models picker and a send arrow Sign in to use GitHub Copilot window in VS Code, showing Continue with GitHub, Continue with Google, Continue with Apple, and Continue with GHE.com as options
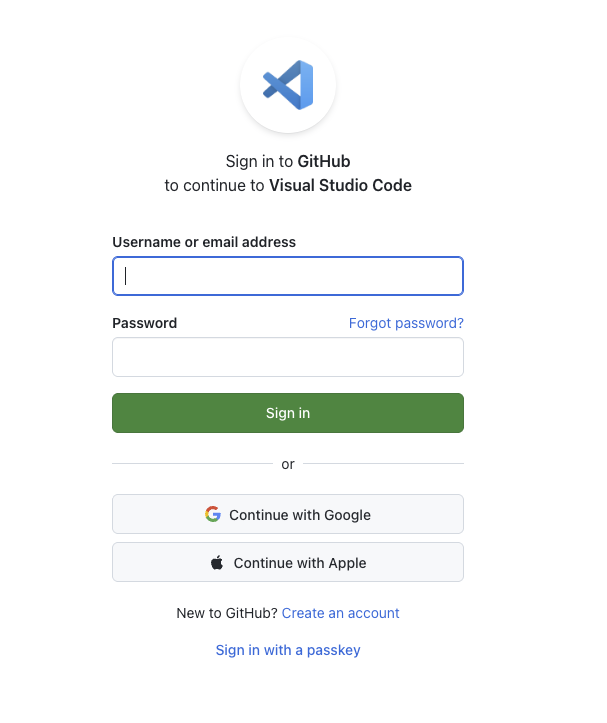
If a full browser tab opens instead, asking for a GitHub username and password, look for "Continue with Google" there too, below the password field. Don't create a separate password account.
GitHub sign in page opened in a browser tab, with username and password fields and a Continue with Google button below them
Copilot Free Copilot Student
Cost Free, anyone Free, school email required
Code completions 2,000 / month Unlimited
Chat / agent use Capped monthly AI-credit allowance, auto-selected models only Higher monthly AI-credit allowance, auto-selected models only
Wait time Instant ~2–3 business days to verify, then up to a week for benefits to activate (longer at semester start)

Step 2: Apply for Student access this week (homework):

  1. Go to education.github.com/students and apply with your school email
  2. Once approved, Copilot upgrades automatically, no reinstall needed
Notes