The Problem...

You have probably made a folder that looks like this:

  essay.docx
  essay_final.docx
  essay_final_FINAL.docx
  essay_final_FINAL_v2.docx
  essay_final_FINAL_v2_actually_final.docx
  

This is manual version control. It works (barely) for a single document. For code, it breaks immediately:


Git solves all of this. It tracks every change you tell it to track, stores a complete snapshot of your project at each point, and lets you move back to any of those points at any time.
The FINAL_v2 folder problem is universal — everyone has done it. The key pain points: (1) no way to compare versions, (2) no clear history, (3) no safety net. Git addresses all three.

What Git Is (and Is Not)

Git is a version control system. It tracks changes to files over time. Every time you take a "snapshot" — called a commit — Git records exactly what your project looked like at that moment, plus a short message from you describing what you did.


Think of it as a timeline of your project:

  [start] ──── [added HTML structure] ──── [added CSS] ──── [added animation] ──── [now]
  

You can jump back to any point on that timeline. You can see exactly what changed between any two points. You can compare what AI gave you to what you kept.


Git is... Git is NOT...
A timeline of snapshots you choose Dropbox / Google Drive (automatic sync)
Local — runs on your computer GitHub — GitHub is a separate thing (more on that later)
Intentional — you decide when to save A backup that runs in the background
A record of decisions A code review tool
The Dropbox distinction is important — students often assume git is automatic like cloud sync. It is always intentional. The "not a tool for catching students" point is worth saying out loud.

The Basic Workflow — Three Steps

Every commit follows the same three-step cycle, whether you do it in the terminal or in VS Code:


1. Stage — choose which changes to include
You tell Git: "these are the changes I want in this snapshot."

2. Commit — save the snapshot with a message
You tell Git: "save this. Here is what it represents."

3. Push — send the commit to GitHub
You tell Git: "put this on GitHub so it's backed up and shareable."

You don't have to push after every commit — commits accumulate locally and you push when you're ready. But pushing often is a good habit.


  Your computer ──── (push) ────► GitHub
       ▲
       │ commit (local)
       │
  Your editor
  
The staging step trips students up. The clearest analogy: staging is like packing a box before you seal it. You choose what goes in, then you seal (commit), then you ship (push).

Using Git in VS Code

VS Code has a built-in Git panel. You'll do most of your Git work here — no terminal commands needed.


How to find it:
Click the Source Control icon in the left sidebar (it looks like a branching diagram), or press Ctrl+Shift+G.


The three steps in VS Code:

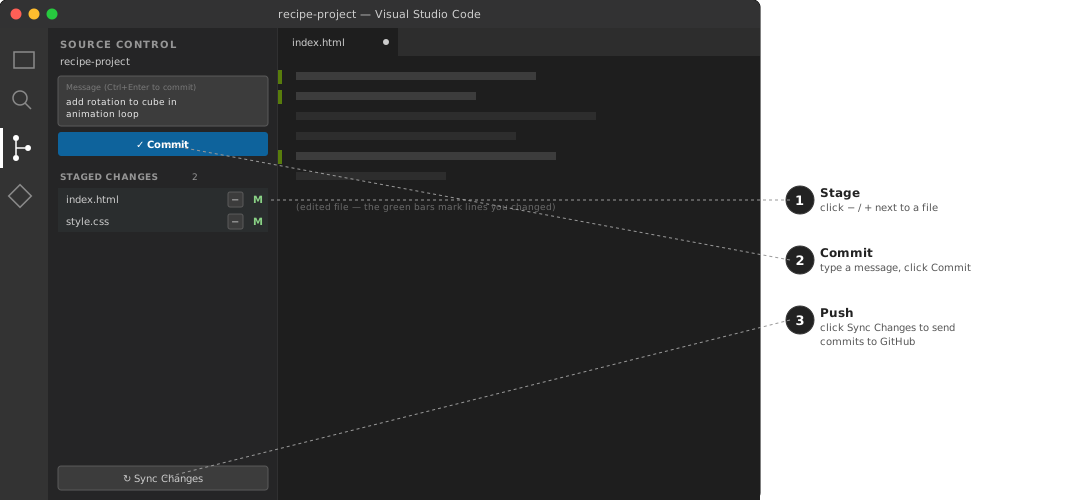
  1. Stage — Changed files appear in the Source Control panel. Click the + button next to a file to stage it, or click Stage All Changes to stage everything.

  2. Commit — Type your commit message in the text box at the top, then click the Commit button (or press Cmd+Enter).

  3. Push — Click the Sync Changes button (circular arrows) to push to GitHub.

Ask:
"How do I initialize a git repository for my project in VS Code without using the terminal?" "What does the Source Control panel in VS Code show me? What do the colored indicators on my files mean?"

Copilot can also run git commands for you. In Agent mode, you can ask: "Initialize a git repository in this folder and make an initial commit." Copilot will run the terminal commands. You should still know what it did and why.
Most students will use VS Code's Source Control panel. The terminal is important to know conceptually, but the GUI is fine for daily work. Copilot in Agent mode can also run git commands — which is great, as long as students understand what it ran.

Demo — Initialize Repository vs. Publish to GitHub

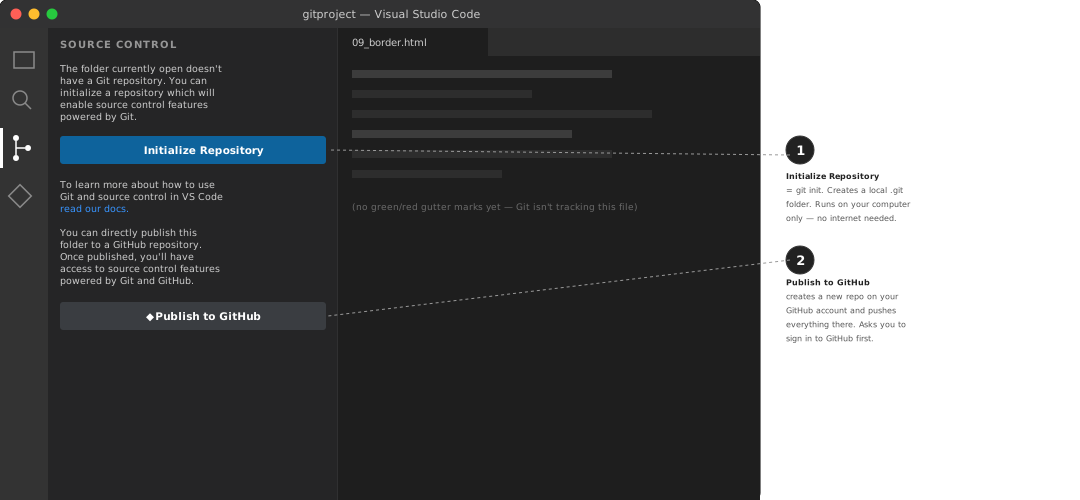
The first time you open the Source Control panel in a new folder, you'll see two buttons. They do very different things.


Initialize Repository = git init. Local only. Starts tracking the folder on your computer. No account, no internet required.

Publish to GitHub = creates a repo on your GitHub account and pushes your commits to it in one step. It will ask you to sign in the first time. You don't need to do this right away, and some assignments may not need it at all.
Students often click Publish to GitHub immediately, thinking it's required to "start" using git. Clarify: Initialize Repository is the only required first step. Publishing is for backup/sharing and can happen later, or never, depending on the assignment. If they click Publish before ever committing, VS Code will still walk them through it, but it's worth doing at least one local commit first so they understand what's being published.

Demo — Committing in VS Code

Here's what the three steps actually look like on screen. Your changed files show up under Staged Changes once you click the + / next to them, then you write a message and click Commit, then Sync Changes to push.


Walk through this live if possible — a real screen share of the Source Control panel is even better than the mockup. Point out that the green M badge means "modified," and that the Commit button is disabled/greyed out until there's a message typed in.

Demo — Going Back to an Older Version in VS Code

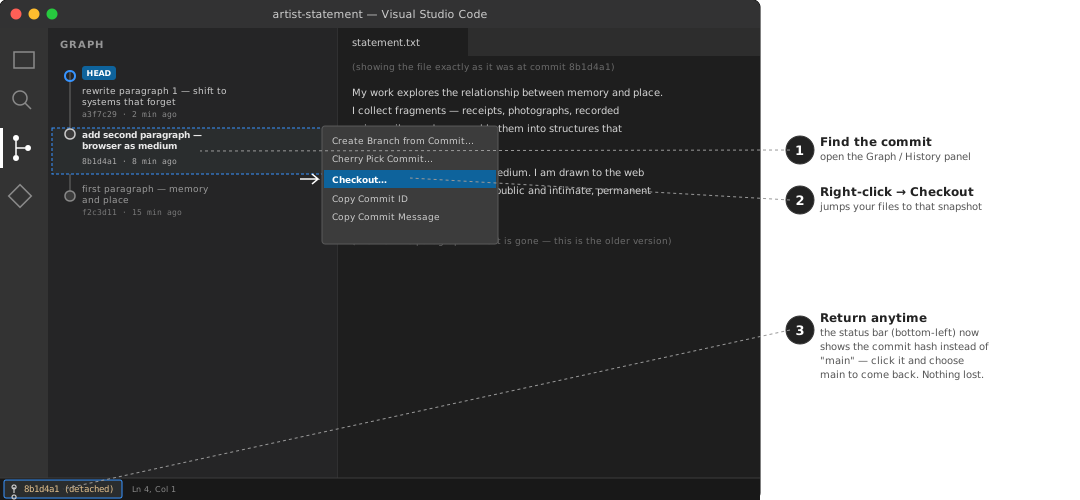
To see or restore an earlier snapshot, open the Graph (or Timeline/History) panel in Source Control, right-click the commit you want, and choose Checkout. Your files instantly change to match that point in time.


The "detached HEAD" banner is the part students find scary. Reassure them: nothing is lost, and clicking back to 'main' returns them to the latest commit exactly as it was. This is the same idea as the earlier "Going Back" slide, just showing where the buttons actually are.

Key Vocabulary

You don't need to memorize commands right now. You do need to know these words — because Copilot, GitHub, and every tutorial you find will use them.


WORKING DIR your edited files not yet in git STAGING AREA selected changes ready to commit LOCAL REPO commits + branches on your computer REMOTE GitHub online backup git add git commit git push git pull repository — lives on your computer on the internet
Term What it means
repository (repo) A folder that Git is tracking. Your project folder, once you've initialized Git in it.
commit A saved snapshot. One point on the timeline. Includes all your files at that moment, plus a message you write.
staging / stage Choosing which changes to include in the next commit. Like deciding what goes in the photo before you take it.
remote A copy of your repo stored somewhere else — usually GitHub. Your local repo and the remote stay in sync when you push/pull.
push / pull Push = send your commits to GitHub. Pull = get changes from GitHub onto your computer.
branch A parallel version of your project. You won't use branches much in this course, but you'll see the word constantly.
merge Combining two branches. Also something you'll see but won't need much.
Ask:
"Explain the difference between a git commit and a git push. Use an analogy." "What is staging in git? Why does git have a staging step instead of just committing directly?"
Students can look up commands easily. What they need to internalize are the nouns — repo, commit, remote, branch — because those words will appear everywhere and cause confusion if they don't know them.

The Anatomy of a Commit

Every commit contains four things:


COMMIT a3f7c29 MESSAGE "add animation loop to cube scene" AUTHOR you@reed.edu DATE Wed Oct 15 14:22:11 2025 SNAPSHOT index.html · style.css · main.js complete copy of every tracked file unique ID (hash) you write this auto-filled auto-filled auto-captured project timeline set up scene b9e2a11 add CSS f1c44d8 add JS logic 9da7b33 add animation a3f7c29 HEAD

Git log shows you the history — a list of every commit, most recent first:

  commit a3f7c29 (HEAD)
  Author: Your Name <you@reed.edu>
  Date:   Wed Oct 15 14:22:11 2025

      add animation loop to cube scene

  commit 8b1d4a1
  Author: Your Name <you@reed.edu>
  Date:   Wed Oct 15 13:55:04 2025

      set up three.js scene with basic cube
  

Each commit is a checkpoint you can return to. If something breaks, you can always go back to any of these points.

The hash (commit ID) is important for going back in time — git checkout <hash> — but students don't need to know that command yet. The main concept is that each commit is a named, timestamped, identified point.

Commit Messages — What to Write

A commit message is short — usually one sentence. It should describe what decision you made, not just what file you changed.


Weak ✗ Better ✓
update file add rotation to cube in animation loop
changes replace Copilot's color picker with a slider — felt more tactile
fixed fix camera position — scene was rendering behind the cube
stuff initial three.js scene — cube renders, no animation yet
copilot code accept Copilot's orbit controls — works as expected

The rule: Future-you reading this message six weeks later should know exactly what was decided at this point — and why. "update file" tells you nothing. "replace animation speed jump with lerp easing" tells you the decision.
Ask:
"Write a good git commit message for this change: I accepted Copilot's suggestion to add an orbit controls library to my three.js scene." Then rewrite it yourself in your own words — the message should be yours.
Commit message quality is a direct signal of engagement. A student with "update file" × 30 commits is vibe-coding. A student with "remove Copilot's fog effect — too heavy, slowed rendering" is making decisions. Worth showing side-by-side in class.

The Commands — What They Do

You'll mostly use Copilot or VS Code's Source Control panel rather than typing these. But you need to know what each command does — so that when Copilot uses one, you know what happened.


Command What it does
git init Start tracking the current folder. Creates a hidden .git/ folder inside it. Do this once per project.
git status Show what has changed since the last commit. What's new, what's modified, what's staged. Run this constantly.
git add . Stage everything that has changed. The . means "all files." You can also stage specific files: git add index.html
git commit -m "message" Save the staged changes as a commit. The -m flag lets you write the message inline.
git push Send your local commits to GitHub (or another remote). The first time you push a new project, it may ask you to set up the remote first.
git log Show the history of all commits — most recent first. Each entry shows the message, author, date, and hash.
git diff Show exactly what changed since the last commit — line by line. Green = added, red = removed.
Students don't need to type these from memory. The goal is recognition — when VS Code's Source Control panel does something, or when Copilot uses one of these in a terminal command, students should be able to say "I know what that is." git status is the one to emphasize: run it constantly.

Git vs. GitHub — Not the Same Thing

These two words get confused constantly. They are different things.


Git GitHub
Software that runs on your computer A website (github.com) that stores git repos online
Tracks your changes locally Stores a backup copy you can push to
Works offline Requires internet
Open source, owned by no one Owned by Microsoft
Does nothing visible Shows your commit history publicly (or privately)

GitHub is also a portfolio. Your public repos — and your commit history — are visible to anyone. For creative web work, GitHub is where your process lives. Future collaborators, employers, and professors can see not just the finished work, but how it was built.


Analogy: Git is your journal. GitHub is a shelf where you keep your journals where others can read them if you let them.
This confusion causes real problems — students will say "I pushed to git" when they mean GitHub, or assume GitHub is required when it isn't. Emphasize: git runs offline on your machine. GitHub is the remote backup and portfolio host.

Git as a Creative Record

In most programming courses, Git is introduced as a technical safety tool — "so you don't lose your work." That's true, but it misses the more interesting use.


In this course, your commit history is your decisions log in code form.


Every time you accept something from AI and it works — commit it. Every time you change something AI gave you — commit it, and say why. The result is a timeline that shows not just what you built, but how you thought.


A commit history that says:
  "accept Copilot's basic three.js scene"
  "change cube to sphere — cube felt too expected"
  "slow down rotation speed — was too fast to read"
  "replace Copilot's flat color with gradient material — more interesting"
  "add mouse interaction — rotation follows cursor"
    
...is a record of creative judgment. It shows what you changed and why — something no finished file can show.

This also solves the attribution question: if a professor or collaborator asks "did you write this or did AI?" — your commit history shows the actual answer.

This framing — commits as creative decisions, not just technical saves — is what distinguishes the course's use of Git from typical CS instruction. Worth spending real time on this slide. The sample commit history above is worth reading aloud in class.

Going Back — Returning to an Earlier State

Because every commit is a complete snapshot, you can return to any point in your history at any time. This is one of the most useful things Git does — and one of the main reasons to commit often.


A realistic scenario:
Your three.js scene is working. You ask Copilot to add a shader effect — it commits that. You then try to adjust it yourself. Now nothing renders. You have no idea what broke. Without Git, you'd be stuck. With Git, you go back to the last commit where the scene worked and start the shader attempt fresh.

set up scene add geometry add color ✓ scene works Copilot: shader HEAD nothing renders git checkout <hash> returns you to this exact snapshot go back to here

How to do it in VS Code:

  1. Open the Source Control panel → click History to see all commits
  2. Or use the Timeline panel at the bottom of the Explorer sidebar
  3. Right-click any commit → Checkout

Terminal reference:
git log --oneline — see all commits and their short hashes
git checkout a3f7c29 — go back to that snapshot (read-only; your other commits are still there)
git checkout main — return to the present

Git has several ways to undo things (checkout, revert, reset) with different tradeoffs. As a beginner, ask Copilot which to use for your specific situation before running anything.
Ask:
"I want to go back to a previous commit to see how my code looked then, without losing my recent commits. What is the safest way to do this in git?"
Going back is one of the most motivating demonstrations of why students should commit often — it only works if there are commits to go back to. Detached HEAD state will confuse students; the practical answer is always "ask Copilot which command is right for this situation." The key concept: your history is never destroyed by going back — you can always return to the present with git checkout main.

When to Commit

You do not commit every single save. You commit at meaningful moments — when something works, when you make a decision, when you accept or change something from AI. This is the same habit professionals use.


Commit when:
  • You get something working for the first time — even if it's small
  • You accept something Copilot gave you and it does what you wanted
  • You change something Copilot gave you — commit and say why you changed it
  • You've just finished a meaningful step and are about to try something new
  • Before you make a big change to code that currently works — so you can go back if needed

~45 min of work — JS click counter + animation — 9 commits initial empty HTML add button + output div declare count = 0 onclick works! ✓ Copilot: setInterval (AI) bug: anim too fast fix: clear interval (fix) slow: 100ms → 350ms CSS: hover + colors (AI) = Copilot output accepted as a commit    (fix) = bug introduced and fixed
A rule of thumb: If you'd be frustrated to lose the last hour of work, commit now.

For Phase 2 and Phase 3 projects, your commit history is a graded artifact. A submission with one commit ("final version") shows no process. A submission with 8–12 commits showing incremental decisions shows engaged, thoughtful work.

What professional teams add on top of this: In a team setting, each person works on a separate branch and commits freely there. Before merging into the shared codebase, those commits go through a pull request — a review process. Teams sometimes also squash many small commits into one clean commit before merging, so the shared history stays readable. The underlying habit — commit at meaningful moments, write descriptive messages — is identical.
Ask:
"What are common mistakes beginners make when using git? What should I watch out for?" "What does 'detached HEAD state' mean in git? Should I be worried if I see that message?"
The "one commit = final version" failure mode is very common. Setting the expectation early — commits are graded for meaningful increments, not just presence — shapes student behavior. Copilot can also help students figure out what to commit when they're unsure.

Git Isn't Just for Code

Git works on any plain text file — not just HTML, CSS, and JavaScript. If you're writing a thesis, a long essay, or any document where you make significant revisions over time, Git can track that too.


What this looks like for a thesis:
  "first full draft of chapter 2"
  "restructure argument — moved section 3 before section 2"
  "advisor feedback incorporated — introduction rewritten"
  "cut 800 words from lit review per advisor note"
  "final proofread pass"
    
Each commit is a named checkpoint. You can go back to any earlier draft at any time. You can see exactly what changed between drafts. If you decide the restructure was wrong, you can recover the original.

The one constraint: Git works best with plain text files — .md, .txt, .html. It can track Word documents (.docx), but it can't show you a readable diff of what changed inside them. For a thesis, writing in Markdown or plain text and converting to a final format at the end is a workflow many writers use for exactly this reason.


GitHub even renders Markdown files directly — so a thesis tracked in Git and pushed to GitHub is readable in a browser, with a full revision history anyone can browse.
This slide is worth a brief mention for students who are writing a thesis or long paper alongside the course. The argument: the habits you're building for code — commit often, write descriptive messages, use history to recover — transfer directly to any long-form writing project. The plain text constraint is real but easy to work around with Markdown.

Walkthrough — Git with a Text File, Step by Step

Every step below uses the same commands you would use with code. The example is a short artist statement being written and revised. Follow along — the file is called statement.txt.


1 — Start tracking the folder

  $ git init
  Initialized empty Git repository in /artist-statement/.git/
  

2 — Write a first paragraph. Stage it. Commit it.

statement.txt

My work explores the relationship between memory and place.
I collect fragments — receipts, photographs, recorded voicemail —
and reassemble them into structures that resist easy narrative.
  $ git add statement.txt
  $ git commit -m "first paragraph — memory and place"
  

git add is required here because statement.txt is a brand new file — git has never seen it before and won't track it automatically. Once a file has been added, you don't need to git add it again for future changes.


3 — Write a second paragraph. Commit again.

statement.txt

My work explores the relationship between memory and place.
I collect fragments — receipts, photographs, recorded voicemail —
and reassemble them into structures that resist easy narrative.

The browser is my primary medium. I am drawn to the web because
it is simultaneously public and intimate, permanent and ephemeral.
  $ git commit -am "add second paragraph — browser as medium"
  

The -a flag stages all changes to already-tracked files automatically. No separate git add needed.


4 — Try a different direction. Rewrite paragraph 1. Commit that too.

statement.txt

My work is interested in systems that forget. GPS coordinates
that drift. Timestamps that contradict. I build things that
fail in precise ways.

The browser is my primary medium. I am drawn to the web because
it is simultaneously public and intimate, permanent and ephemeral.
  $ git commit -am "rewrite paragraph 1 — shift to systems that forget"
  
Three ways to stage — same result, different control:

git add statement.txt  — stage one specific file. Required the first time a new file is added.

git add .  — stage everything that has changed. Useful when you have multiple files and want to commit all of them.

git commit -am "message"  — skip the staging step entirely for already-tracked files. Fastest option for a single ongoing file.

5 — Look at your history

  $ git log --oneline

  a3f7c29  rewrite paragraph 1 — shift to systems that forget
  8b1d4a1  add second paragraph — browser as medium
  f2c3d11  first paragraph — memory and place
  

Three snapshots. Each one a decision.


6 — See exactly what changed in the last commit

  $ git diff HEAD~1

  - My work explores the relationship between memory and place.
  - I collect fragments — receipts, photographs, recorded voicemail —
  - and reassemble them into structures that resist easy narrative.
  + My work is interested in systems that forget. GPS coordinates
  + that drift. Timestamps that contradict. I build things that
  + fail in precise ways.
  

Lines beginning with - were removed. Lines beginning with + were added. HEAD~1 means "the commit just before the current one."


7 — The rewrite isn't working. Go back to the previous version.

You want to return to the state after Step 3 — both paragraphs, original first paragraph. Copy the hash from git log:

  $ git checkout 8b1d4a1
  

statement.txt now reads:

My work explores the relationship between memory and place.
I collect fragments — receipts, photographs, recorded voicemail —
and reassemble them into structures that resist easy narrative.

The browser is my primary medium. I am drawn to the web because
it is simultaneously public and intimate, permanent and ephemeral.

The rewrite commit still exists in the history — nothing was deleted.


8 — Come back to the present

  $ git checkout main
  

You are back at the most recent commit. All three commits are intact. You can go back and forward as many times as you like.


9 — Push to GitHub

All of the above happened locally — only on your computer. To send your commits to GitHub, you push. The first time, you need to tell git where to send them:

  $ git remote add origin https://github.com/yourname/artist-statement.git
  $ git push -u origin main
  

After that first setup, every subsequent push is just:

  $ git push
  

In VS Code, the first push appears as a Publish Branch button in the Source Control panel — it handles the setup automatically.

The point: Git didn't protect you from making a bad revision — it protected you from being stuck with it. Push gets that history off your machine and onto GitHub — backed up, shareable, and visible as a portfolio of your process.
Walk through this live in class with a plain text file open in VS Code. Key moments to pause: after git log (have students read the three commit messages aloud — does the history tell the story?), after git diff (the +/- format is unfamiliar but immediately readable once you see it), and after git checkout (show that the file literally changes in the editor window). The return to main reassures students that going back is always reversible.
Lab — Initialize and Make Your First Commits

  1. Ask before you do:
    Open Copilot Chat in Ask mode and type: "I am about to initialize a git repository for a web project. Walk me through the steps and explain what each step does. Assume I'm a beginner." Read the explanation. Ask about anything you don't understand.

  2. Set it up:
    Open a Phase 1 assignment folder in VS Code. Use the Source Control panel (or Copilot in Agent mode) to initialize a git repo in that folder. Make an initial commit with the message: initial commit — starting file

  3. Make 2 more meaningful commits:
    Make a real change to your HTML or CSS — something intentional, not random. Stage and commit it with a message that describes the decision. Repeat once more. You should have 3 commits total.

  4. Look at your history:
    In the Source Control panel, open the Timeline or run git log --oneline in the terminal. Read your own commits back. Do they tell the story of what you did?

  5. Optional — push to GitHub:
    Create a repository on github.com and push your project. Ask Copilot to walk you through the steps if you haven't done this before.

You're done when: you have at least 3 commits with commit messages that describe real decisions — not just "update file" or "changes."
The lab is intentionally simple — the goal is the habit, not the complexity. Students who have 3 descriptive commits have internalized the core idea. GitHub push is optional here; it becomes required for Phase 2 submissions.