How to use your Google Cloud education credits to chat with Gemini (and other models) inside
VS Code's Copilot Chat panel.
What you will end up with
Gemini models listed in the Copilot Chat model picker in VS Code, billed to your own Google
Cloud project and paid for by your education credits. You will set things up once in the
Google Cloud Console, download a key file, and hand that key to a VS Code extension. You do
not need to install the Google Cloud command-line tool (gcloud).
You will need:
Your reed.edu Google account.
The coupon code for the education credits.
VS Code (version 1.110 or newer) with Copilot Chat, signed in with your GitHub account.
Part 1: Google Cloud
Step 1: Redeem the education credits
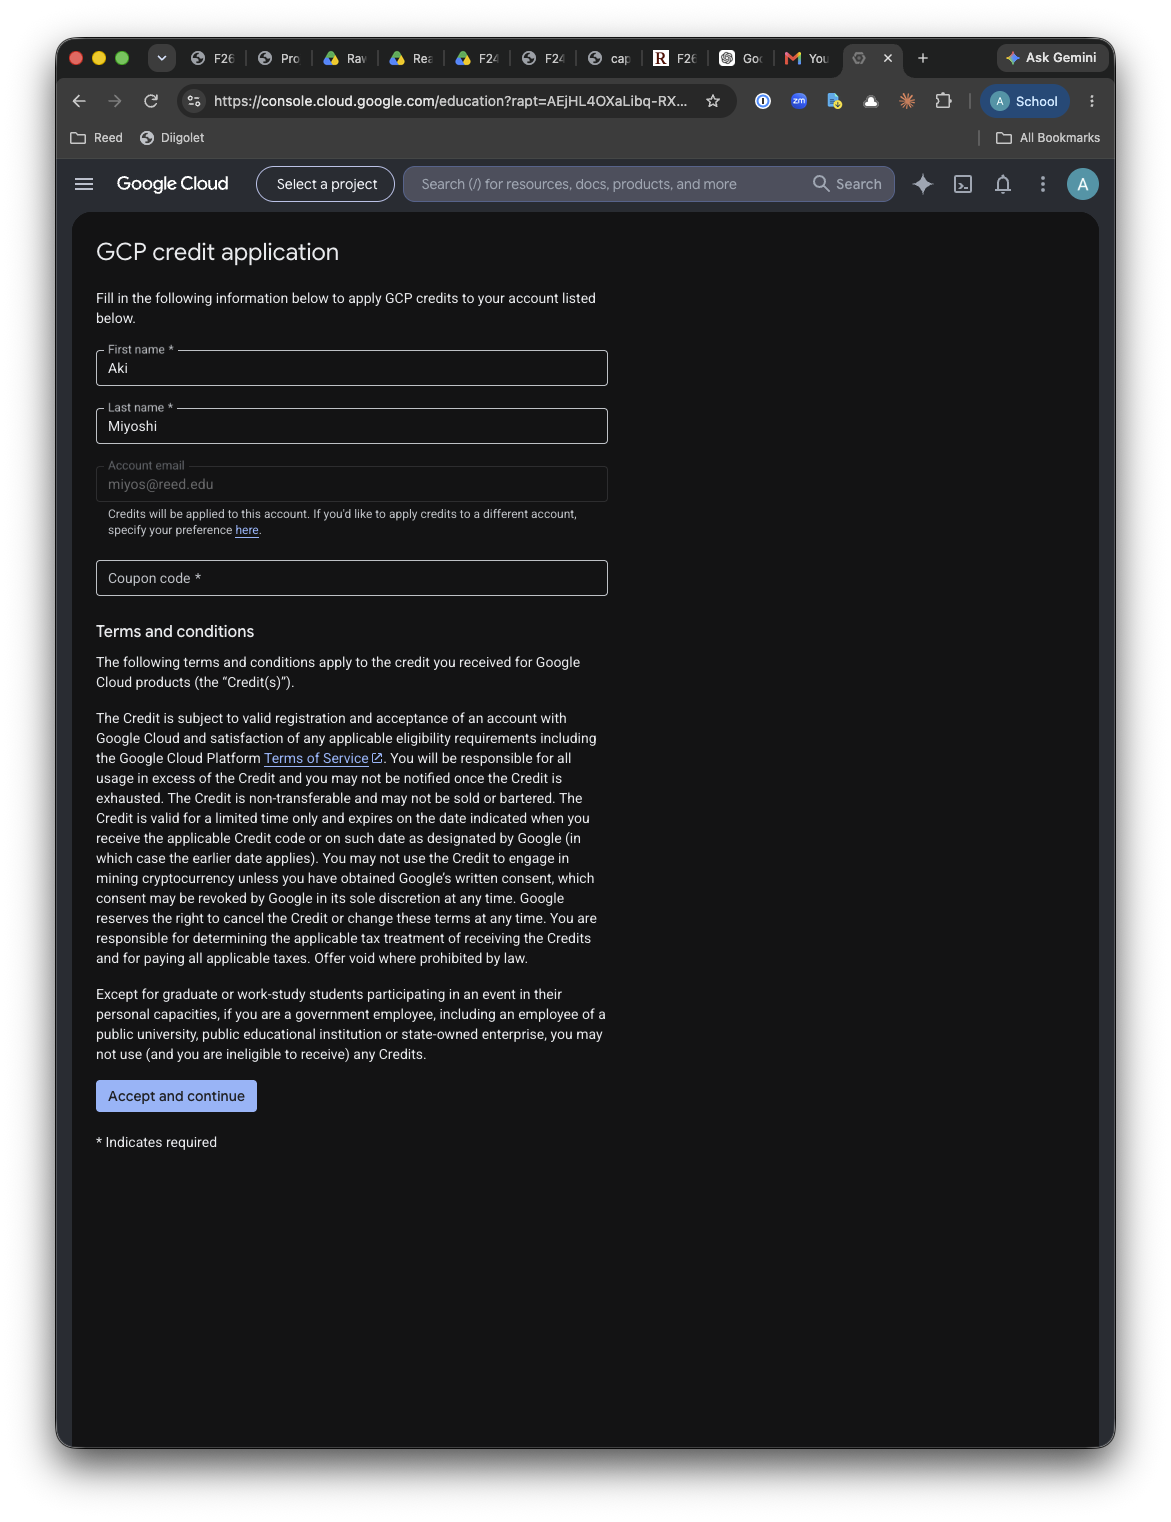
Open the credit application link you were given. Fill in your name and make sure the account
email is your reed.edu address. Enter the coupon code and accept the terms.
The GCP credit application form, signed in with a reed.edu account, with a field for the
coupon code.
Watch out for
Use your reed.edu account, not a personal Gmail. Otherwise the credits will not be
connected to the Reed organization you pick in Step 2.
The coupon code is single-use. Do not share it.
Step 2: Create a project
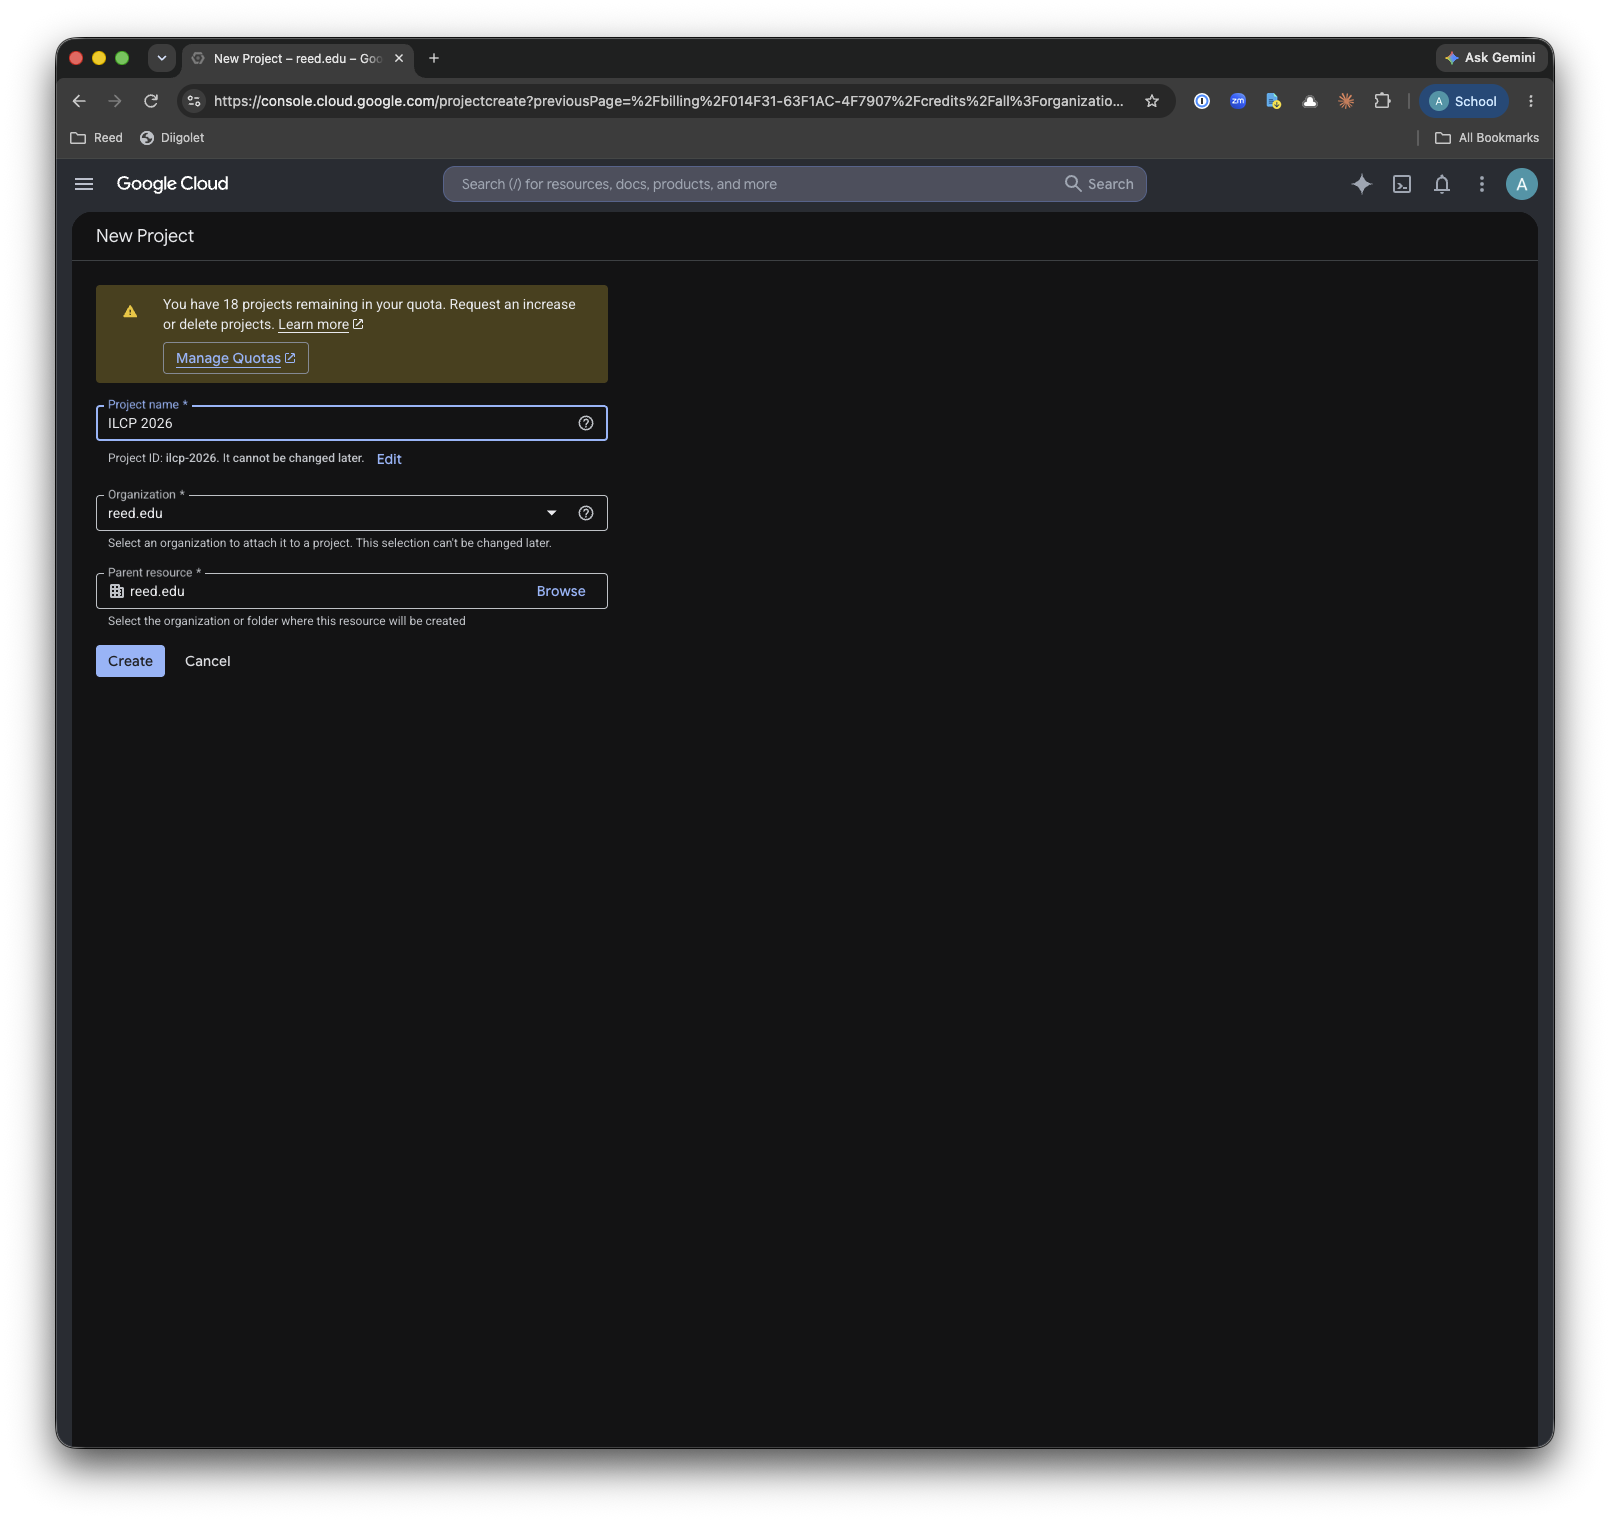
Create a new project in the Google Cloud Console. Give it a name (for example "ILCP 2026"),
and choose reed.edu as the organization and as the location.
The New Project form: project name ILCP 2026, organization reed.edu, location reed.edu.
Google turns the name into a Project ID (here ilcp-2026).
Write the Project ID down. You will type it into VS Code in Step 8.
Watch out for
The Project ID cannot be changed later. If you want a different one, click Edit next to
it before clicking Create.
Step 3: Enable the Agent Platform API
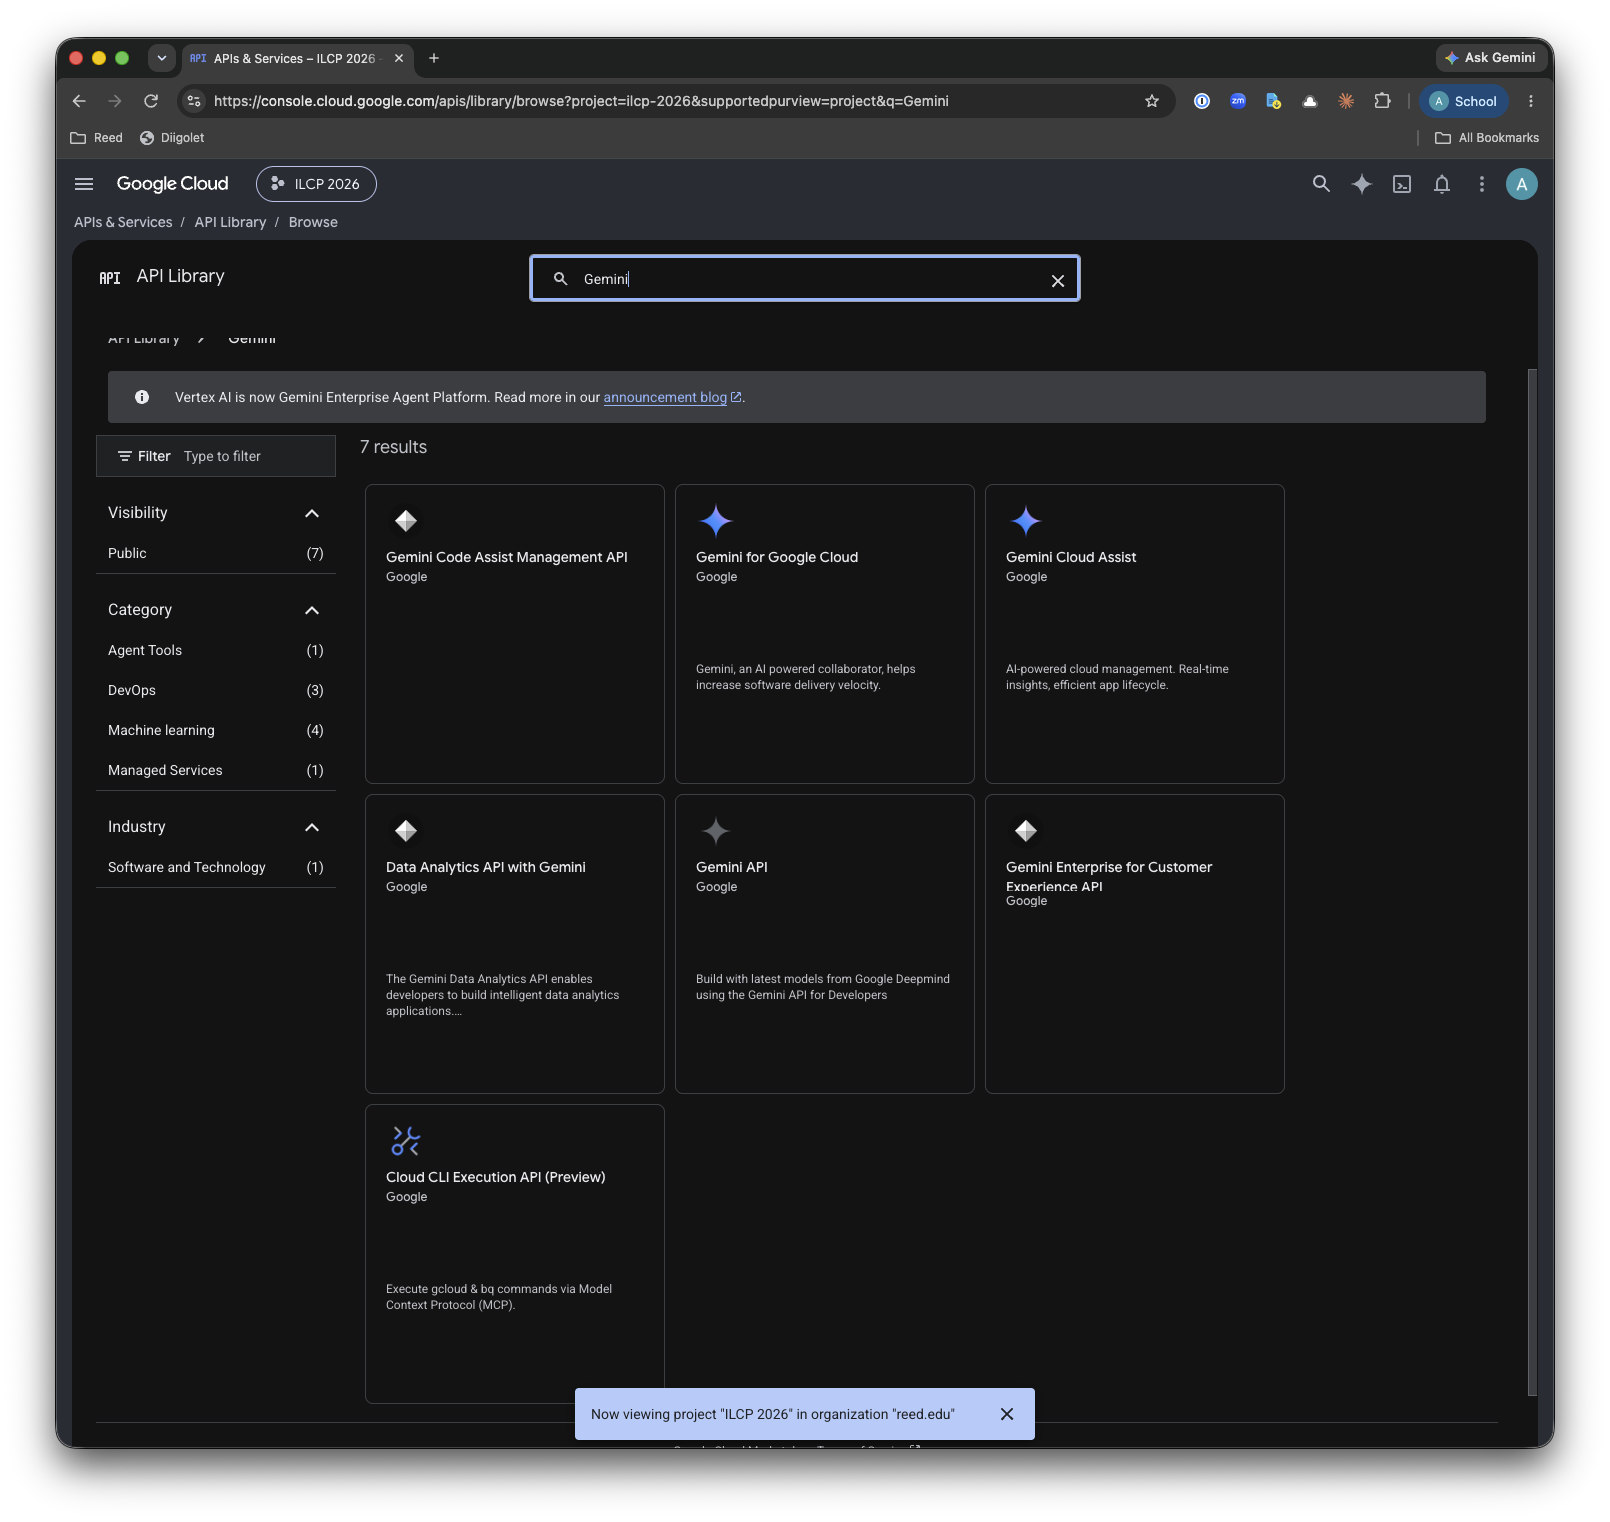
Go to APIs & Services > Library, search for "Agent Platform API", open
it, and click Enable. Make sure your new project is selected at the top of the
page first.
The API Library. A banner notes that Vertex AI is now called Agent Platform.
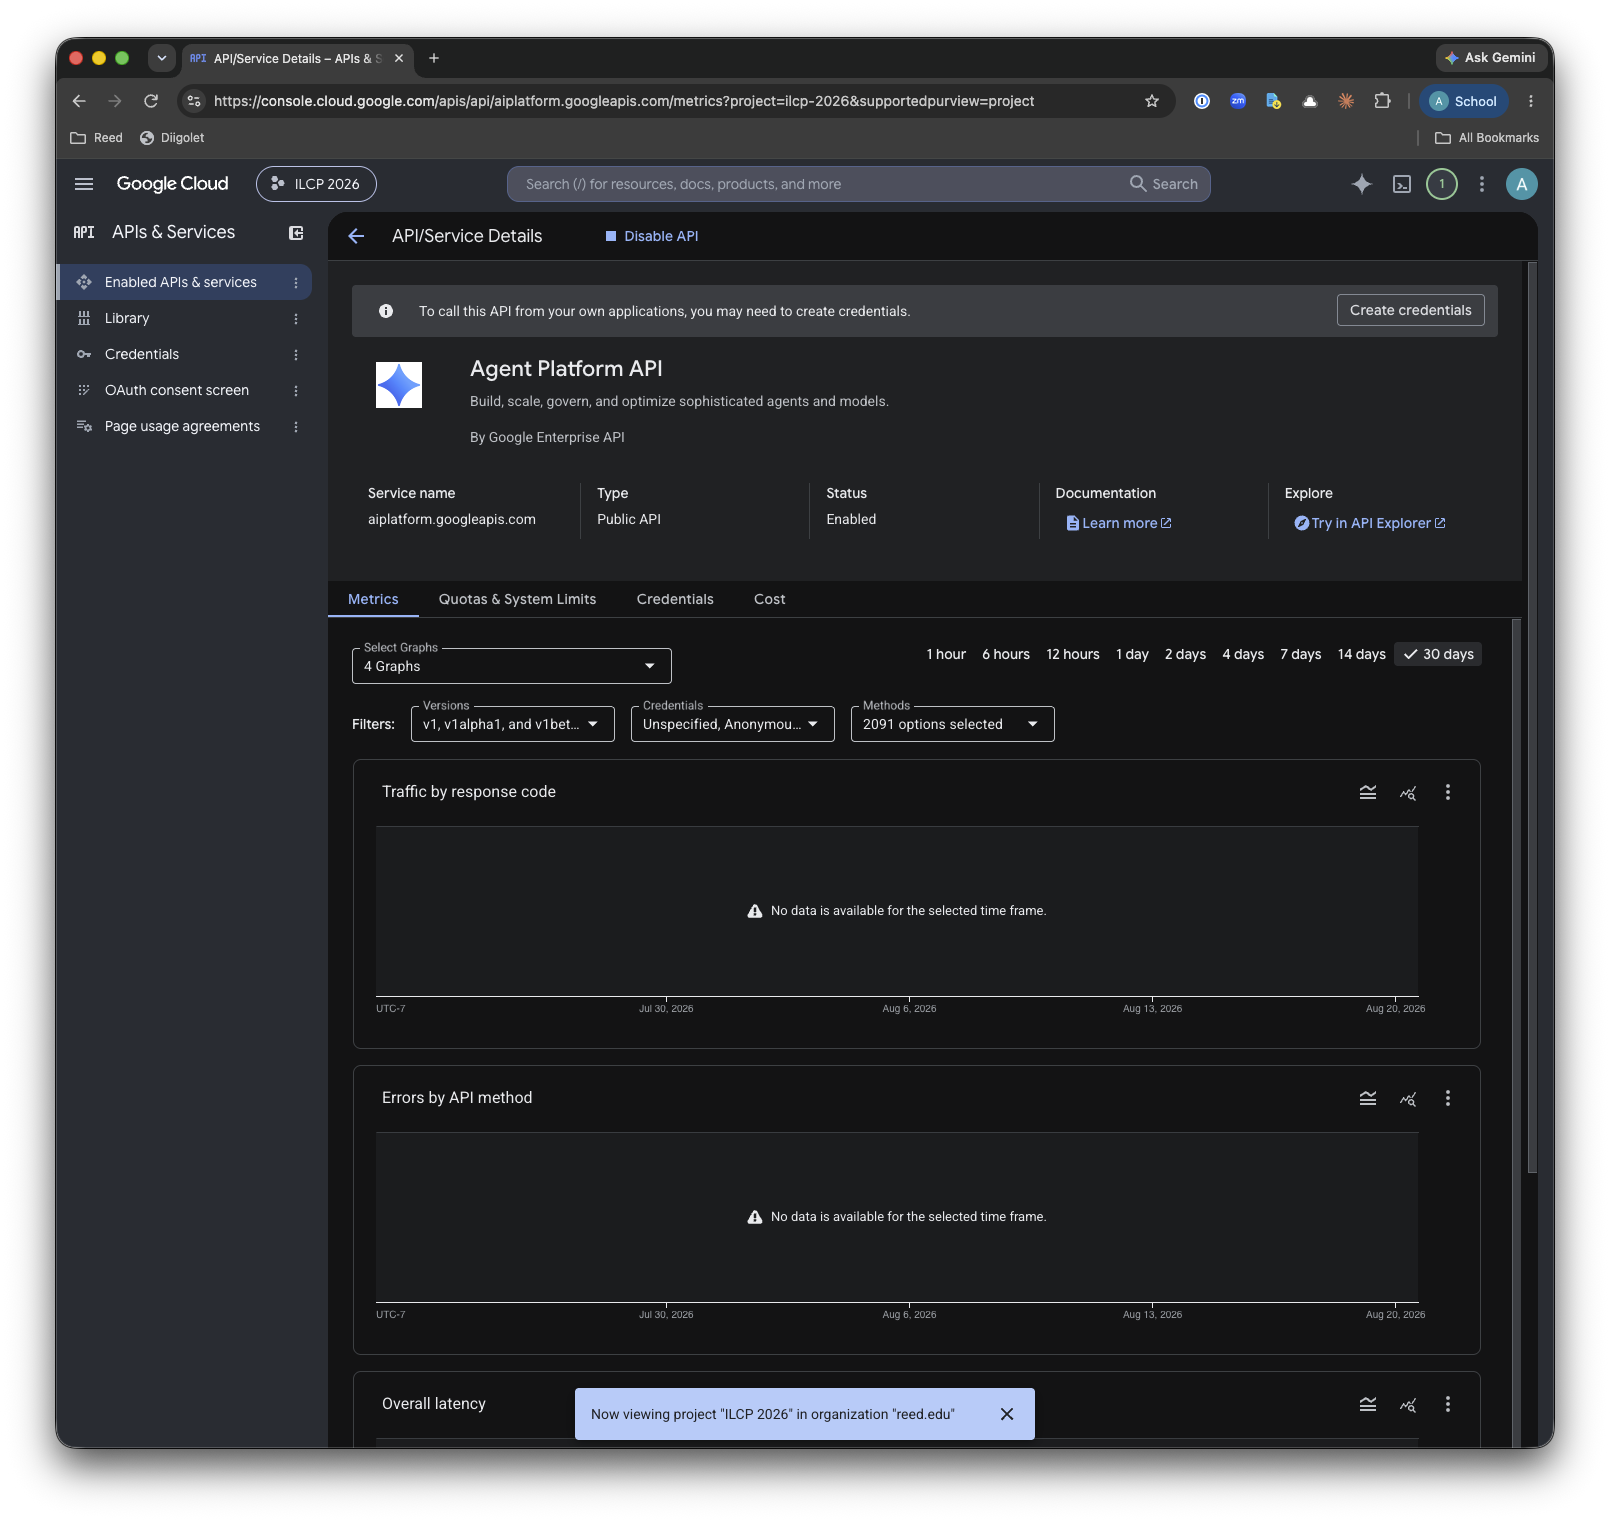
The Agent Platform API page, showing Status: Enabled.
Watch out for
Google renamed Vertex AI to "Gemini Enterprise Agent Platform" in 2026. Older tutorials,
and some menus, still say Vertex AI. They are the same thing.
This is the only API you need. If the console later suggests enabling a long list of
other APIs, you can ignore it.
Step 4: Create a service account
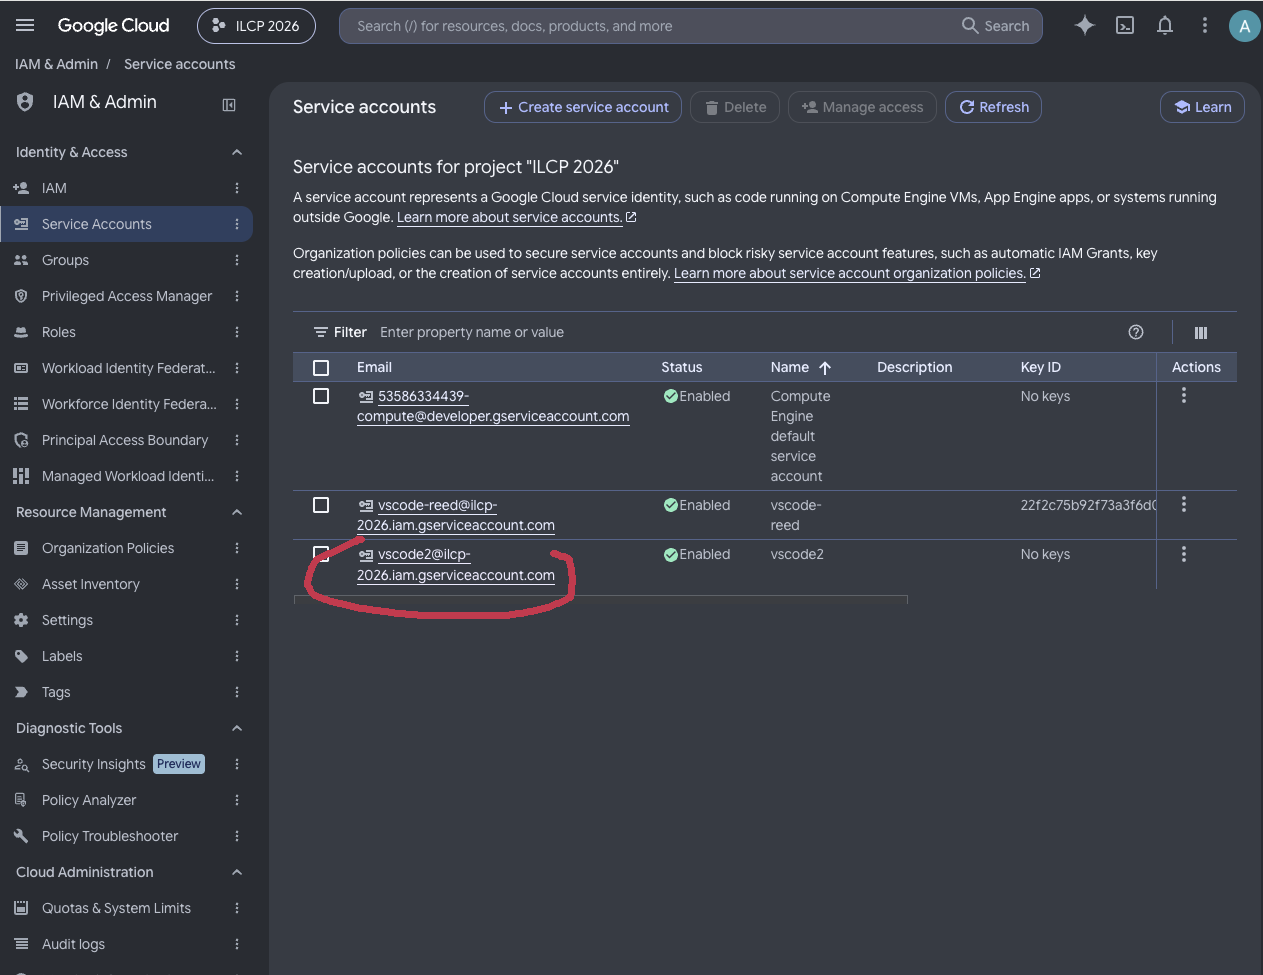
A service account is a separate identity that VS Code uses to call the models for you. Go to
IAM & Admin > Service Accounts and click Create service
account. Name it something like vscode. On the Permissions step, give it
the role Agent Platform User. You can skip the last optional step.
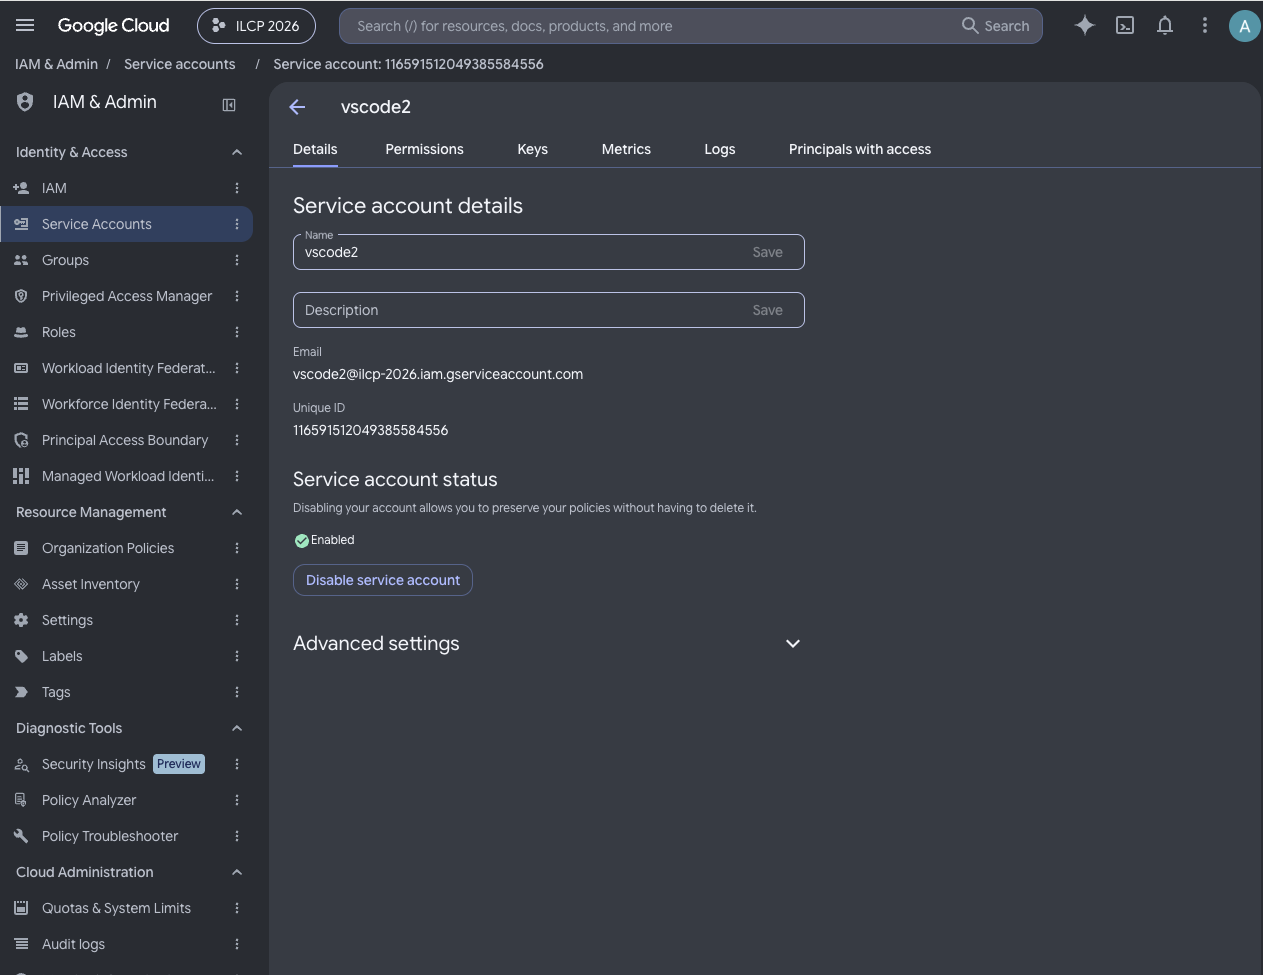
The Service account details page, under IAM & Admin > Service Accounts.
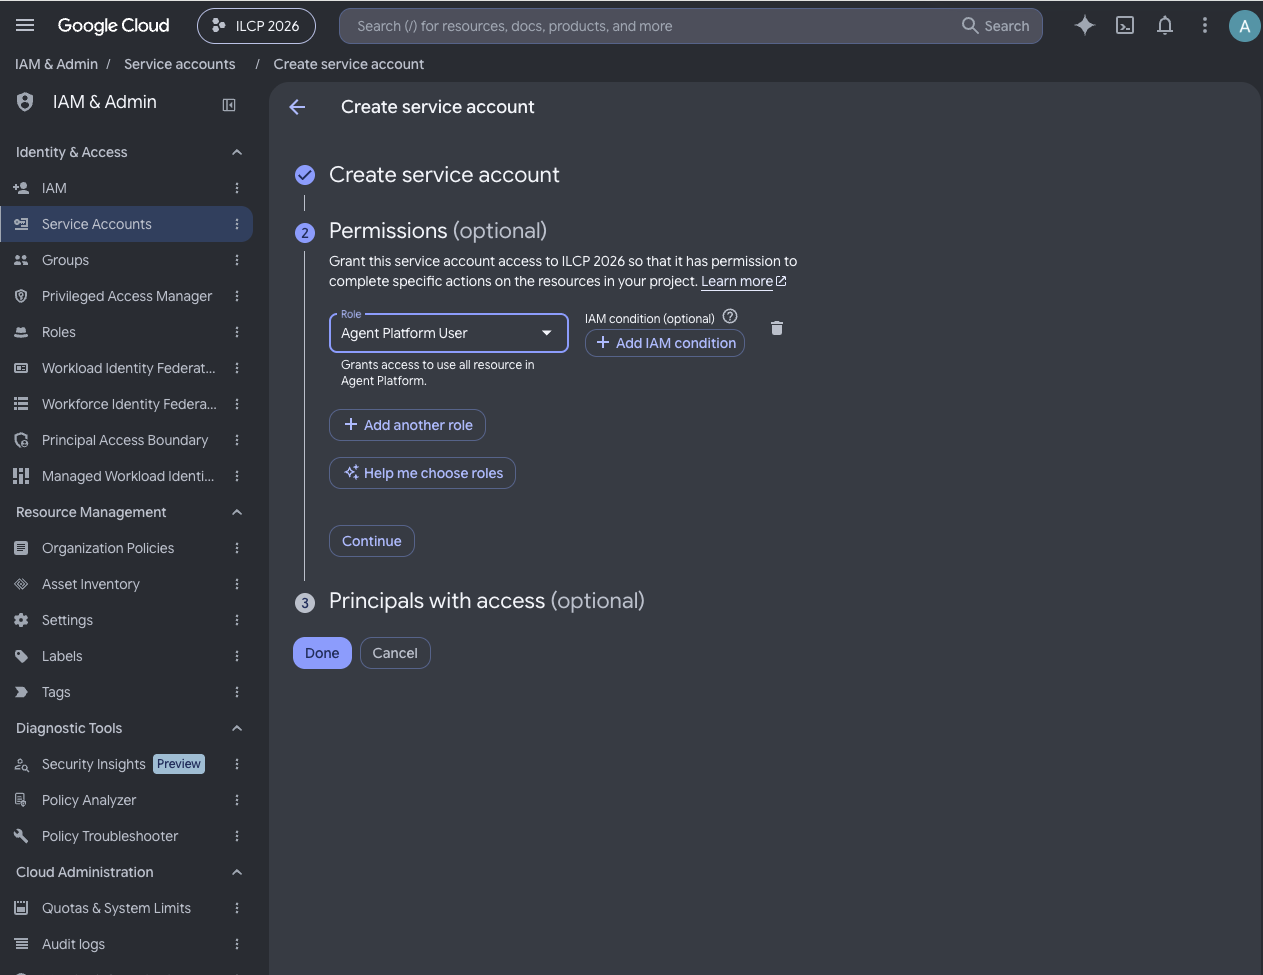
The Permissions step of Create Service Account, where you choose the role.
With Agent Platform User chosen as the role. Click Done.
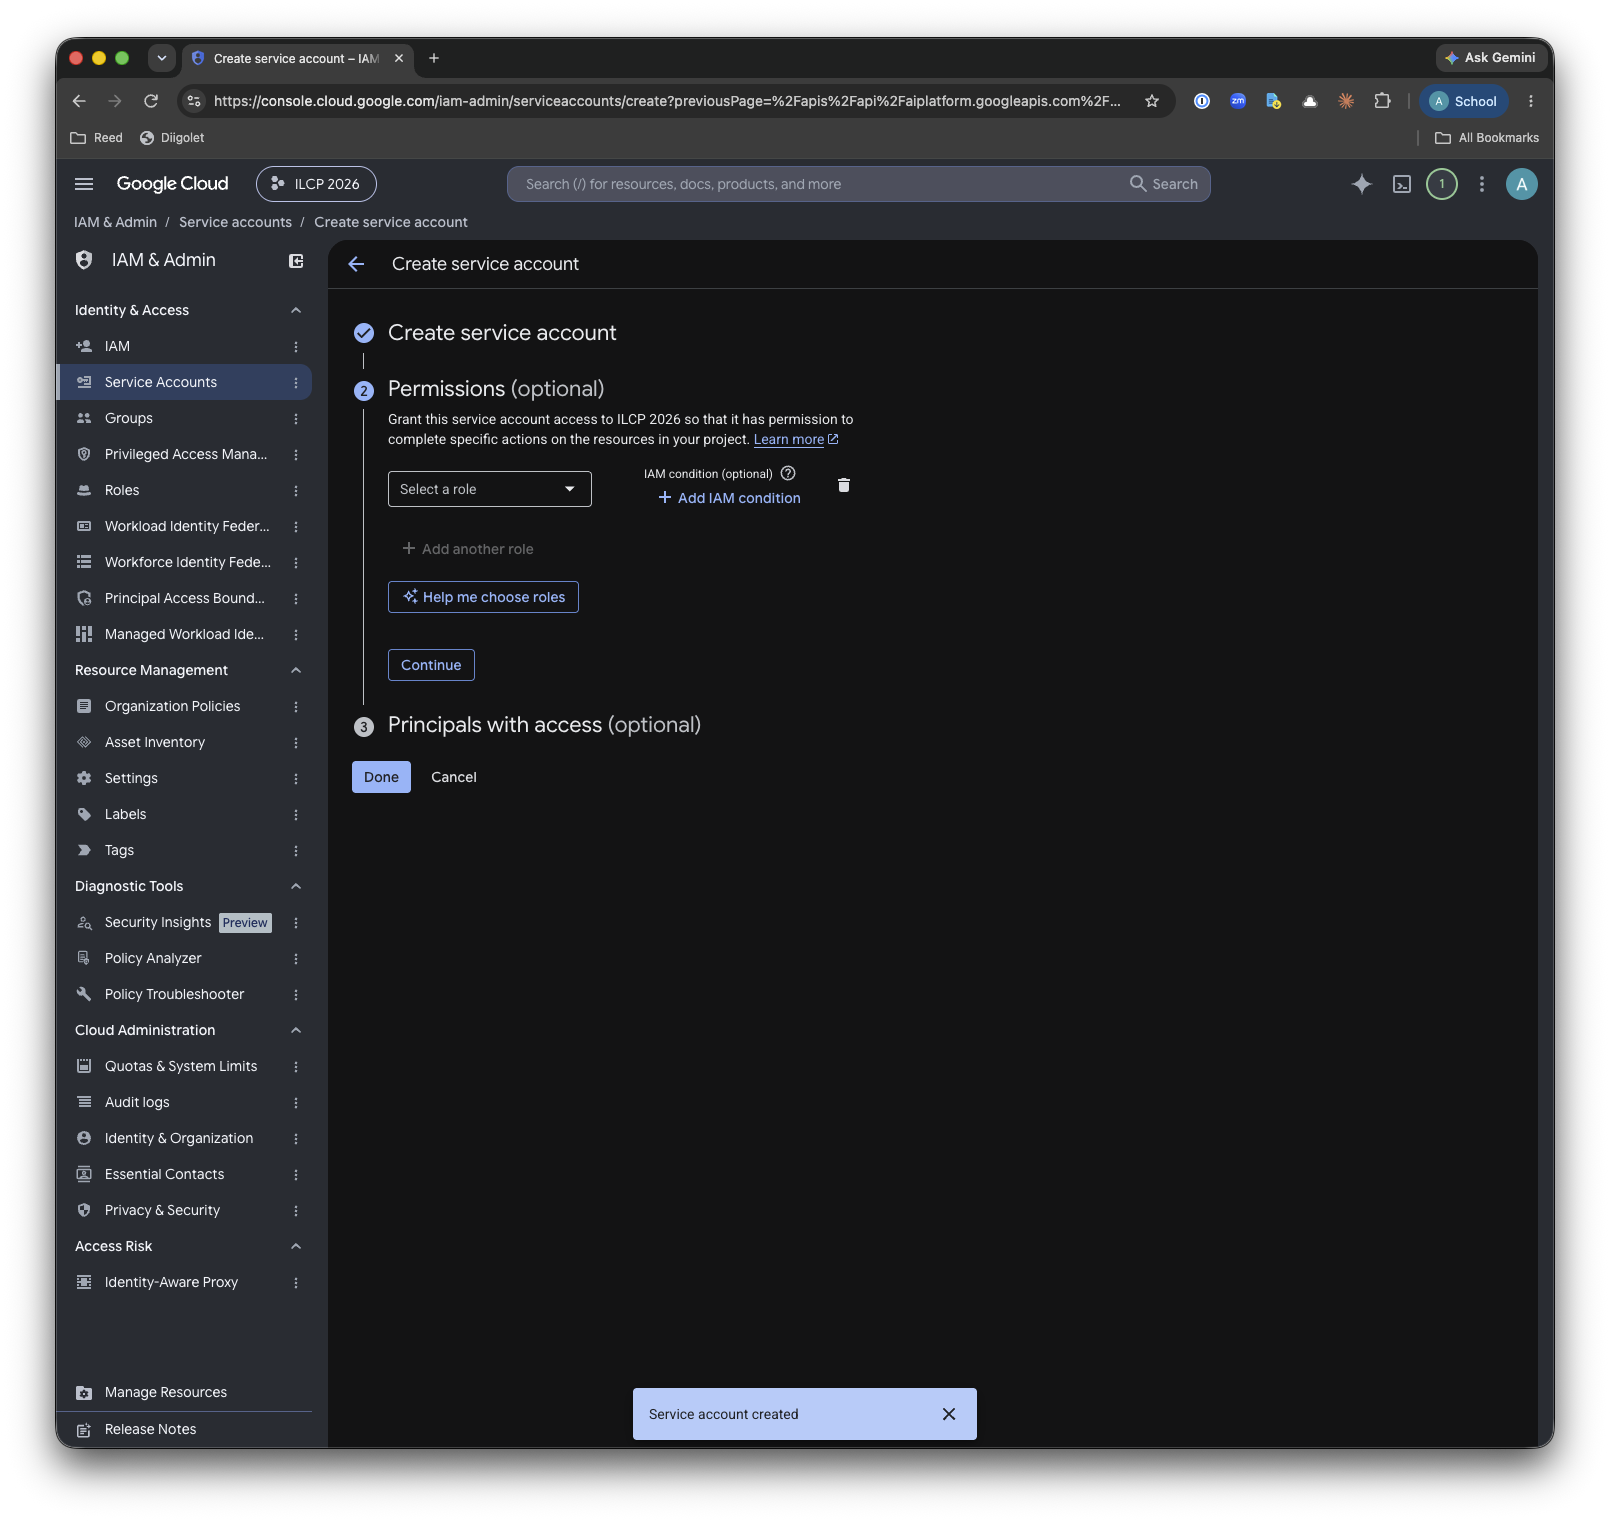
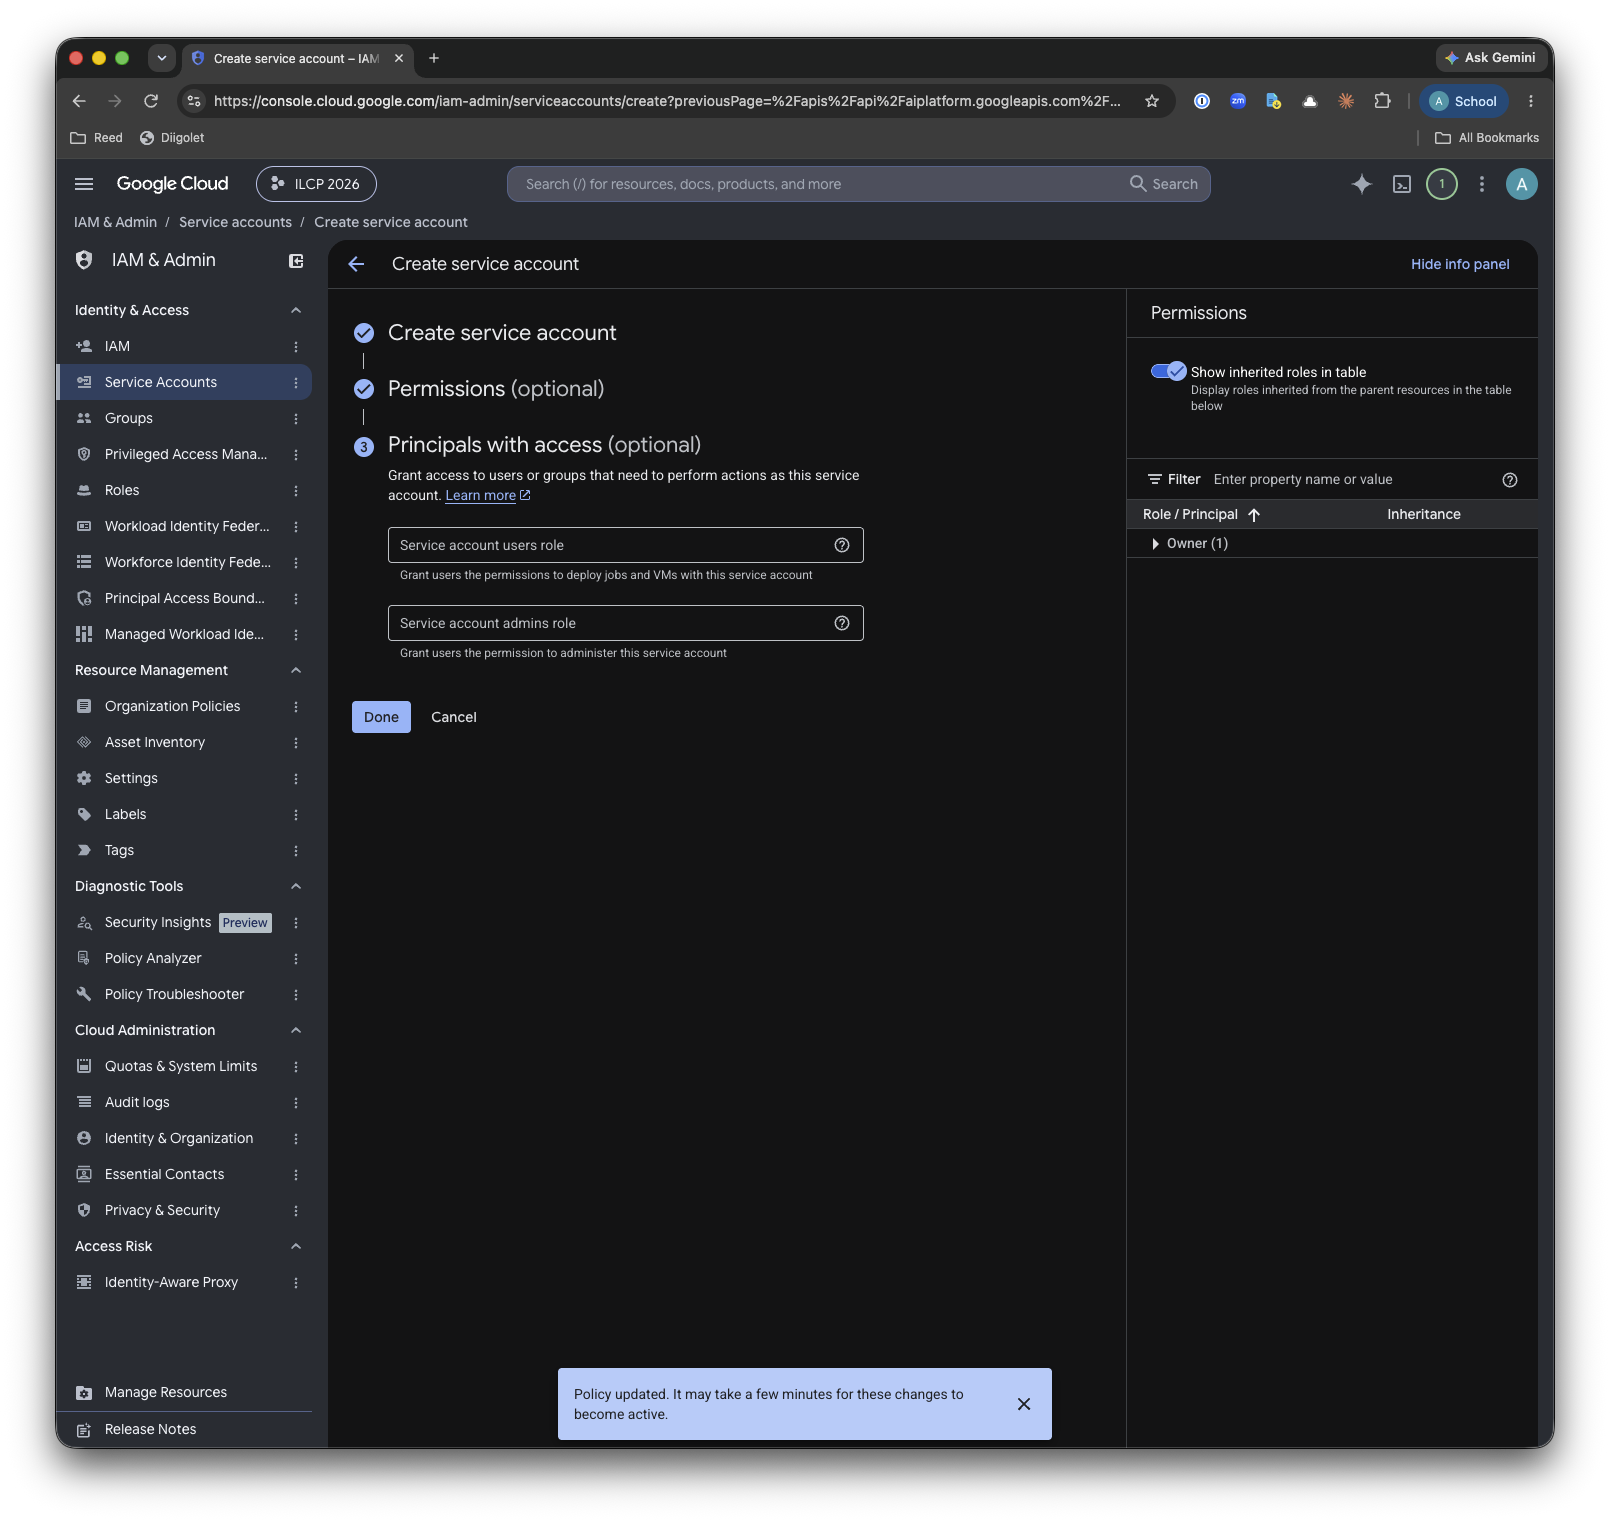
After clicking Done: "Service account created" and "Policy updated. It may take a few
minutes for these changes to become active."
Watch out for
The role must be Agent Platform User (its technical name is
roles/aiplatform.user). Without it, no models will appear.
As the message says, the role can take a few minutes to start working.
Step 5: Download a key for the service account
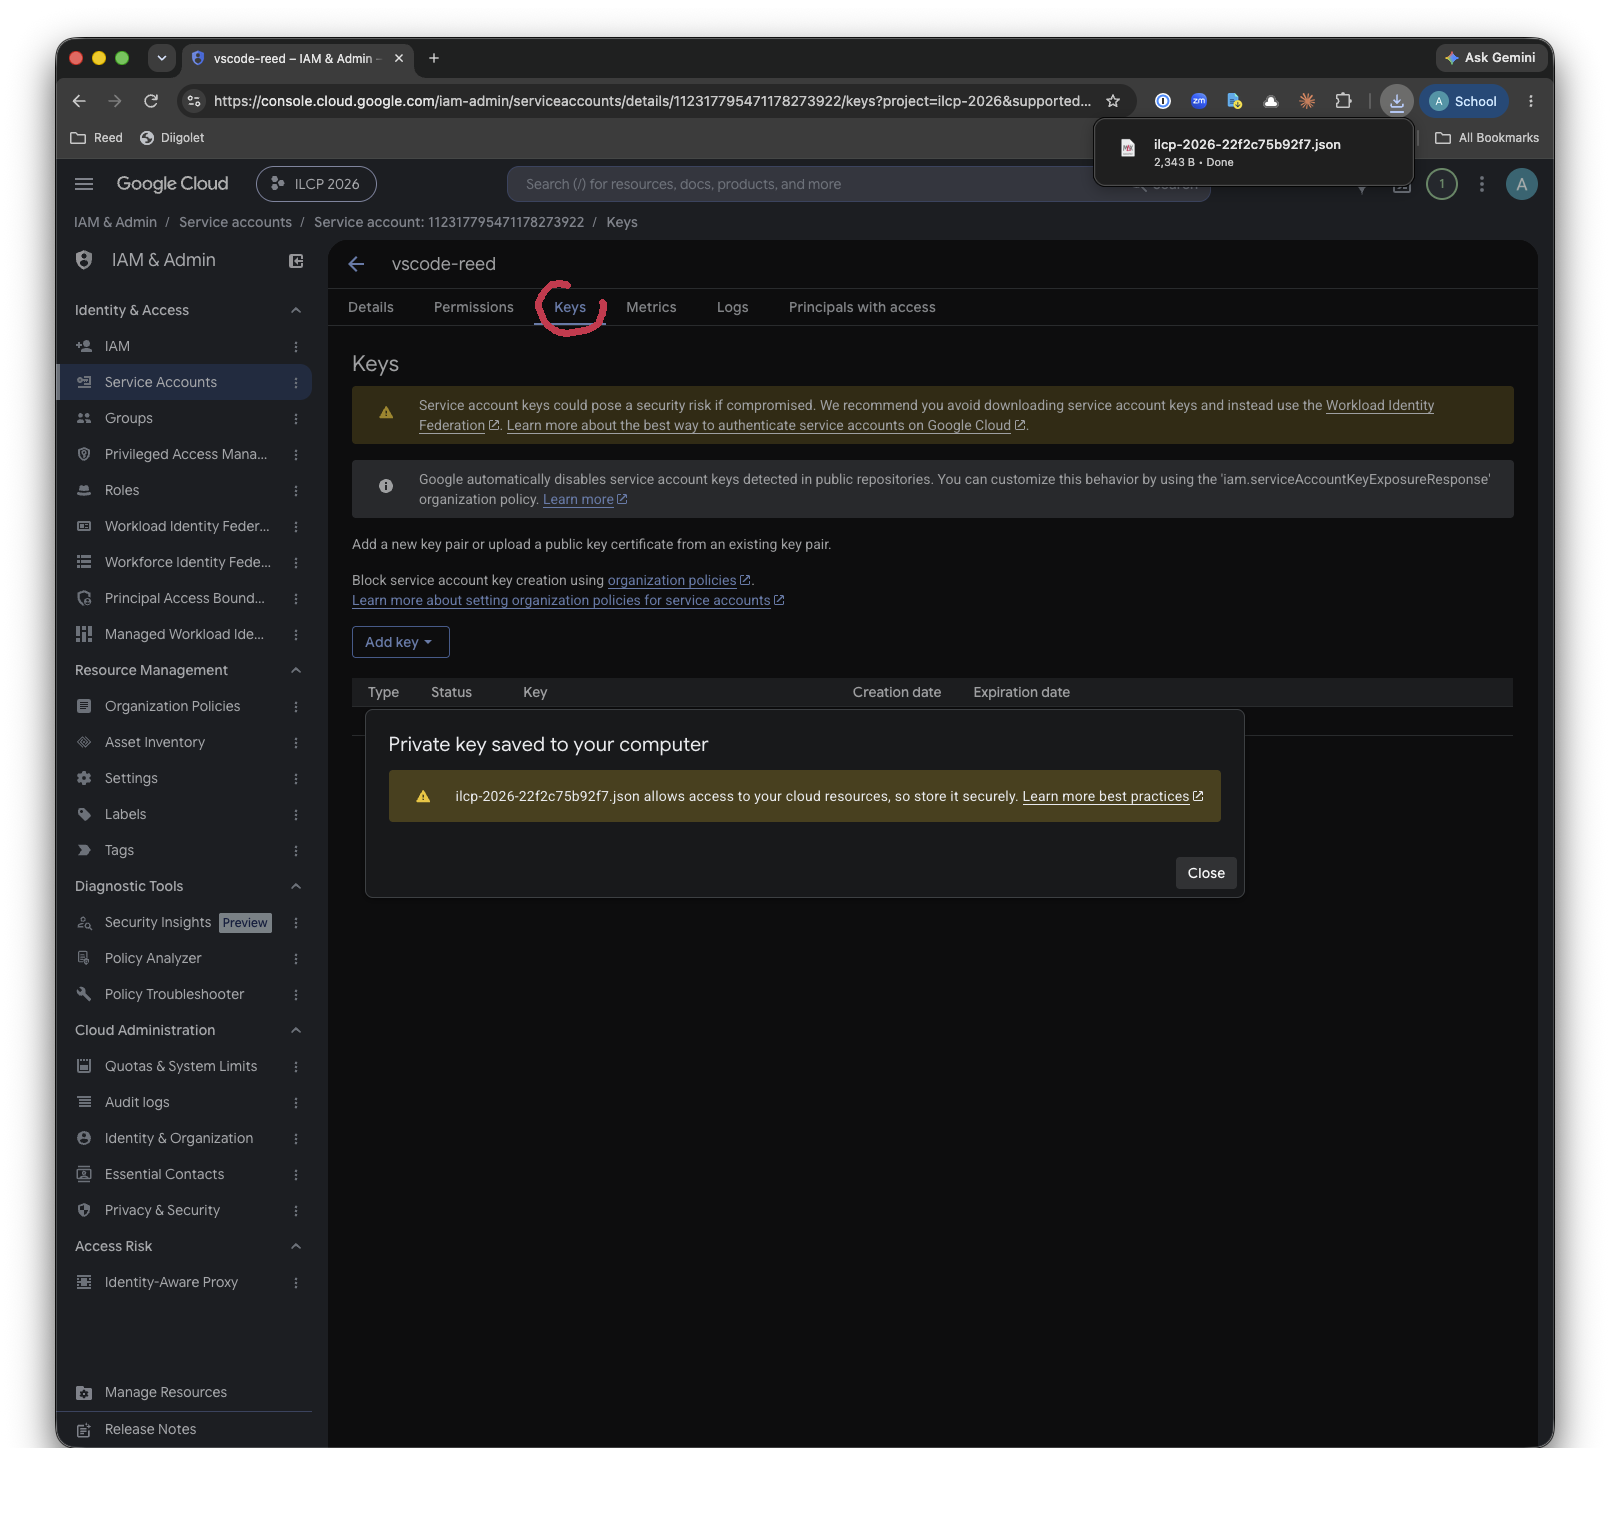
Click the new service account, open the Keys tab, and choose
Add key > Create new key > JSON. A .json file downloads to
your computer.
The Service accounts list. Click the email of the account you just created.
"Private key saved to your computer," with the name of the downloaded JSON file.
Watch out for
This file works like a password that spends your credits. Never email it, share it, or
put it in a Git repository or a published web folder.
You will import it into VS Code in Step 7 and can delete it after that.
Part 2: VS Code
Step 6: Install the extension
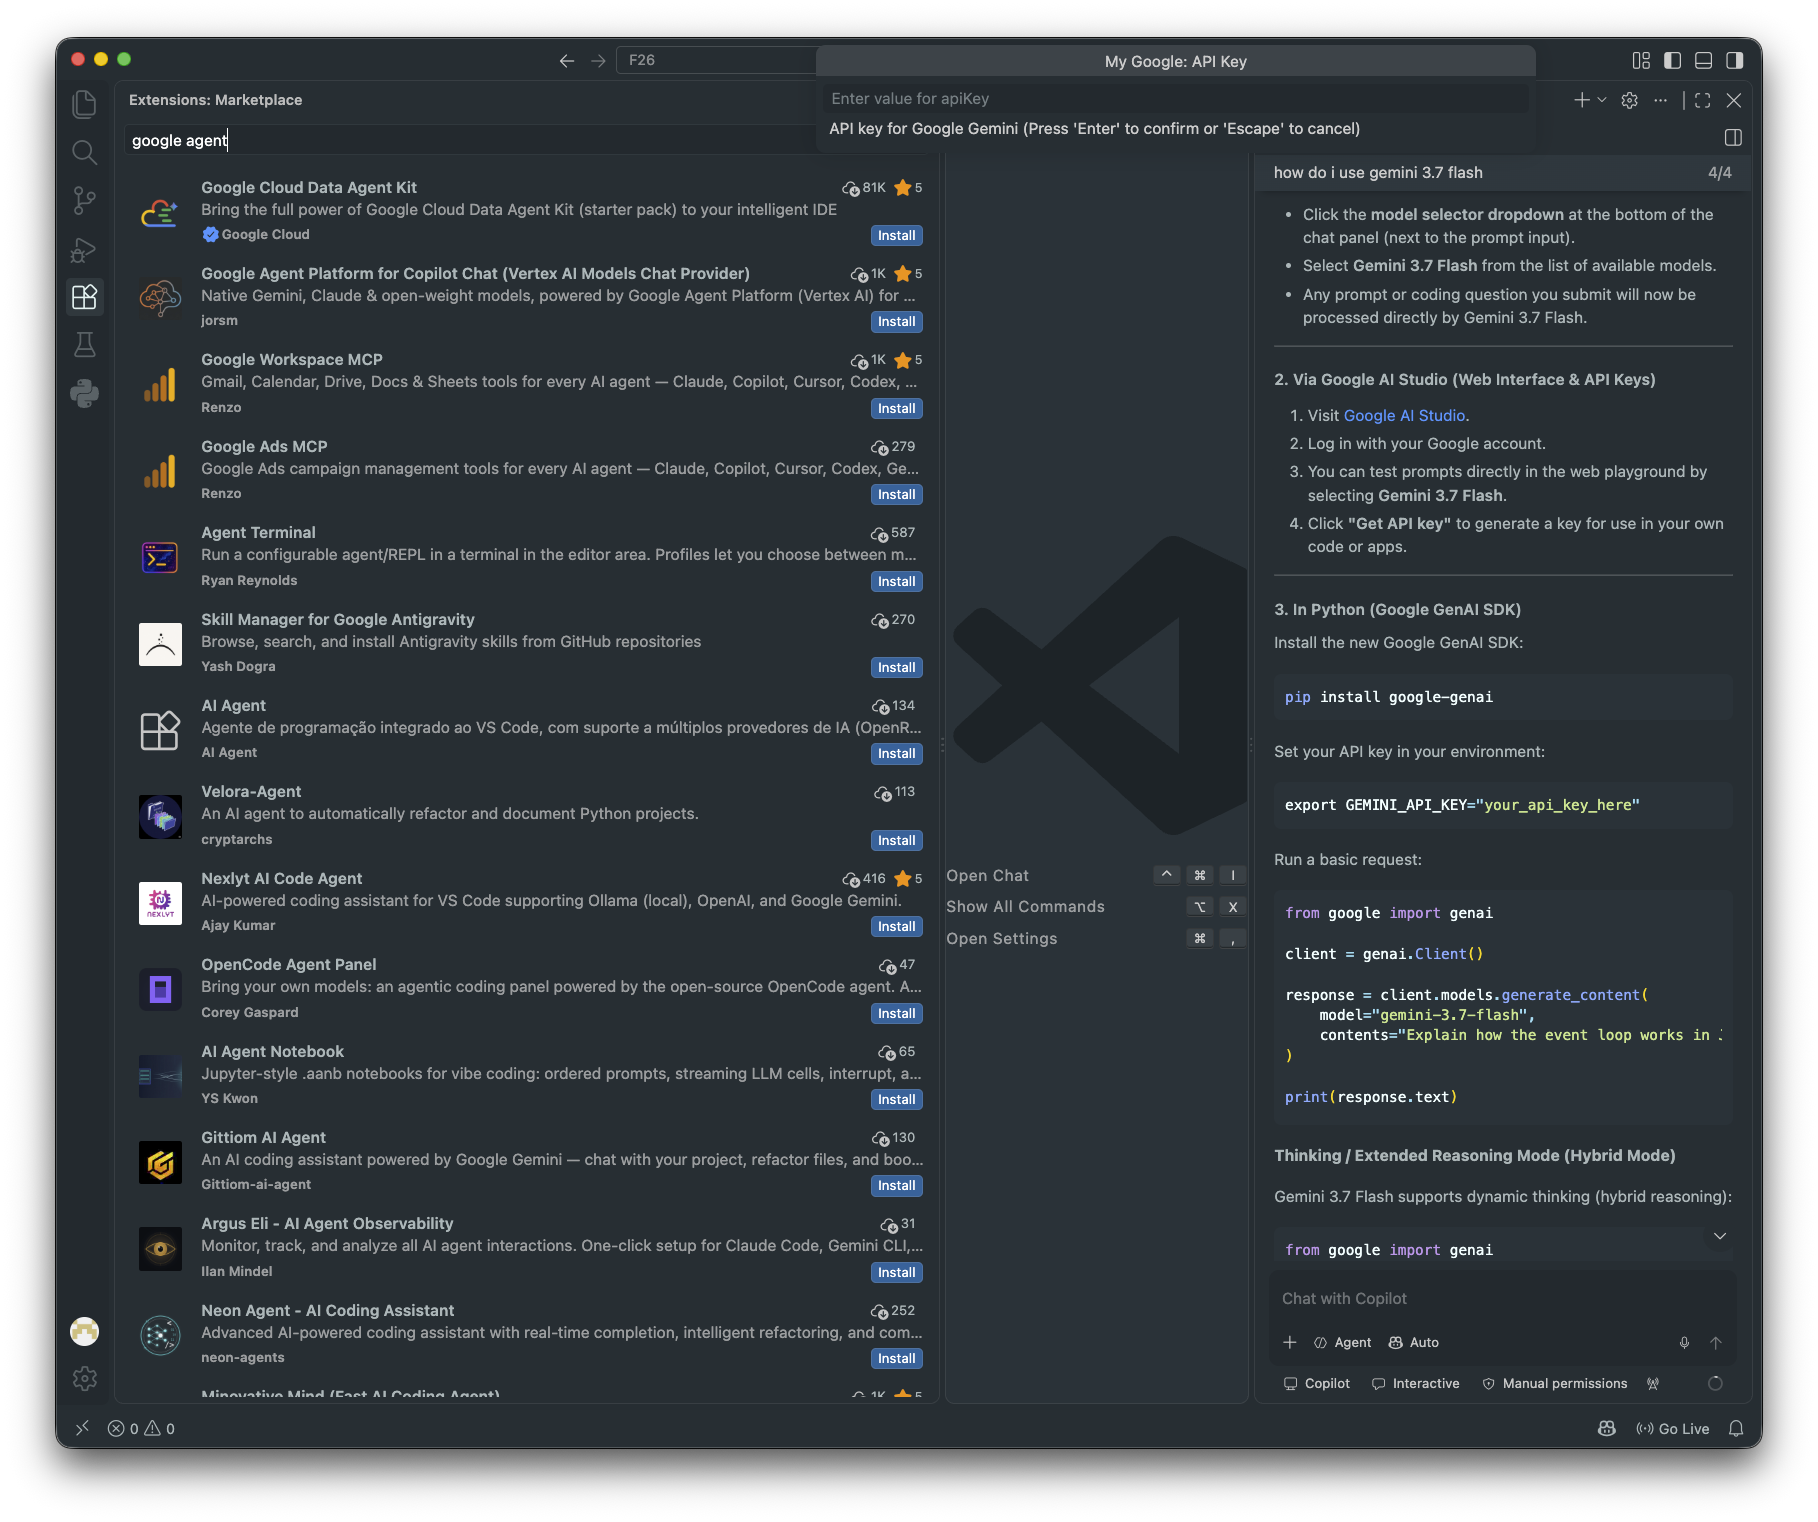
In VS Code, open the Extensions panel and search for "google agent". Install
Google Agent Platform for Copilot Chat (Vertex AI Models Chat Provider) by
jorsm.
Searching the Extensions panel for "google agent". The one to install is "Google Agent
Platform for Copilot Chat (Vertex AI Models Chat Provider)" by jorsm.
Watch out for
The same author has an older extension called "Vertex AI Models Chat Provider
(Deprecated)". Do not install that one.
Ignore any instructions that appear in the chat panel about API keys or
pip install. That is a different method.
Step 7: Import the key
Open the Command Palette: Cmd+Shift+P (Mac) or Ctrl+Shift+P
(Windows).
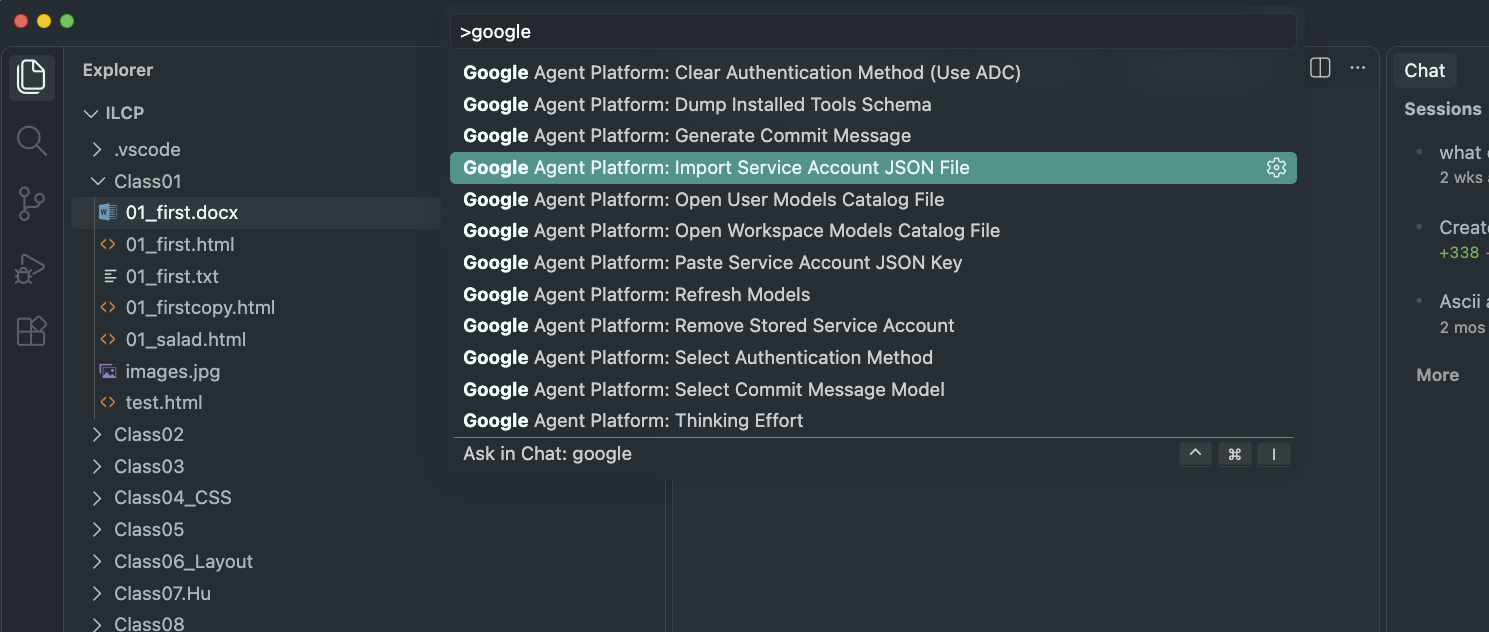
Type Google Agent Platform: Import Service Account JSON File and press Enter.
Choose the JSON file you downloaded in Step 5.
When asked for a name, keep the suggested one (your Project ID) and press Enter.
Typing google in the Command Palette lists the extension's commands. Pick
Import Service Account JSON File.
You should see: "Service Account '...' securely stored and activated for this
workspace." The key is now saved inside VS Code, so you can delete the JSON file from
your Downloads folder.
Watch out for
The key is turned on only for the folder (workspace) you have open. When you open a
different folder, run Google Agent Platform: Select Authentication Method
once and pick your stored key from the list. You do not need to import the file again.
Step 8: Enter your Project ID
Open Settings, in one of these ways:
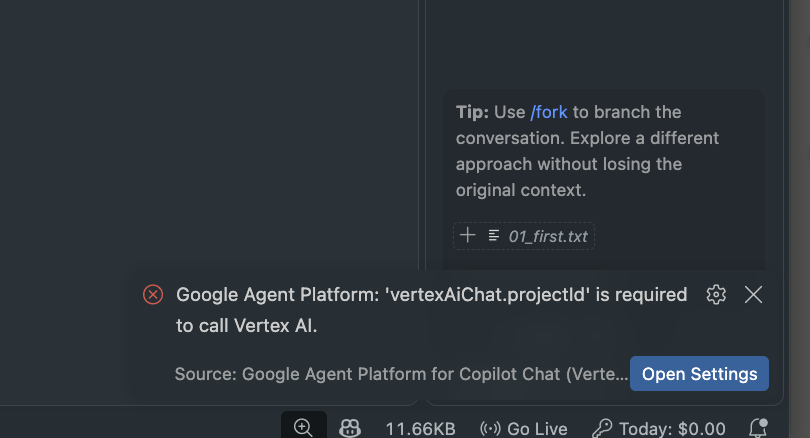
If a notification says "'vertexAiChat.projectId' is required to call Vertex
AI", click its Open Settings button.
Use the keyboard: hold Cmd and press the comma key
(Mac), or hold Ctrl and press the comma key (Windows).
Use the menu: Code > Settings > Settings (Mac) or
File > Preferences > Settings (Windows).
Make sure the User tab is selected, so the setting applies to every folder.
Search for vertexAiChat.projectId.
Type your Project ID from Step 2 (for example ilcp-2026).
If the Project ID is missing, this notification appears. Open Settings
takes you to the right place.
Watch out for
Use the Project ID, not the project name. "ILCP 2026" will not work; "ilcp-2026" will.
Step 9: Pick a model in Copilot Chat
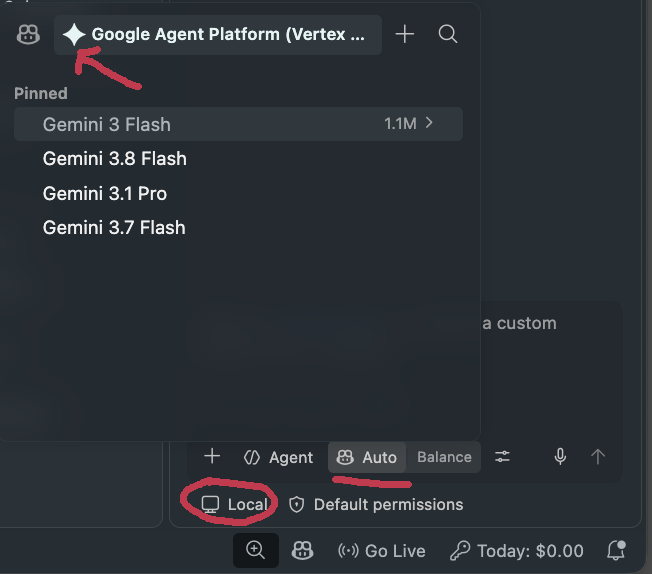
Open the Chat panel. Check the indicator at the bottom left of the panel: it must say
Local. A Local session shows the modes Agent / Ask / Plan
with the model name next to them.
The correct setup: Local at the bottom left, the mode (Agent), and the model name next to
it. Here the model picker is open on the Google Agent Platform tab, listing Gemini models.
Click the model name (it says Auto at first). At the top of the list, click
the star icon next to Copilot to see the models from your Google Cloud
project. Choose the newest Gemini Flash model (for example, Gemini 3.8 Flash)
and send a test message.
Watch out for
Stay with a Flash model. The Pro models (for example,
Gemini 3.1 Pro) cost much more per message and can use up your credits quickly.
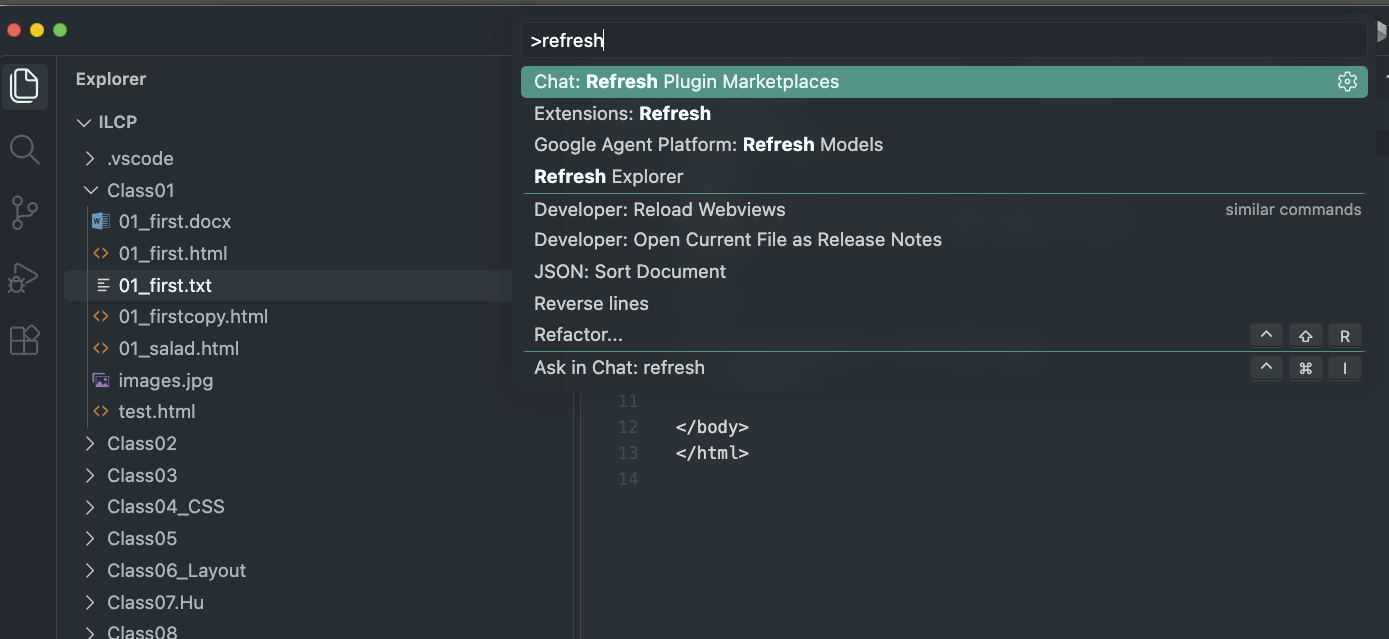
If the list is empty, run Google Agent Platform: Refresh Models from the
Command Palette (Cmd+Shift+P on Mac, Ctrl+Shift+P on
Windows). Finding the models can take up to a minute.
Type refresh in the Command Palette and pick Google Agent Platform:
Refresh Models. The highlighted first item is a different command.
Making the credits last
Use a Gemini Flash model by default. Flash models cost much less per
message than Pro models or Claude. Switch to a bigger model only when you need it.
Check your spending. Run Google Agent Platform: Show Usage &
Costs Dashboard to see an estimate. Your Google Cloud Billing page shows the real
numbers.
Start new chats often. Long conversations resend everything each time,
which costs more.
If something goes wrong
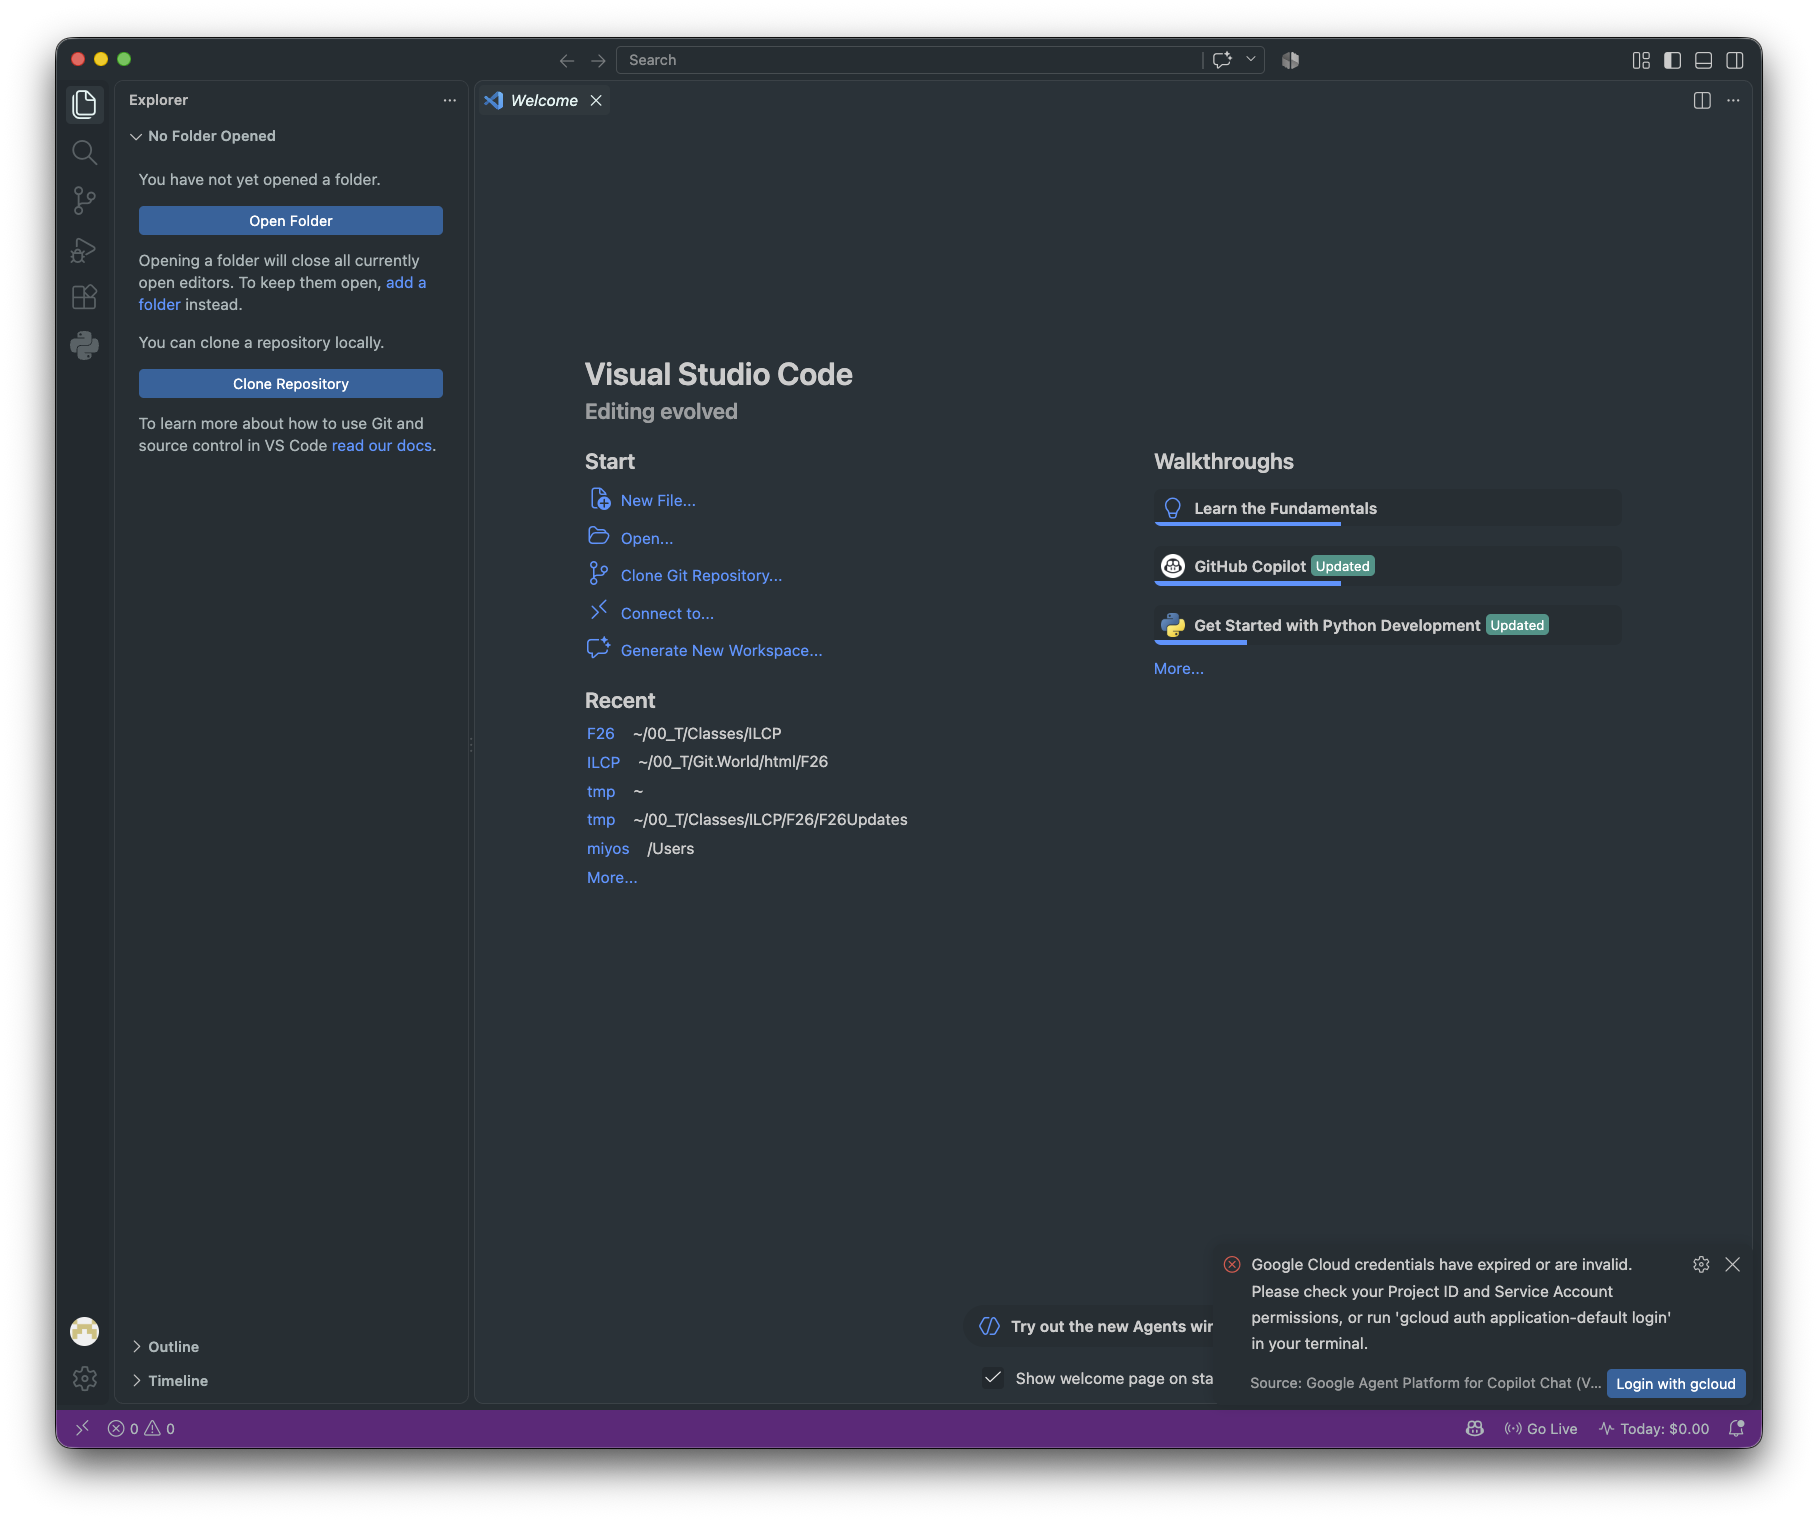
A notification says credentials expired, with a "Login with gcloud" button
This means VS Code is not using your key in the folder you have open. Do not click "Login with
gcloud" (it needs gcloud, which you did not install). Instead, run
Google Agent Platform: Select Authentication Method and pick your stored key.
The notification you see when no key is selected for the current folder.
No Google models after clicking the star icon
Check the Project ID in Settings (Step 8).
Check that the key is selected for this folder (Step 7).
Check that the service account has the Agent Platform User role (Step 4).
If you just gave the role, wait about 10 minutes, then run
Google Agent Platform: Refresh Models.
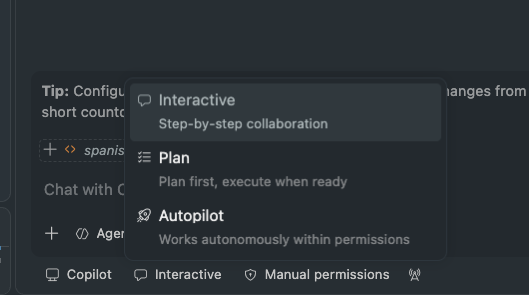
The chat shows Interactive / Plan / Autopilot instead of Agent / Ask / Plan
The session is not Local, so your Google models cannot appear. Open the session menu above the
chat input box, choose Continue In > Local, and check that the indicator at
the bottom left says Local.
Wrong setup: the session is set to Copilot, so the modes read Interactive / Plan / Autopilot
and your Google models are not available.
Gemini works but Claude models do not
Claude models must be enabled separately. In the Google Cloud Console, open
Model Garden, find the Claude model you want, and click Enable. Gemini models
do not need this step. Claude models also cost more, so use them sparingly.
Checklist
Redeem the credits with your reed.edu account.
Create a project and write down its Project ID.
Enable the Agent Platform API.
Create a service account with the Agent Platform User role.
Download a JSON key for it.
Install "Google Agent Platform for Copilot Chat" by jorsm.
Import the JSON key, then delete the file.
Set vertexAiChat.projectId in User settings.
In a Local chat session, click the model name, then the star icon, and pick the newest Gemini Flash model.