Skipping Textbook Lesson 4

I'm skipping Lesson 4 in the textbook.


These ideas are important but it is about good practice, nuance, robusness or improvements over what we've learned so far. I think it would make more sense if you come back to this after you've learn more.
Notes

Selecting HTML Elements by Their ID

Recall when we did CSS selectors, we added id's to HTML elements so that we can select based on id names.
  <div id="div1">
  
  </div>


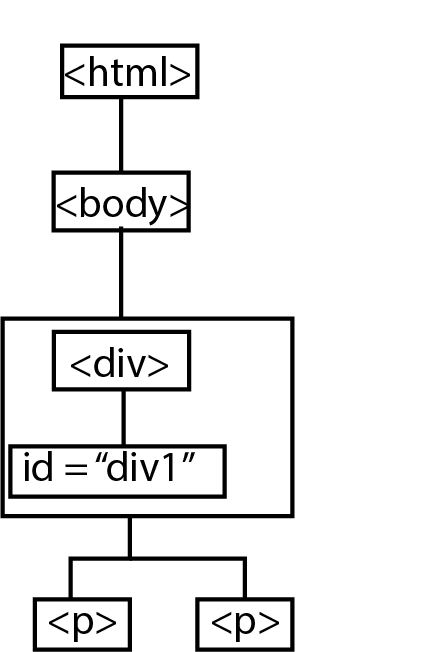
You can use ids to select the DOM object that represents that HTML element with the id in Javascript. You use the document.getElementById() method.


The method will return a DOM object that you can modify.
  var myDiv = document.getElementById("div1");
Notes

DOM innerHTML Property

A DOM object can be used to access (get) information about the HTML Element you selected. You can also set new values. To access information inside the DOM object, we use "." (dot)
  object.property
Here we look into the innerHTML property of an HTML object. innerHTML represents the HTML code inside the HTML element.
  HTMLobject.innerHTML
If we were to use the DOM object myDiv from the previous code snippet,
   myDiv.innerHTML
represents the HTML code inside the div.

As in the example below, you can read and write into innerHTML.
<!DOCTYPE html>
<html>
<head>

</head>
<body>

<div id="div1">
<p>Here is some original text</p>
<p>Here are some more</p>
</div>

<script>

  var myDiv = document.getElementById("div1");        // select the DOM object that has the ID "div1" and put it into the variable myDiv
  alert(myDiv.innerHTML);                             // print out the HTML content inside myDiv 
  myDiv.innerHTML = "<p>Here is new text</p>"         // write into myDiv's HTML content

</script>
</body>
</html>
[sample code]

Notes

DOM Style Property

Another useful property is the style property. It gives you access to the CSS properties through Javascript.
   myDiv.style
The above gives you access to the CSS properties of the HTML element myDiv

You can read from the style property to retrieve the current CSS settings, or you can write into it to set new CSS settings.
<!DOCTYPE html>
<html>
<head>

</head>
<body>

<div id="div1" style="width:200px">
<p>Here is some original text</p>
</div>

<script>
  var myDiv = document.getElementById("div1");      // select the DOM object that has the ID "div1" and put it into the variable myDiv
  alert(myDiv.style.width);                         // read the width property of the CSS style for the myDiv DOM object

  myDiv.style.width = "400px";                      // write (set) the width property of the CSS style for the myDiv DOM object
  myDiv.style.color = "red";                        // write (set) the color property of the CSS style for the myDiv DOM object
  myDiv.style.backgroundColor = "yellow";           // write (set) the backgroundColor property of the CSS style for the myDiv DOM object


</script>
</body>
</html>
[sample code]

The CSS property name used after the "style" property directly comes from CSS with one caveat. CSS has property names that contain hyphens. Since hyphen will be interpreted as a "minus" sign in Javascript, in Javascript, you must remove the hyphen and captalize the first character that follows.
CSS                        JavaScript

background-color --->     backgroundColor
font-size        --->     fontSize
text-align       --->     textAlign
Notes

Not in textbook: HTML Forms

I didnt go over the input tag in HTML because there was no way to react to it.

But with Javascript, we can now react to it using events (like onclick or onchange!).

See w3schools for what kinds of inputs are available here
  • <input type="button">

  • <input type="checkbox">

  • <input type="color">

  • <input type="date">

  • <input type="datetime-local">

  • <input type="email">

  • <input type="file">

  • <input type="hidden">

  • <input type="month">

  • <input type="number">

  • <input type="password">

  • <input type="radio">

  • <input type="range">

  • <input type="reset">

  • <input type="search">

  • <input type="submit">

  • <input type="tel">

  • <input type="text">

  • <input type="time">

  • <input type="url">

  • <input type="week">


It depends on the input type how to access the content/state but the value property works for many (the ones in bold above at least)
<input type="range" value=20 id="myslider">
<input type="range" value=50 id="myslider">
<input type="range" value=90 id="myslider">


With Javascript you can get and set the value property once you have access to the HTML object
  var mr = document.getElementById("myslider");
  alert(mr.value);
  my.value = 0;


Here is a full example: [sample code]

<!DOCTYPE html>
<html>
<head>
<title> The Title of this HTML Page </title>
<style>
body {
  margin: 1em;
}

div {
    border: 1px dashed black;
    width: 50%;
    height: 100px;
}
</style>
<script>
function sliderchange(){
  var r = document.getElementById('myslider');
  // alert(r.value);
  // r.value = 0;

  var d = document.getElementById('mydiv');
  d.innerHTML = "slider value is " + r.value;
}

</script>

</head>

<body>


<input type="range" min="0" max="255" value="128"
  onchange="sliderchange();" style="width:50%;" id="myslider" >

<br><br>
input monitor:<br>
<div id="mydiv" style="font-size:20px;">
</div>

</body>
</html>


Interactivng with the User

These methods/function are given to you by the system
    alert();
    prompt();
    comfirm();
  
Notes

Accessing Browser History (History object)

There are built-in objects that are available for you to reference without searching for it (eg. using document.getElementByID()...etc). One of them is the window.history object. Since it is directly inside the window object, you can just reference it by its name history. It it has one property and three methods
history.length       // how many pages the user has visited
history.forward()    // equivalent to the forward button
history.back()       // equivalent to the back button
history.go()         // takes an argument and takes the user to the relative place in the history list


history.go(-3); // go back 3 pages
history.go(2);  // go forward 2 pages
history.go("example.com") // go to the nearest URL in the history list that contains 'example.com'


A full example [here]:

<!DOCTYPE html>
<html lang="en">
<head>
<meta charset="utf-8">
<title> The Title of this HTML Page </title>

<script>
  function go_forward(){
    history.forward();
  }

  function go_back(){
    history.back();
  }

  function go_backtwo(){
    history.go(-2);
  }

</script>
</head>
<body>
  <script>
  alert("you've visited " + history.length + " web pages in this browser session");
  </script>


<input type="button" onclick="go_forward();" value="forward">
<input type="button" onclick="go_back();" value="back">
<input type="button" onclick="go_backtwo();" value="back two pages">

</body>
</html>

Notes

Location object

The location object contains information about the URL of the current page.
  location.href          // 'https://www.reed.edu/art/studio-art.html'
  location.protocol      // 'https:'
  location.host          // 'www.reed.edu'
  location.pathname      // '/art/studio-art.html'

  location.reload()      // equivalent to reload button
location.href can be read to gain information. You can also write into it to move to a different page
  location.href = "http://www.reed.edu";   // transport the user to a new page


Full example [here]:

<!DOCTYPE html>
<html lang="en">
<head>
<meta charset="utf-8">
<title> The Title of this HTML Page </title>

<script>
  function go_reed(){
    alert("you are at " + location.href);
    location.href = "http://www.reed.edu";
  }
</script>

</head>
<body>


<input type="button" onclick="go_reed();" value="go reed">
</body>
</html>

Notes

Using Date and Times (Making your own instance of an object)

Unlike history or location objects, there is no Date object already created for you. You have to create the Date object like this:
var mydate = new Date();
Once you have a date object, you can get information about the date/time the moment the object was created.
var year = mydate.getFullYear();      // four-digit year
var month = mydate.getMonth();        // month in number 0 - 11
var date = mydate.getDate();          // day of month
var day = mydate.getDay();            // day in number 0 - 6
var hours = mydate.getHours();        // hours 0 - 23
var minutes = mydate.getMinutes();    // 0-59
var seconds = mydate.getSeconds();    // 0-59
var millseconds = mydate.getTime();    // milliseconds since Jan 1st 1970


Full [example]:
<!DOCTYPE html>
<html lang="en">
<head>
<meta charset="utf-8">
<title> The Title of this HTML Page </title>
</head>
<body>


<script>
  var mydate = new Date();

  var year = mydate.getFullYear();      // four-digit year
  var month = mydate.getMonth();        // month in number 0 - 11
  var date = mydate.getDate();          // day of month

  document.write("today is "
    + (month + 1)
    + "/"
    + date
    + ", "
    + year);
</script>


</body>
</html>


When you have two date objects, you can compare dates like this
  var mydate = new Date();
  var mydate2 = new Date(2020, 0, 1); // Jan 1st 2020

  if(mydate.getTime() > mydate2.getTime()) {
     alert("current time after Jan 1st, 2020");
  }
Notes

Math Object

The Math object can save you a lot of work. It exists without you creating it.
Math.ceil(n)           // returns n rounded up to whole number
Math.floor(n)          // returns n rounded down to whole number
Math.max(a,b,c,...)    // returns the largest number
Math.min(a,b,c,...)    // returns the smallest number
Math.random()          // returns random number between 0 and 1
Math.round(n)          // returns n rounded up or down to the nearest whole number
There are many more methods. See w3school for more info.


[Here] is an example of a function that returns a random number in the range you specify
<!DOCTYPE html>
<html lang="en">
<head>
<meta charset="utf-8">
<title> The Title of this HTML Page </title>
<script>
function myRand(range){
    return Math.round(Math.random() * range);
}
</script>
</head>

<body>
<script>
  alert("a random number from 0 - 100:" + myRand(100));
</script>
</body>
</html>

Notes