Incorporating DVD Video into a Powerpoint presentation (Mac OS X)
1. Tools Needed:
1.1. Codecs: Quicktime 6.5.1 (included with Mac OS X)
1.2. DVD Ripper: MacTheRipper http://www.wormintheapple.gr/macdvd/mtr.html
1.3. Re-Encoder: OpenShiiva http://openshiiva.sourceforge.net/
1.4. Movie editor: Quicktime Pro http://www.apple.com/quicktime/buy/
2. Startup
2.1. Download and install all of the tools listed above. Quicktime 6.5.1 is probably already installed on your system, but you will need to purchase a Pro license to edit your videos. ($29.99)
2.2. Determine the chapter of the video you would like to include. In DVD Player, the current chapter is displayed whenever you select 'Window->Show info' (command-shift-I)
3. MacTheRipper: Start the MacTheRipper application.
3.1. Initial Settings
3.1.1. Make sure that (see below):
3.1.2. the RCE Region is 1 (or whatever the region of the disc you are inserting is)
3.1.3. 'Macrovision Removal' is selected.
3.1.4. 'Extract Title' is selected
3.1.5. 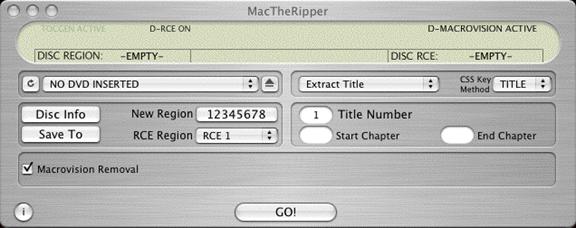
3.2. Rip the DVD
3.2.1. Insert a DVD. DVD Player will start. Quit it.
3.2.2. Specify the chapter(s) you like as 'Start Chapter' and 'End Chapter'
3.2.3. Click on Save To and specify where you would like the file (e.g. the Desktop)
3.2.4. 
3.2.5. Click on Go!
4. OpenShiiva: Start the OpenShiiva application
4.1. Files
4.1.1. Click on 'Set input file' and Select the file you just ripped (something like VTS_01_04.VOB in the location you specified above)
4.1.2. Click on 'Set output file' and type in a name (such as movie.mp4)
4.1.3. Click on 'Optimize MP4 file'
4.1.4. 
4.2. Crop & Scale
4.2.1. Now click on 'Crop & Scale.' This step (and the 'Video' step) can be skipped, but you’ll end up with a huge file. Don't be that guy.
4.2.2. Specify the crop. For letterboxed movies, you’ll probably need somewhere between 0 and 100 pixels off the top and bottom. Experiment until the image at the bottom looks right.
4.2.3. Specify the scaling. First note the ratio of width to height on the bottom. Then put in numbers proportional to each (e.g. 853x360 -> 480x202[1])
4.2.4. 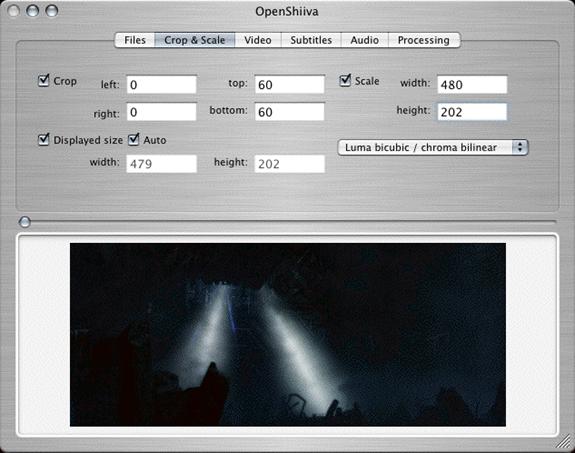
4.3. Video
4.3.1. Next click on 'Video.'
4.3.2. Select '31' for Quantiser. This is a minimum setting, don’t worry, it’ll look fine.
4.3.3. Select 'Bitrate' and type in 100 Kbytes/s (this works well with 480xwhatever)
4.3.4. 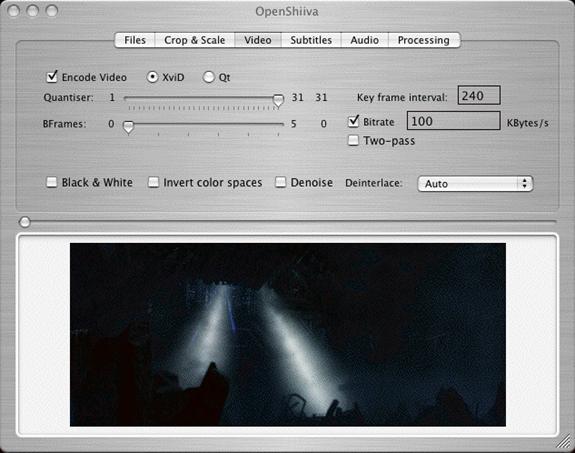
4.4. Subtitles
4.4.1. Click on 'Decode Subtitles' if you desire subtitles, then select the appropriate subtitle track.
4.5. Audio
4.5.1. Click on 'Audio.' Select 'Decode AC3 audio' and 'Encode audio.'
4.5.2. 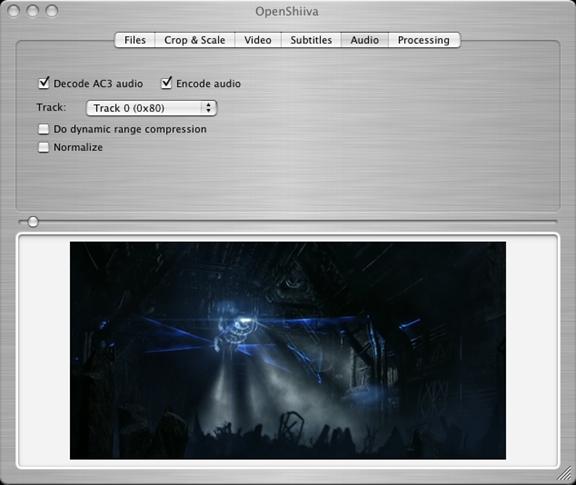
4.5.3. This will bring up a dialog box:
4.5.4. 
4.5.5. Select 'MPEG-4 Audio' and 44.100 kHz. Click on 'Options' to set the audio bitrate if so desired. (The default is 128 kbps, which works fine.)
4.6. Processing
4.6.1. Click on 'Processing' and click Go!
4.6.2. 
4.6.3. On
a 800 Mhz iBook G4, this
5. Quicktime Pro
5.1. Open the file you just created (in this case, movie.mp4). You can do this in OpenShiiva by clicking on the 'Open mp4 file' once encoding is done.
5.2. 
5.3. The twin sliders at the bottom of the video determine the start and stop points of the video. Adjust them until they mark the start and stop points that you desire. (You can test this by selecting Movie->Play Selection Only)
5.4.
5.5.  Select
'Edit->Trim' to crop the piece
Select
'Edit->Trim' to crop the piece
5.6.
5.7.  Select
'File->Save As' to save the selection. You should click on 'Save as
self-contained.'
Select
'File->Save As' to save the selection. You should click on 'Save as
self-contained.'
5.8. You’re done! (Incorporating it into Powerpoint, Keynote, or your class is your problem.)